WIZ Release Notes
1. New Tenant Creation (21st November 2023)
Feature Requirement:
Creation of a new CloudLabs tenant to store the test templates.
Implementation:
Created a new WIZ Content tenant to store the test templates.
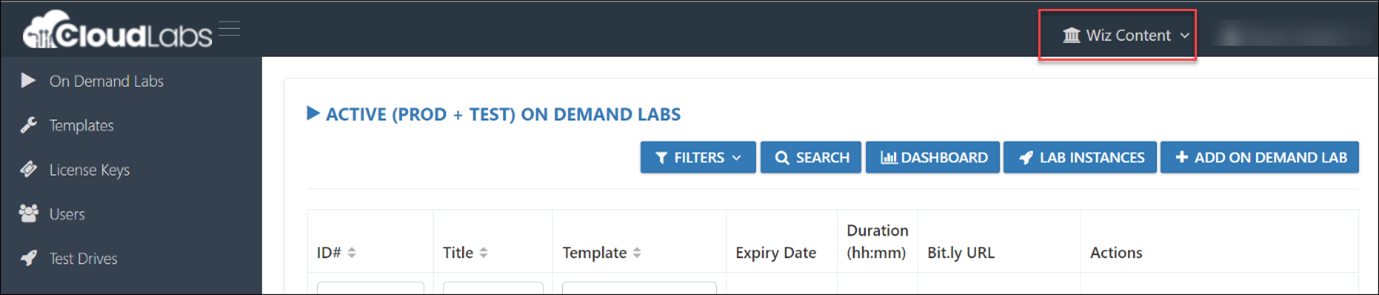
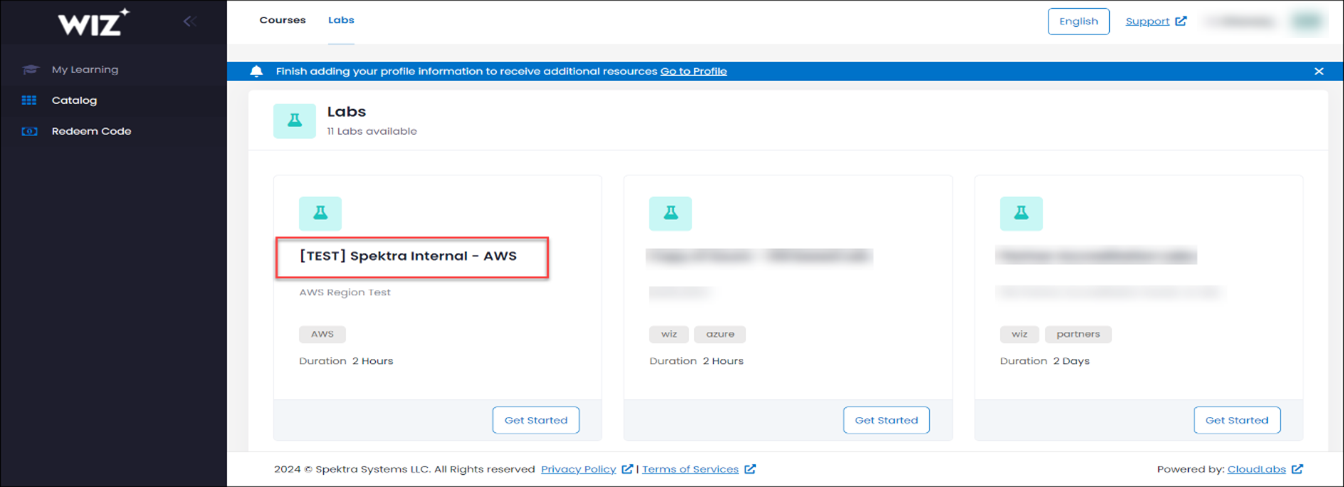
Steps For Changing the Tenant:
Go to the WIZ tenant as highlighted in red. Select the dropdown option, and you should be able to see the WIZ content tenant (as shown in the screenshot below).

2. Power-BI reports
2.1 Subscription Count (24th November 2023)
Feature Requirement
Number of Subscriptions Available for all the three clouds.
Implementation
Created the PowerBI report for the available and unavailable subscriptions in all three clouds.
Steps to check available and unavailable subscriptions in the PowerBI report
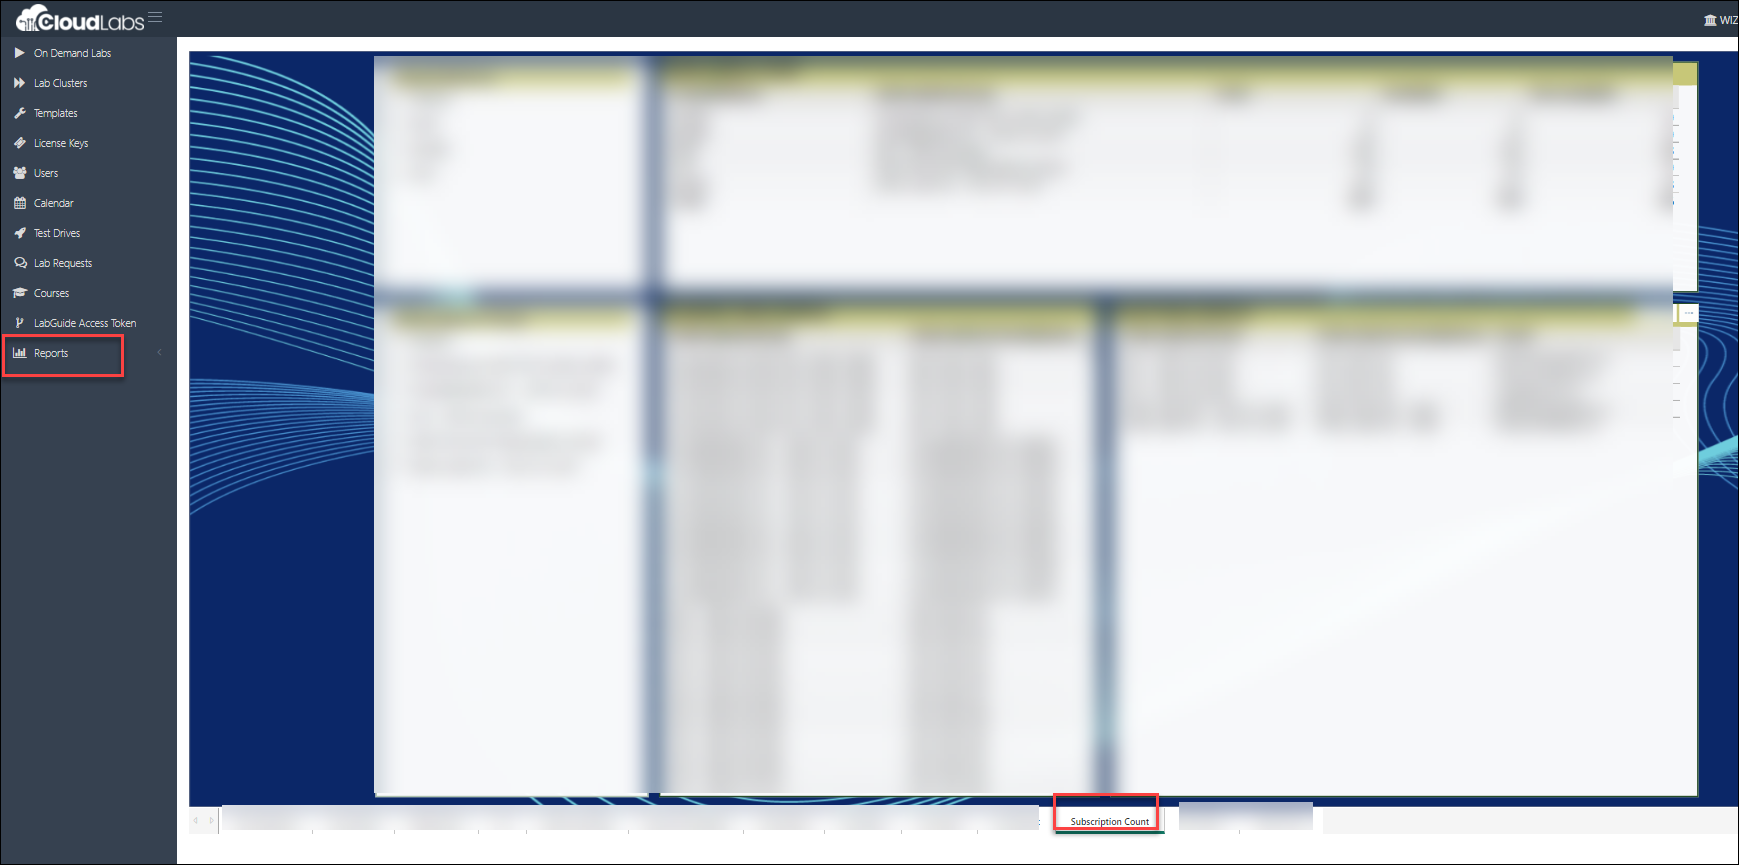
In the Admin Portal go to the Reports section and click on “Admin”.
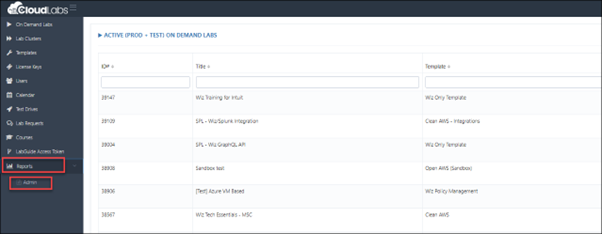
Choose the Subscription Count page, here you will be able to check on the availability based on the subscription group name and the cloud platform.
2.2 Cloud Spend Report (28th December 2023)
Feature Requirement
Cloud Spend report for All Three clouds.
Implementation
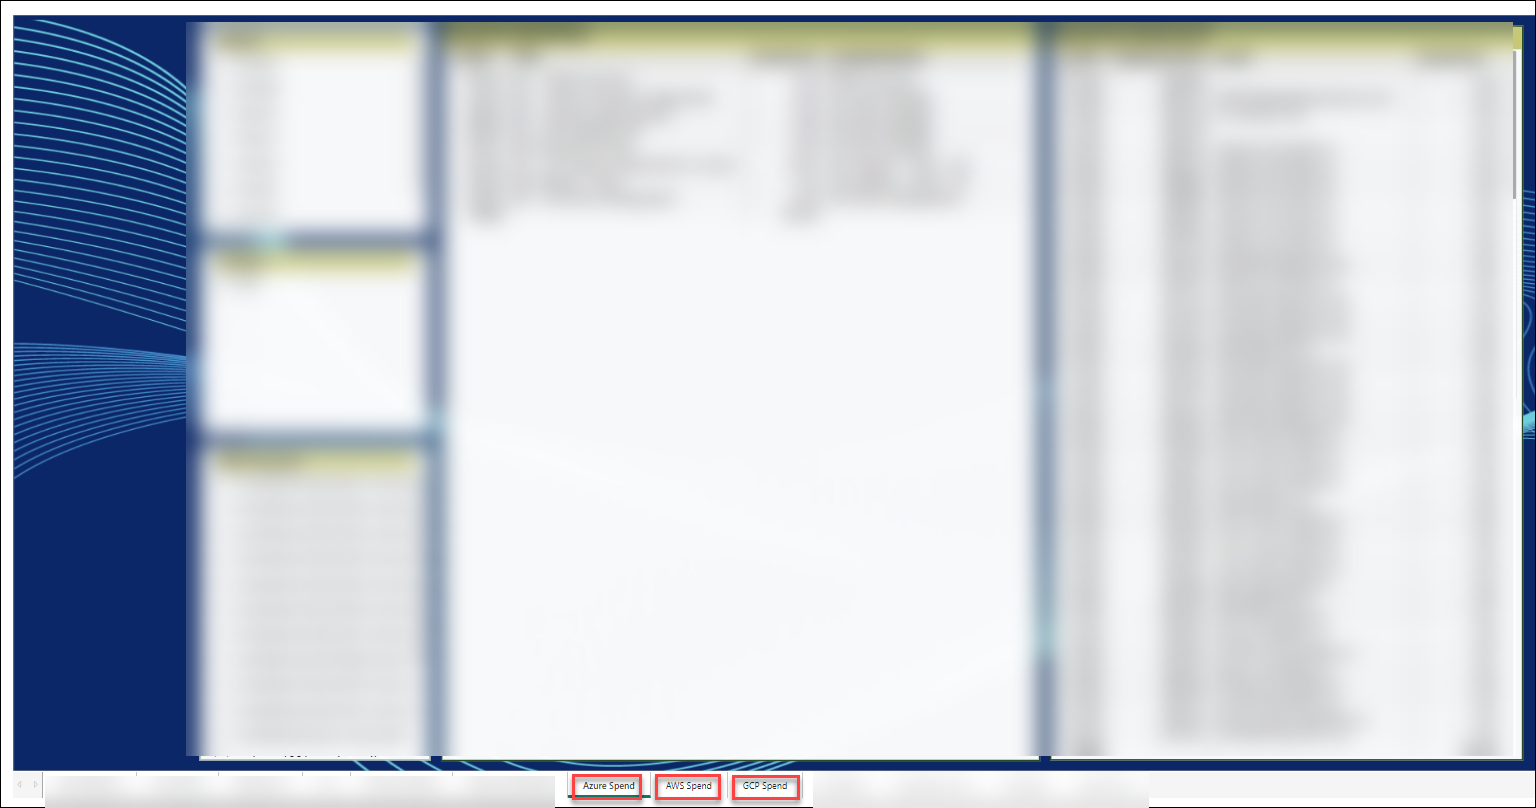
Modified the cloud spend based on 3 different clouds. Bifurcation is based on Month, tracks, and users.
Cloud Spend Report
2.3 Sign-in Report (22nd January 2024)
Feature Requirement
Sign-in details of the custom portal
Implementation
Implemented the Power BI report for the sign-in details in the custom portal.
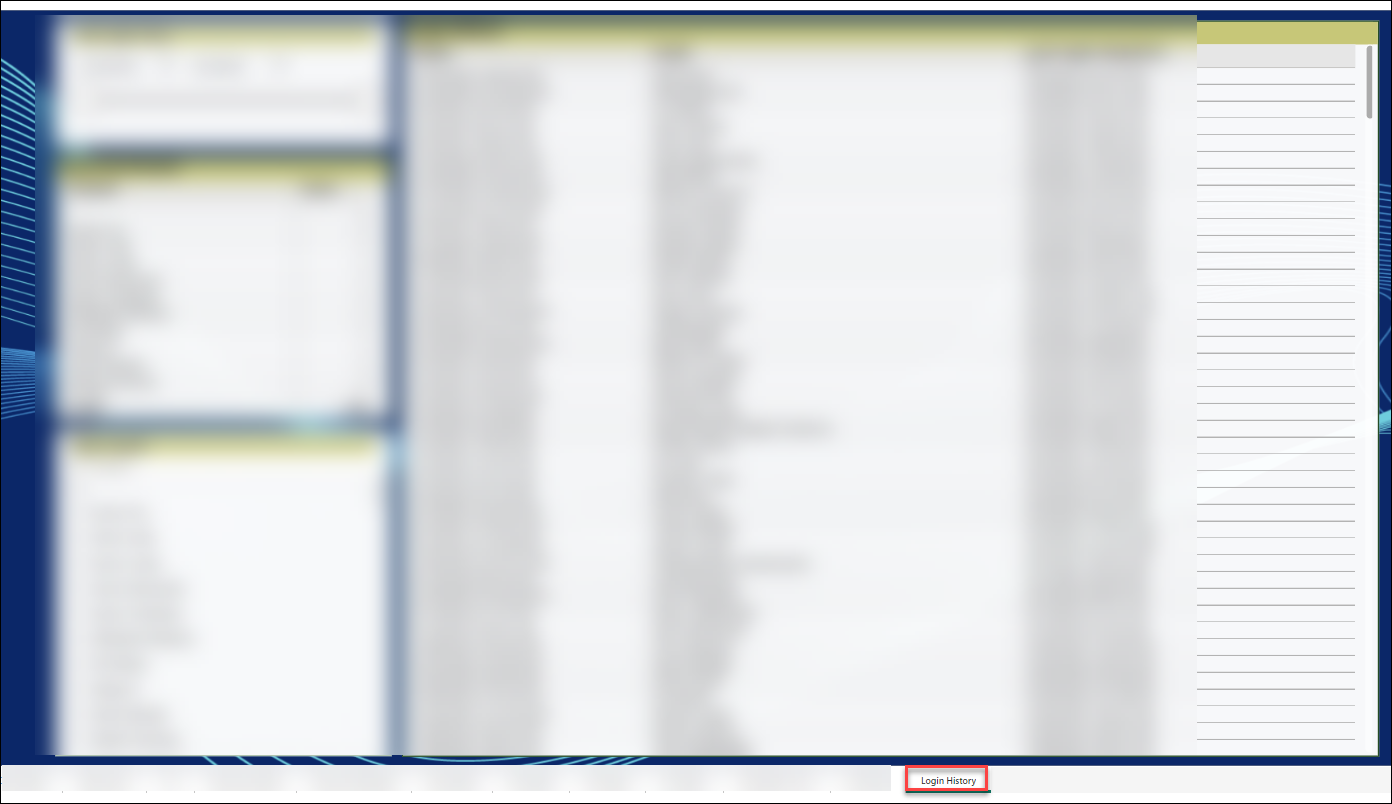
Steps for checking the Sign-in Report
Go to the Reports section, select Login History, and view the logins organized by time, date, user names, and domains.
2.4 Validations report (27th February 2024)
Feature Requirement
Validation status for User reports.
Implementation
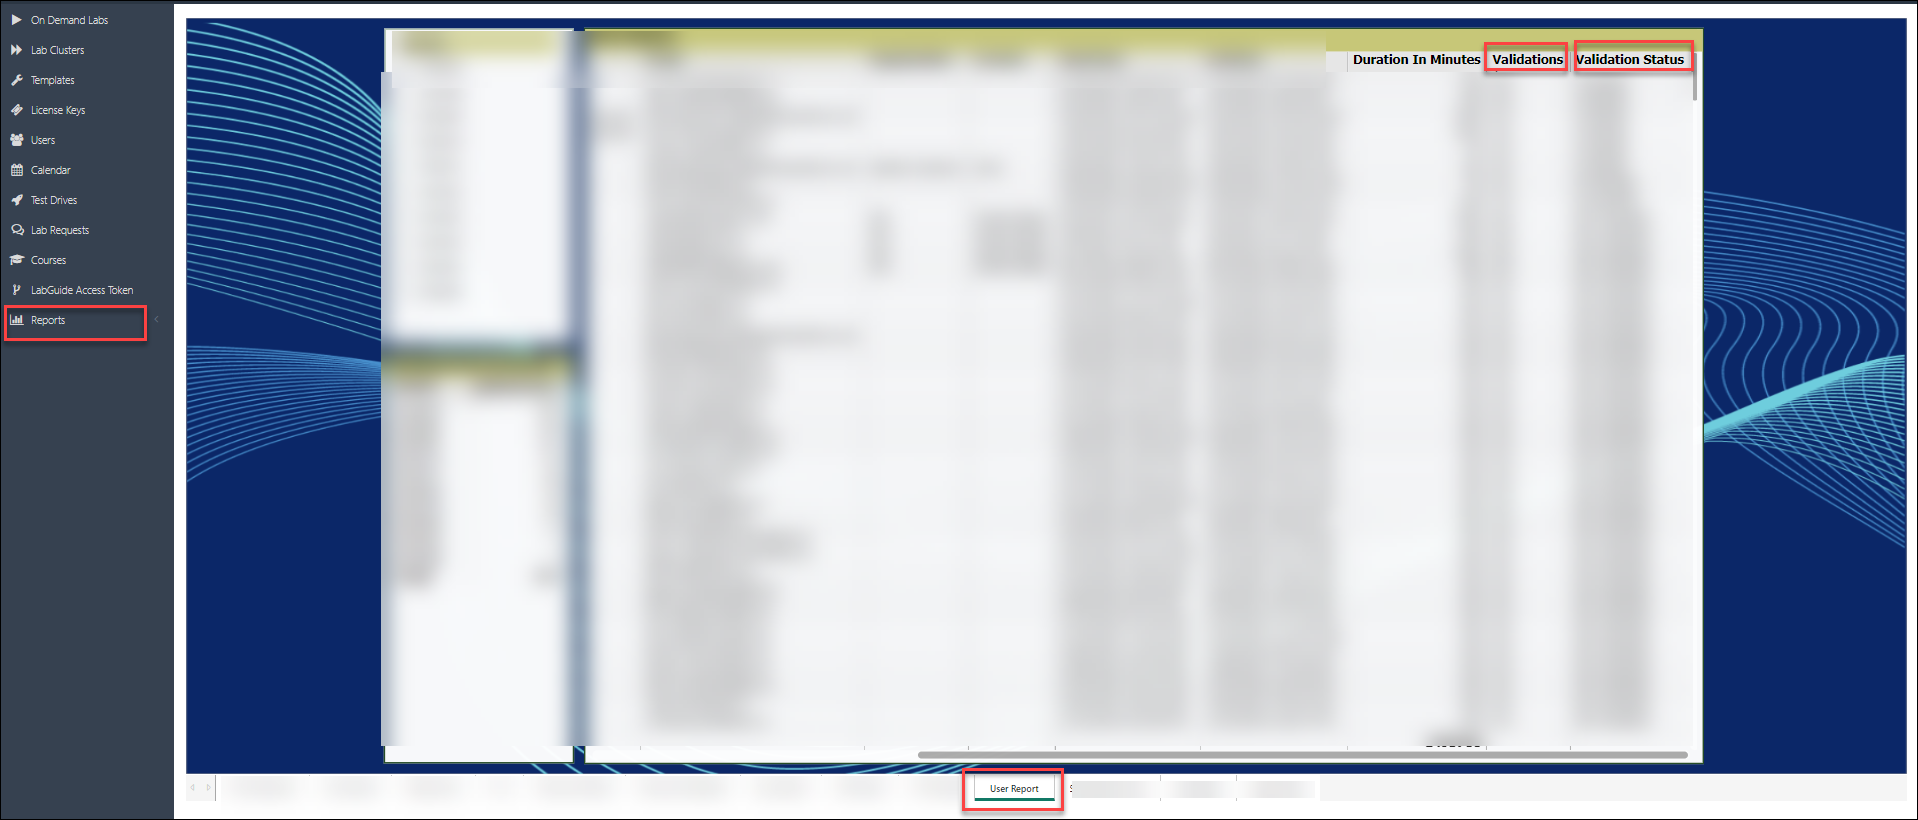
Added a separate column called User Reports to check the validation status.
Validations report
In the "Validations" column, determine the ratio of validations completed to the total number of validations provided.
Once all validations are successfully completed, the status will be marked as Complete. If some validations are only partially completed, the status will indicate Incomplete. If no validations have been completed, the status will be labeled as Not Validated.
3. Clean up script (26th November 2023)
Feature Requirement
Implement the attendee resource clean-up based on the below list.
- Connector
- Dashboard
- Dashboard Widget
- Outpost
- Cloud Configuration Rule
- Host Configuration Rule
- Control
- Ignore Rule
Implementation:
- Developed the API calls for the cleanup of the resources in the Wiz Portal.
4. Lab Guide Preview (11th Dec 2023)
Feature Requirement
Enable user-friendly features for previewing the lab guide before launching the lab in the custom portal.
Implementation
Added a new tab for a preview button in the lab Catalog view under the custom portal.
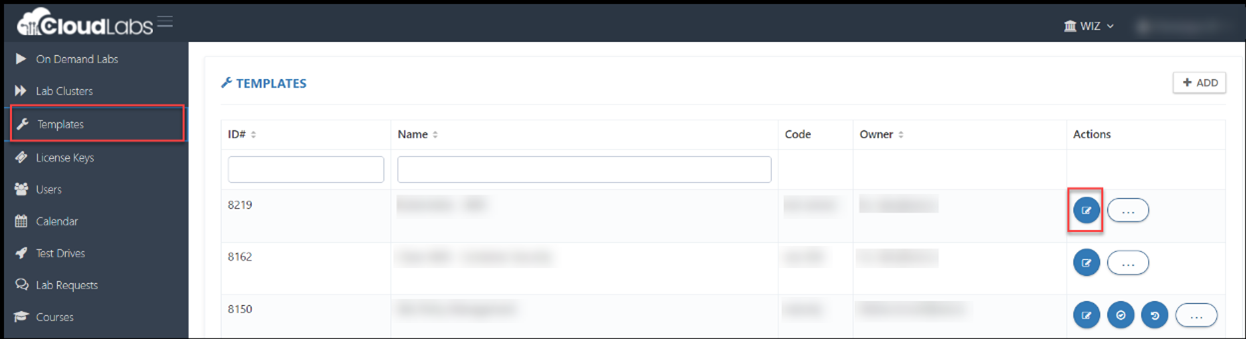
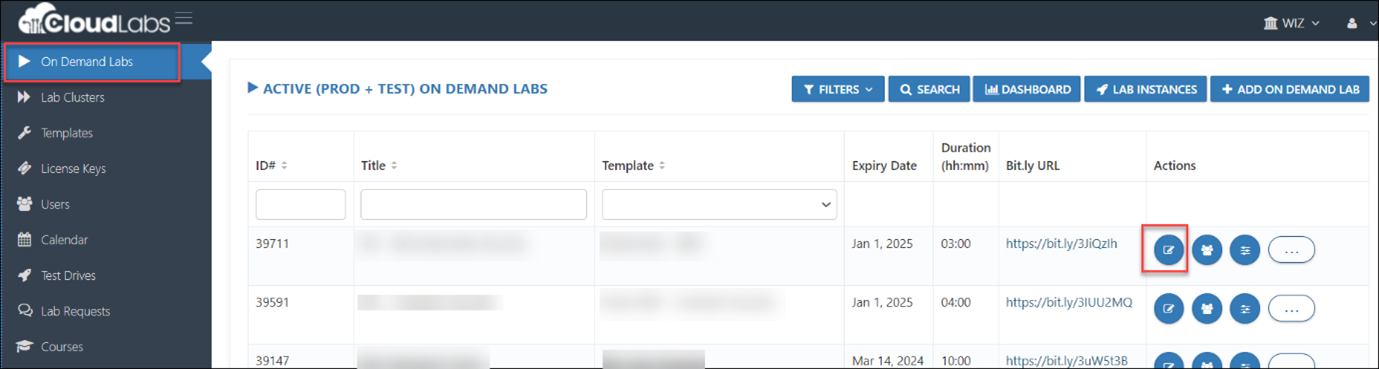
Steps for enabling the lab preview option
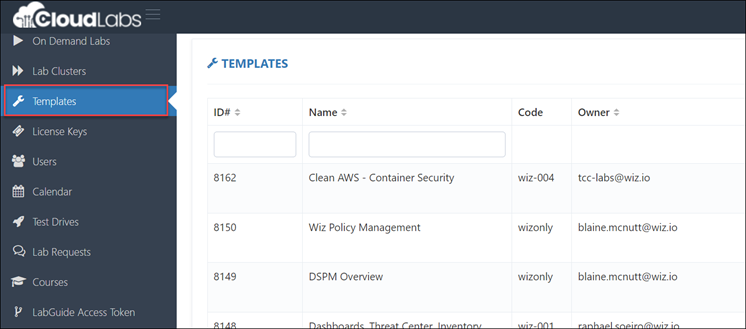
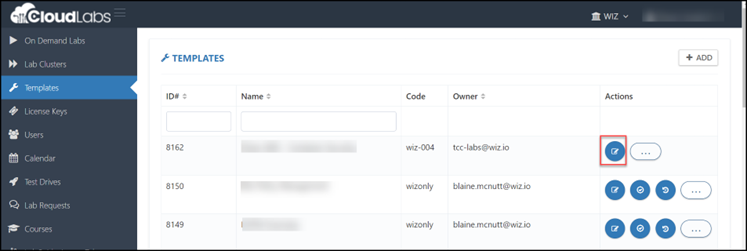
In the Admin Portal, navigate to the templates section and click on the edit option for a specific template.
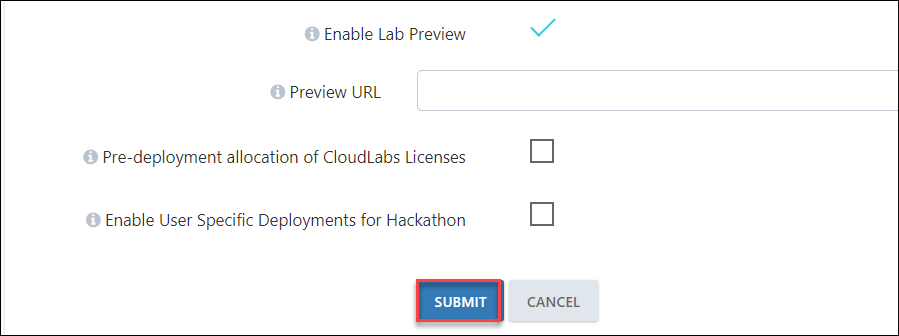
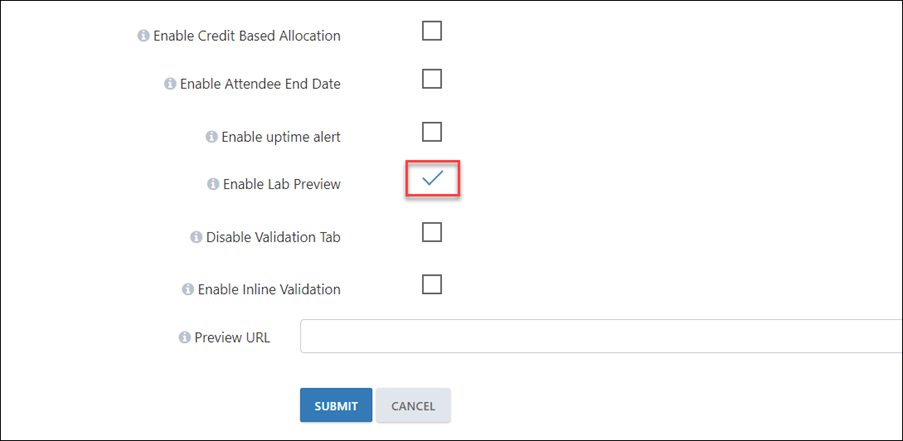
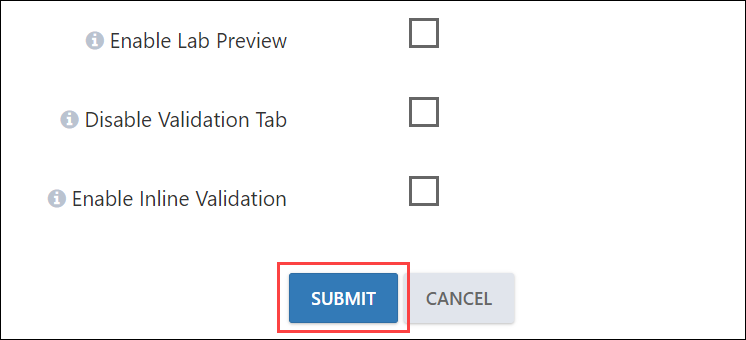
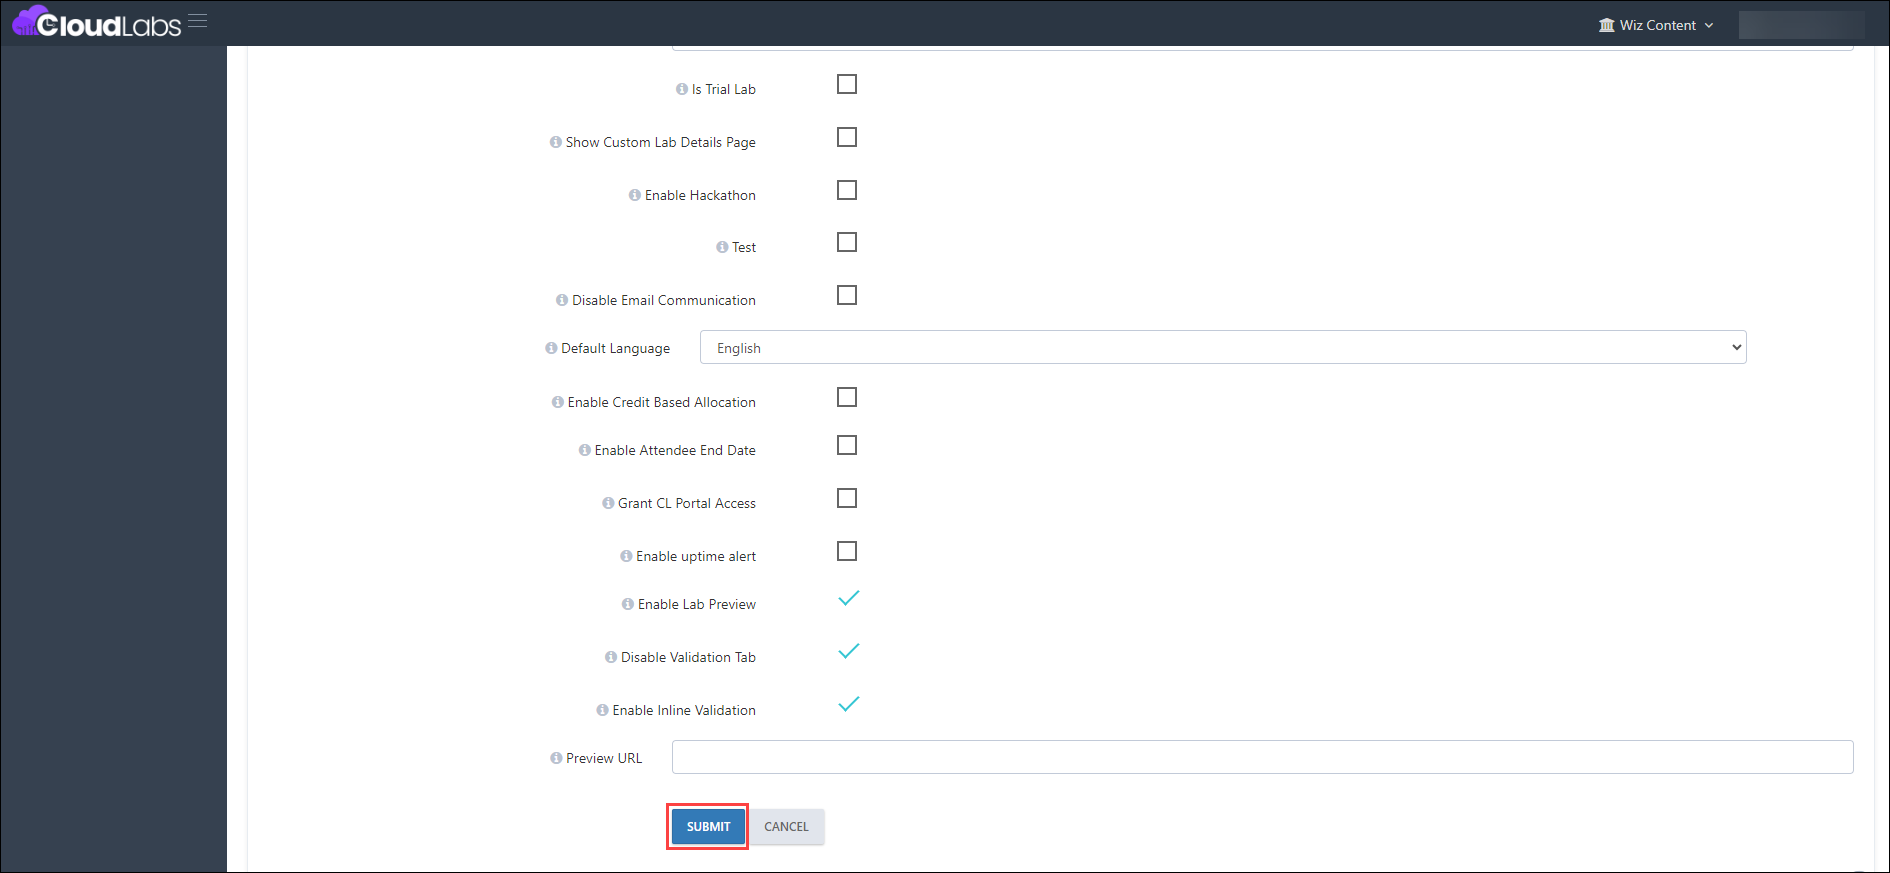
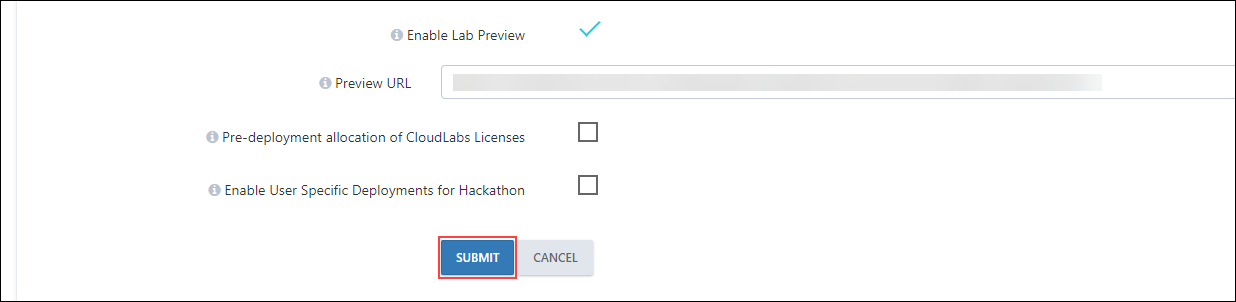
In the template, enable the checkbox for Enable Lab Preview.

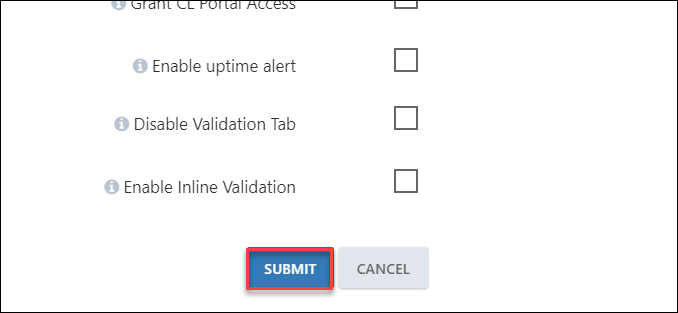
Click on the SUBMIT button to save the changes.
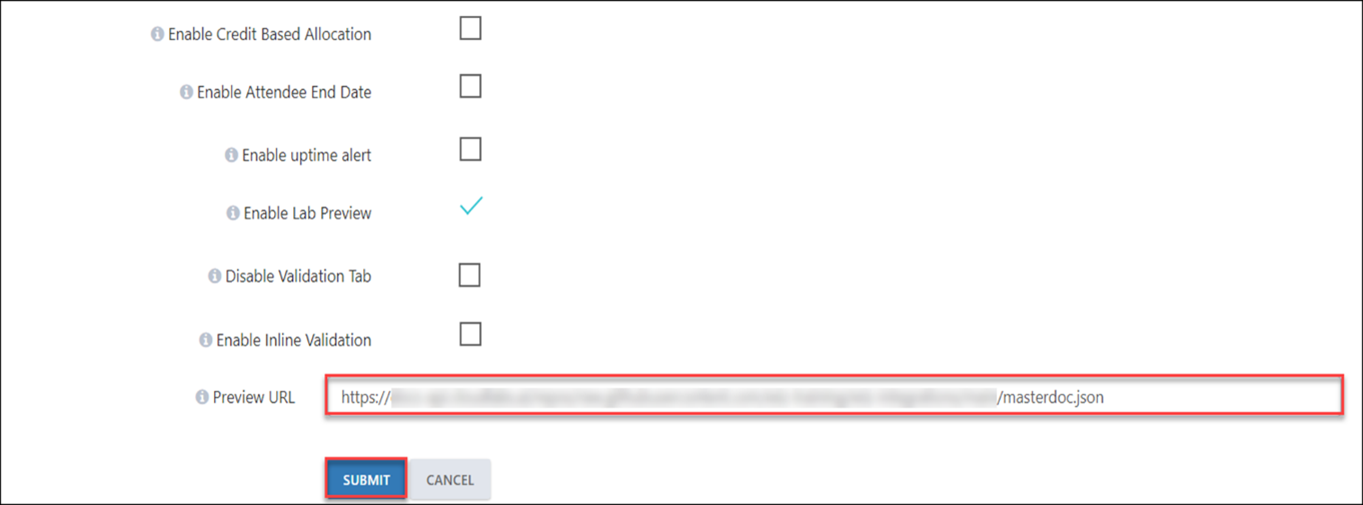
Once we have successfully saved the preview option. Navigate back to the On-demand Labs page, edit the respective ODL, and select the Enable Lab Preview option.
Add the Preview URL (Master Doc link for the lab guide) and click on submit.
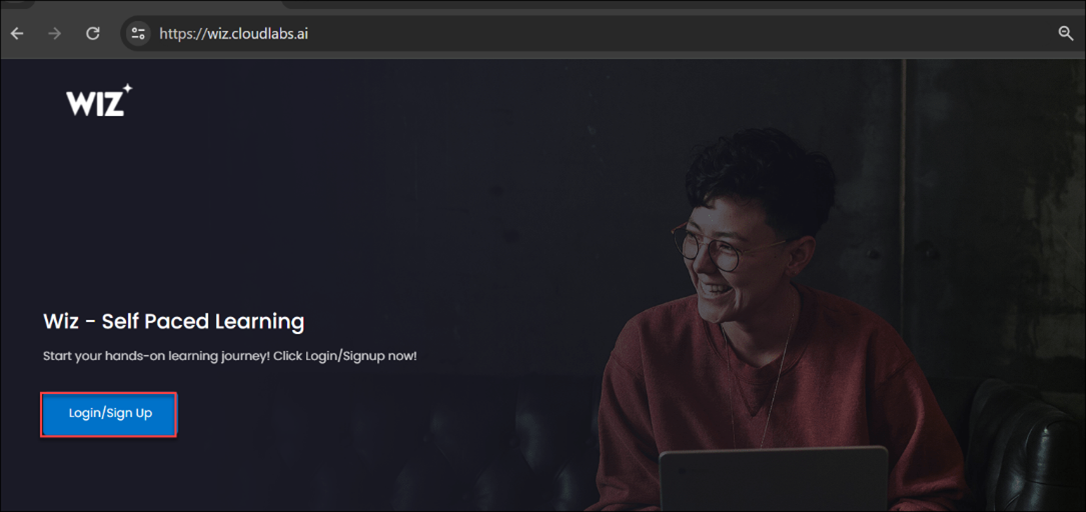
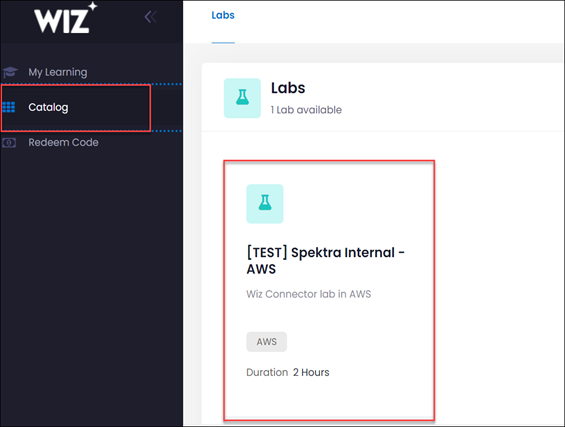
Navigate to the Custom portal (https://wiz.cloudlabs.ai) and click on Login/Sign Up.
In the Catalog section, choose the lab for which you wish to preview the lab guide.
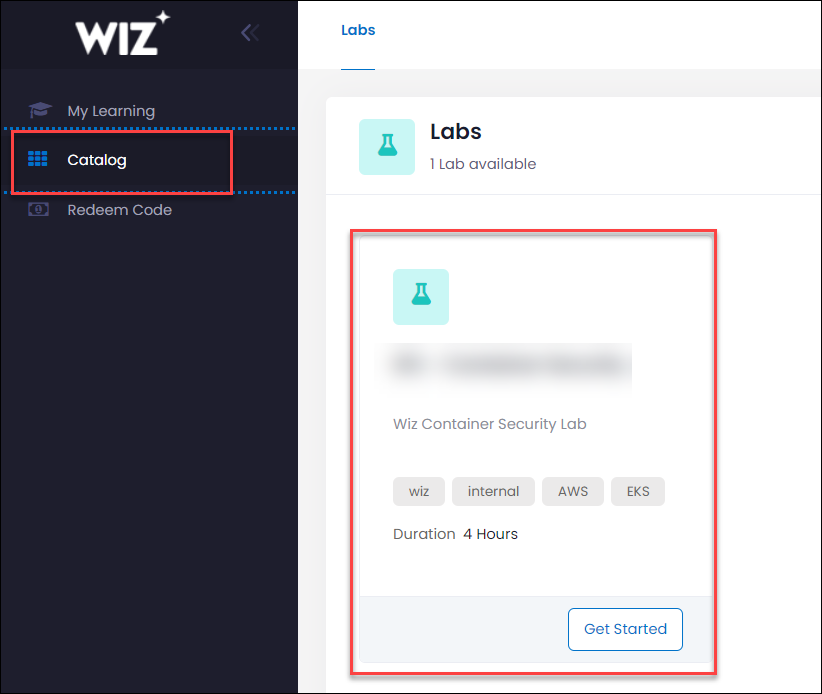
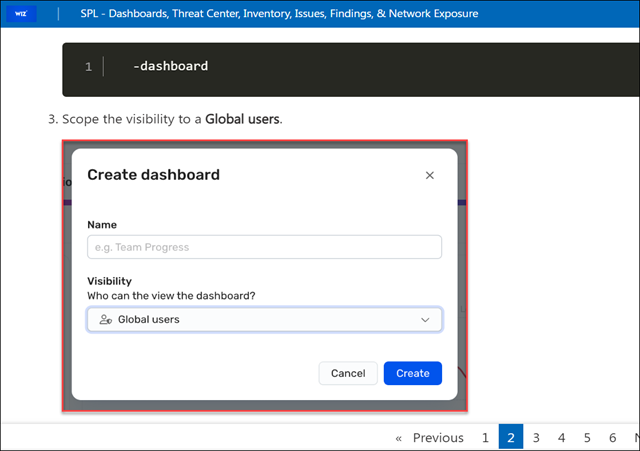
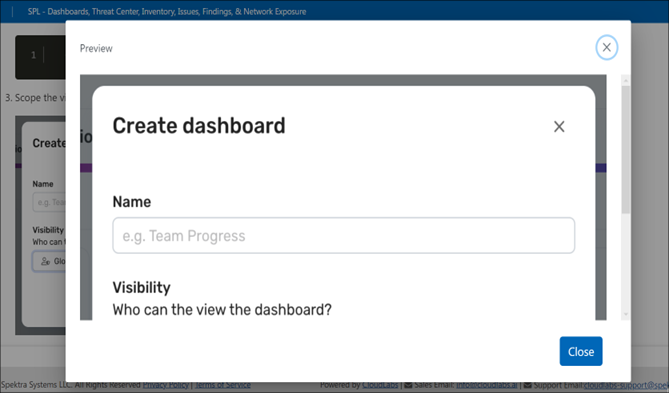
Click on Preview to view the lab guide.
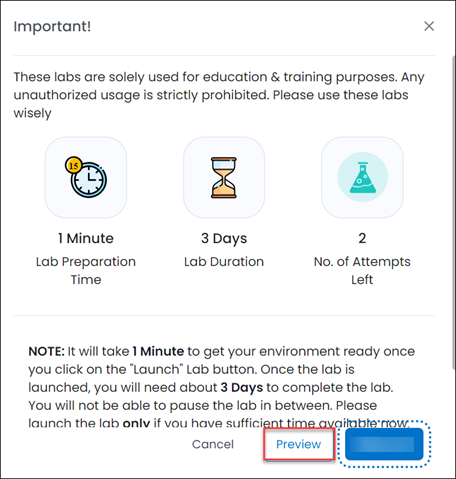
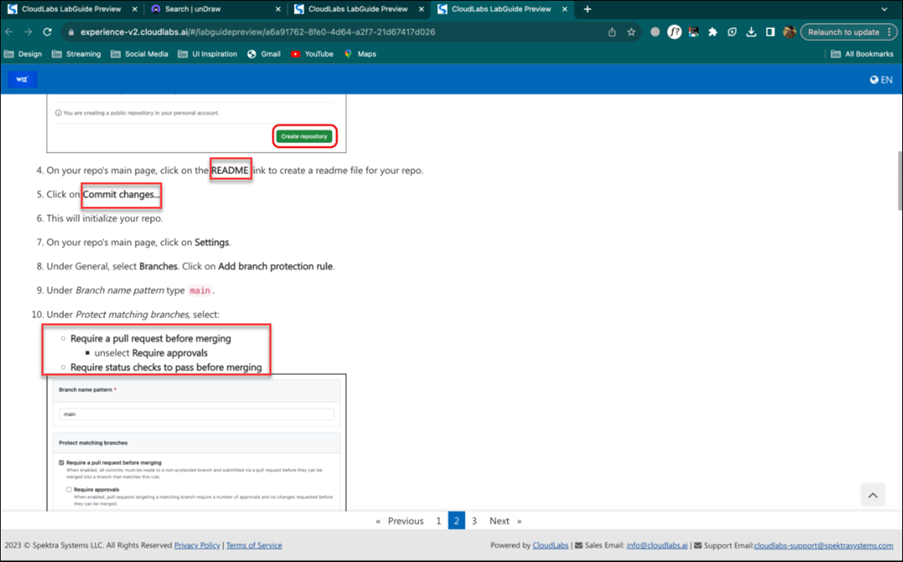
The lab guide preview is accessible within the portal.

5. Lab Guide Updates (11th December 2023)
Feature Requirement
Capability for full-screen view of the image in labguide.
Implementation
Implemented a feature allowing users to view images in full-screen mode.
Steps for checking the Lab guide updates
Go to the lab guide page and select the respective image that you wish to choose.
After selecting the image, it will appear in full-screen view, as illustrated in the image below.
6. Catalog View (11th December 2023)
Feature Requirement
As more labs are added to the catalog view, the display becomes crowded, making lab titles difficult for users to read.
Implementation
The issue is fixed by decreasing the font size of the title in the custom portal.
Also provided the character length (54 characters) for the custom portal to view the full name.
Steps for checking the Catalog View
Note: Spektra supports 54-character limit for headers. If you need any further modifications, please reach out to Labs-support@spektrasystems.com
7. Lab Guide View (11th December 2023)
Feature Requirement
Rendering of bold text in Chrome browser on MacBook.
Implementation
Addressed issues related to bold text rendering in Chrome on MacBook.
checking the Lab guide view
8. SAML Mapping (8th January 2024)
Feature Requirement
- Need to make the API calls for creating the WIZ project and assign the roles to the ODL users.
- Create a new custom handler that can map to another tenant, where Cloud Labs will be adding the users and assigning the specific permissions that are passed through the custom handler.
Implementation
- CloudLabs will be creating the User to access the CSP and Wiz.
- CloudLabs will add the user to a specific group based on the custom handler inputs.
- When a user is granted write permissions, a new project will be created, and the user will be assigned to that group. Additionally, a new AAD group will be created, and the user will be added to that group.
- If the user is assigned with read-only permission, the user will be added to the existing project and existing AAD group.
- After the Lab is finished, if the user possesses the appropriate writing permissions, proceed to delete the AAD group along with the newly established project associated with the user.
- If the user has read-only permission, then the user will be removed from the AAD group and the project.
Steps for assigning the Permissions
To assign roles to the user with either Read-only or Write permission, the following steps should be followed:
In the Admin portal, we need to select the templates section.
Click on Edit Template.
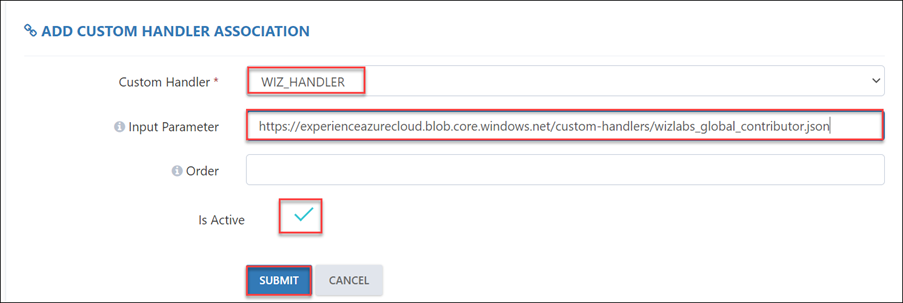
In the Custom Handler section, click on the +ADD button.

In the Custom Handler Section add the below inputs and click on submit.
Custom Handler: WIZ_HANDLER
Input Parameter: https://experienceazurecloud.blob.core.windows.net/custom-handlers/wizlabs_global_contributor.json
Is Active: True
Note:: If the "Is Active" button is not set to true then custom handler permissions will not apply.
Types of Input Parameters
Wiz_Ctf tenant with Global contributor: https://experienceazurecloud.blob.core.windows.net/custom-handlers/wizctf_global_contributor.json
Wiz_Labs tenant with Global Contributor and Global incident analyst: https://experienceazurecloud.blob.core.windows.net/custom-handlers/wizlabs_global_contributor_response_analyst.json
Wiz_Labs with Global Contributor and Project Admin: https://experienceazurecloud.blob.core.windows.net/custom-handlers/wizlabs_global_contributor_project_admin.json
Wiz_Labs with Global Contributor role: https://experienceazurecloud.blob.core.windows.net/custom-handlers/wizlabs_global_contributor.json
9. Custom Portal Profile (12th February 2024)
Feature Requirement
Add the Required fields in the My Profile Section of the Custom Portal.
Implementation
We have currently added/modified the fields based on WIZ requirements.
Steps for checking the custom portal profile
Login to Custom Portal (https://wiz.cloudlabs.ai).
On the right-hand side, you will be able to see the name xxxxxxxxx highlighted in the red.
Click on the name you will be able to see the My Profile section.
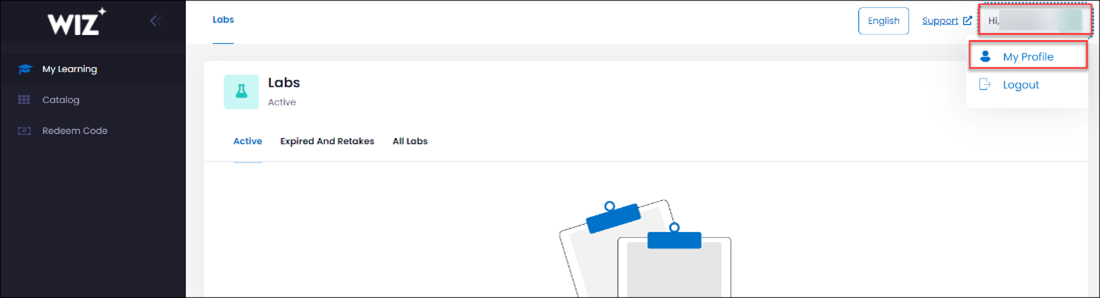
You will need to fill in the mandatory fields and click on Save Changes.
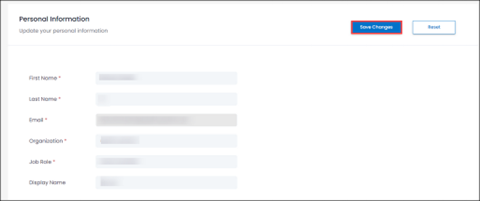
Lab User: Lab users will be unable to launch a lab or course if mandatory fields are not updated. Additionally, they should not be prompted for duplicate information in the registration form when attempting to launch a lab using an activation code in the custom portal.
Note: For any modifications on the above fields reach out to the Spektra team at Labs-support@spektrasystems.com
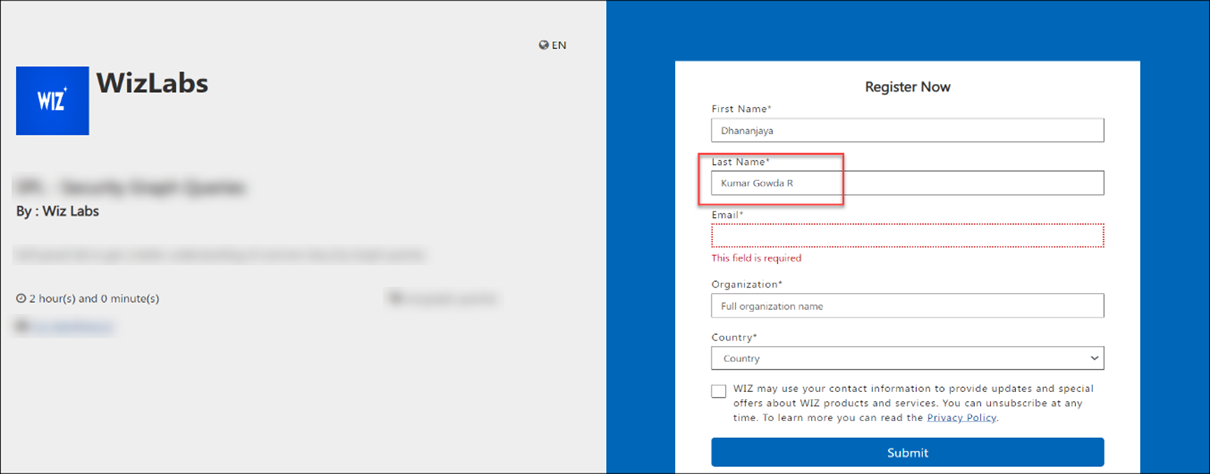
10. Spacing and Hyphens issue on the registration page (12th February 2024)
Feature Requirement
Need to allow the double spaces and the symbols (-) in the last name.
Implementation
We are allowing the double spaces and symbols (-) in the last name.
Steps for checking the spacing and hyphens on the registration page
Allowing the hyphens in the Last Name.
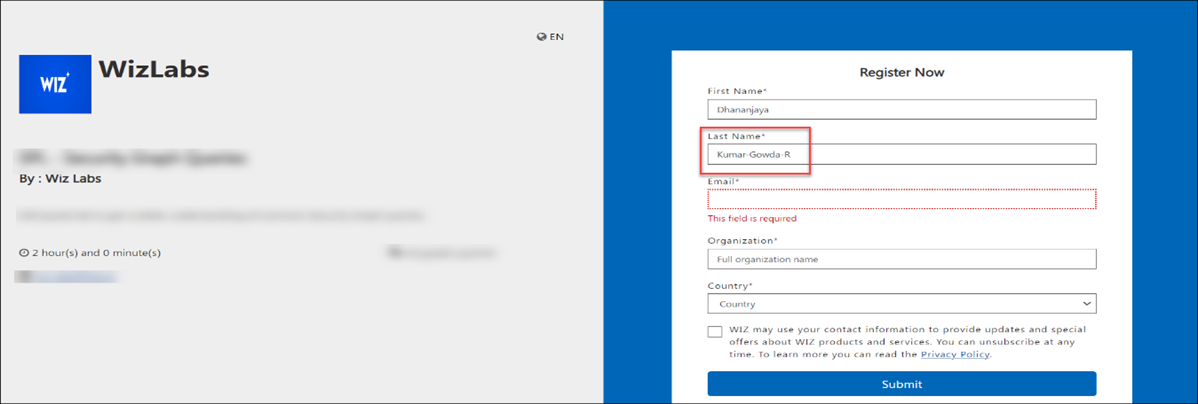
Allowing the Spaces in the Last Name.
11. Voucher Extension (12th February 2024)
Feature Requirement
Admin users must have the functionality to add 500 vouchers simultaneously.
Implementation
We are allowing the admin user to add the 500 vouchers simultaneously.
Steps for checking the voucher extension
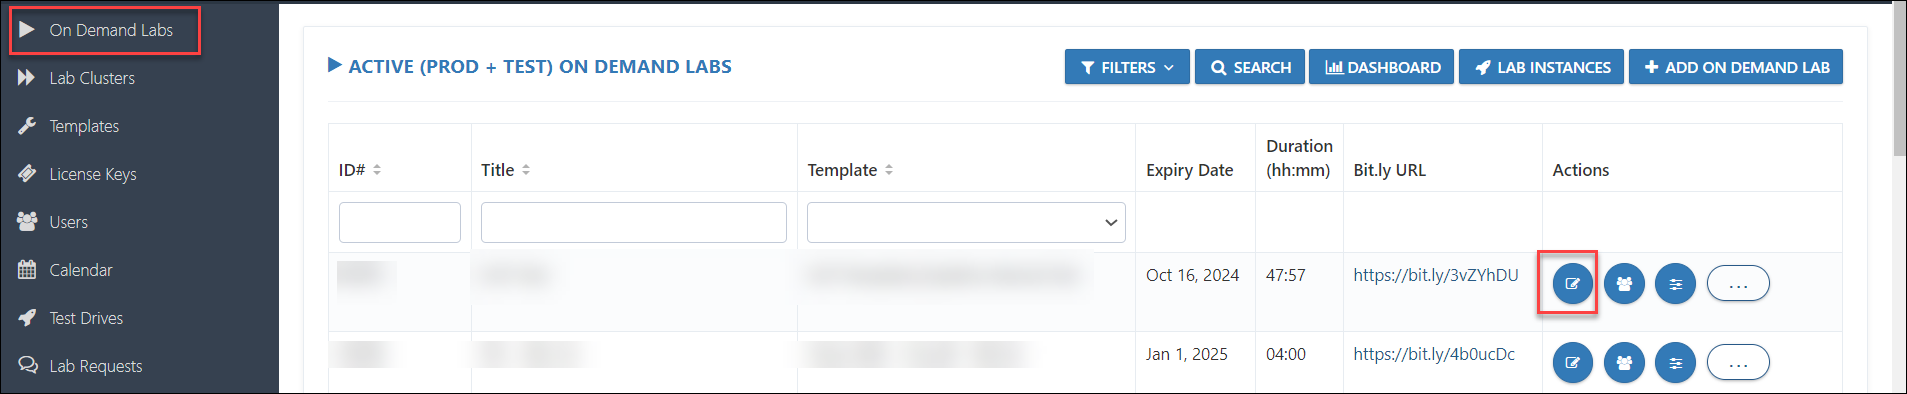
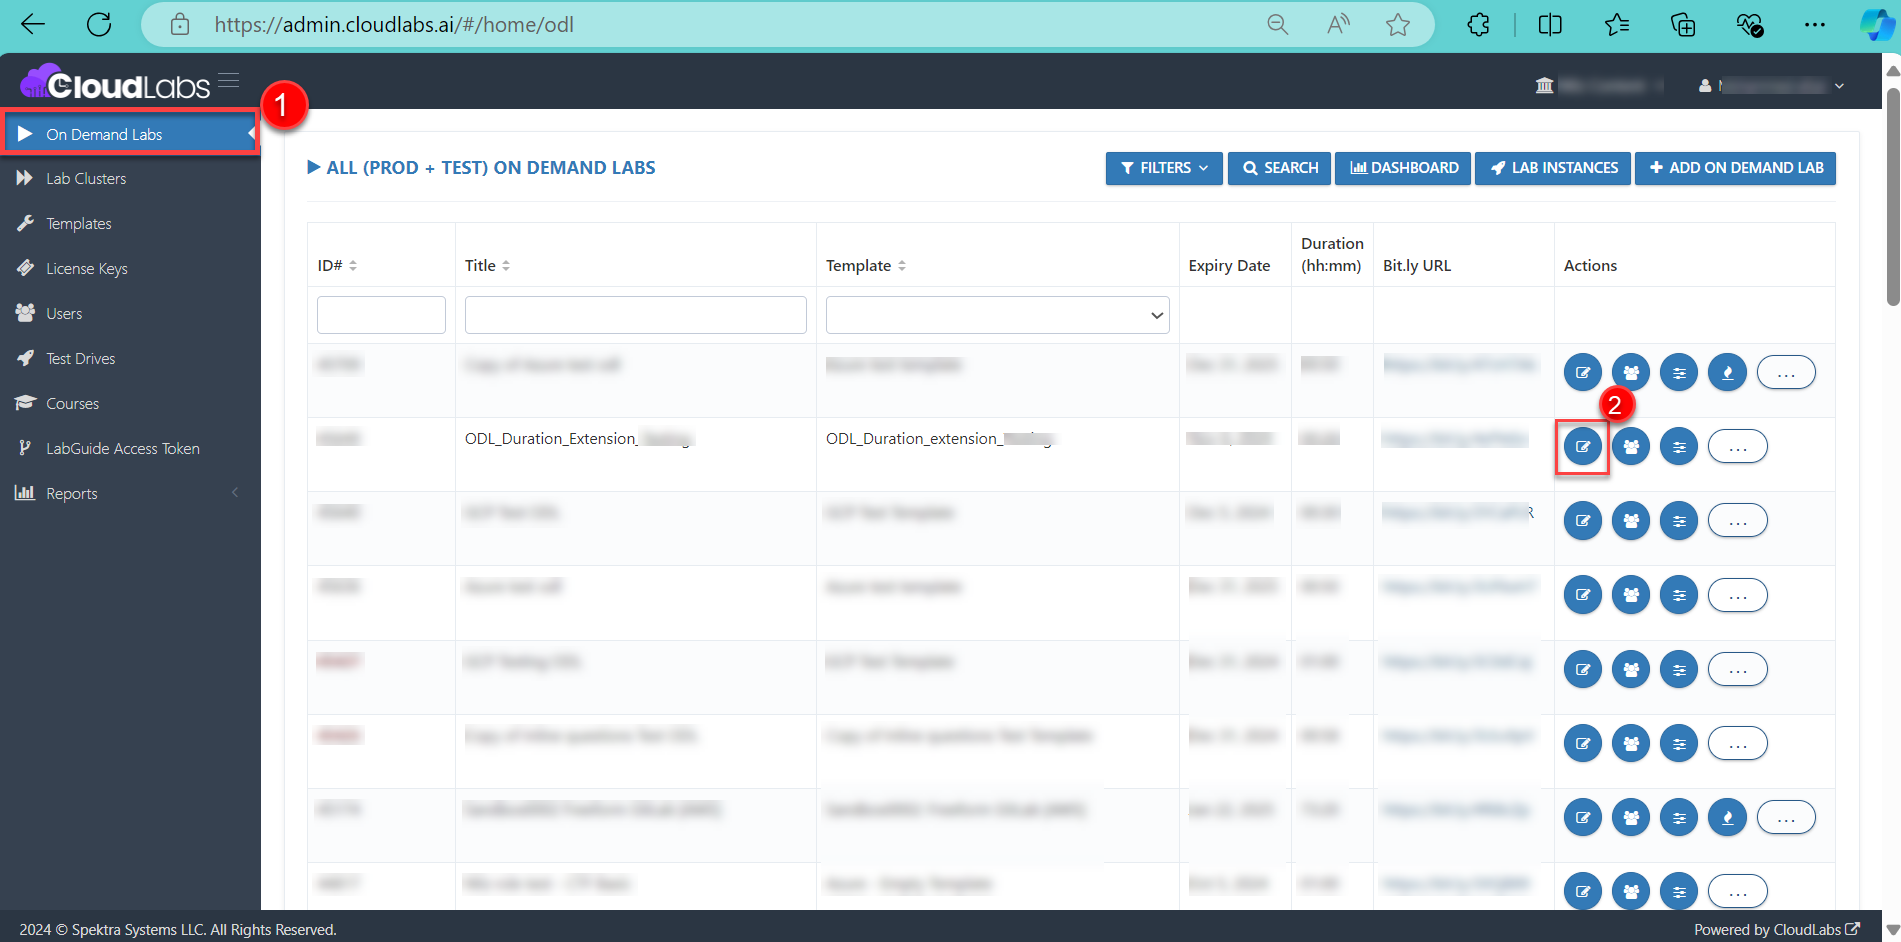
Go to On Demand Labs, choose the ODL you want to Add the vouchers for, and click on Edit (Highlighted in red below).
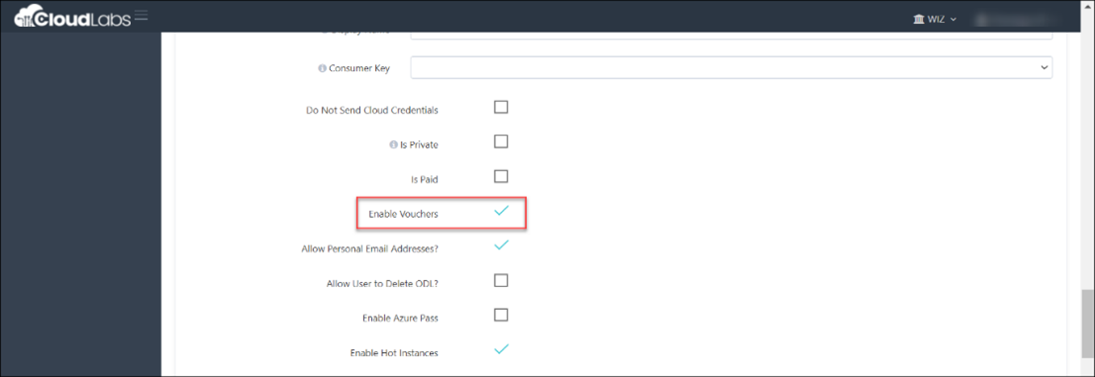
Now you have a checkbox to choose for Enable voucher and click on submit.
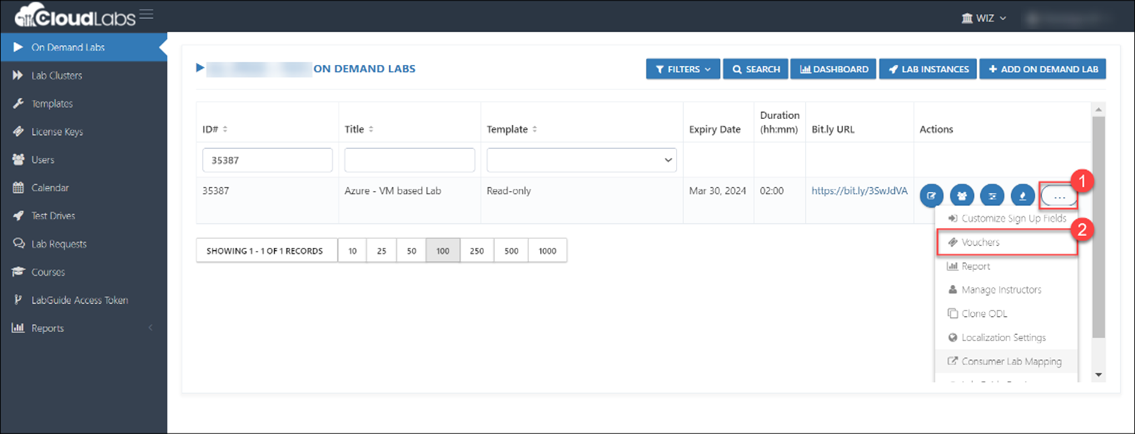
Navigate back to the same ODL, click on the ellipses option (...), and select Vouchers from the dropdown menu.

Once the vouchers are selected, we will have an option to + Add Vouchers.
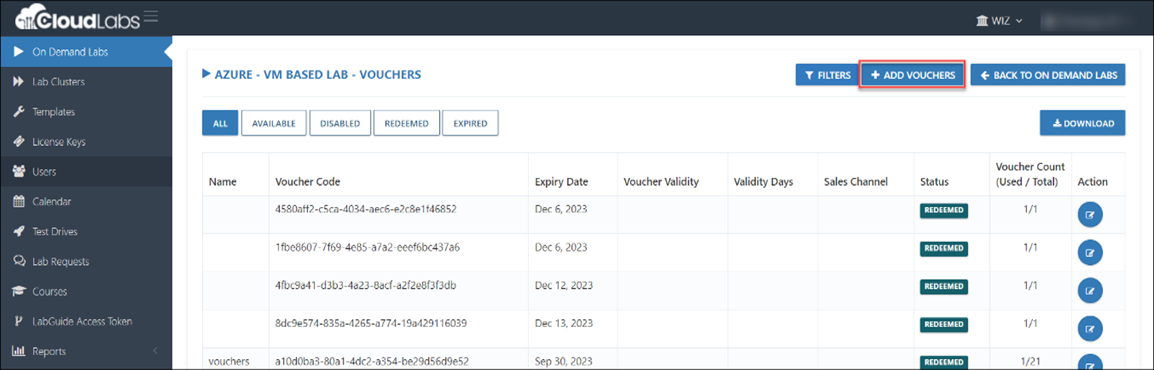
Go to the count section and enter the number of vouchers required (As seen in the screenshot below)
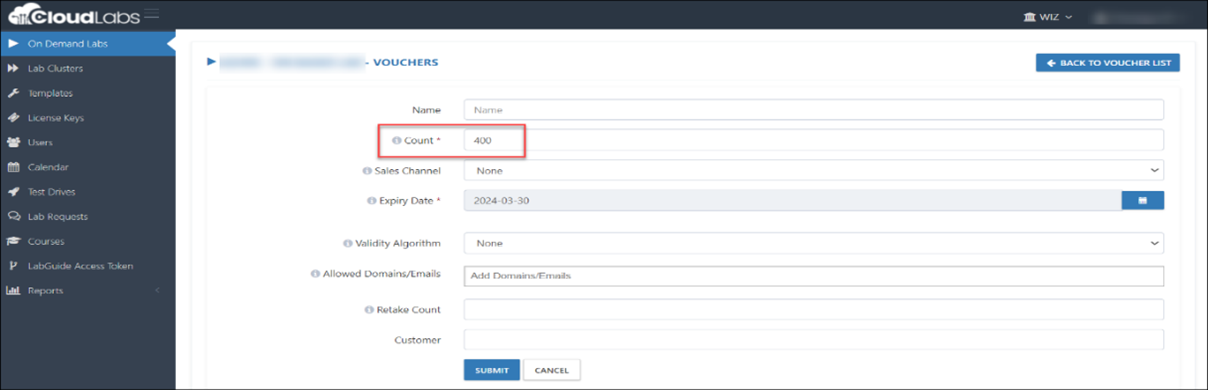
Negative Testing: We are also trying to show the negative testing. If the “Count” increases to more than 500 you will not be able to add/submit the request.
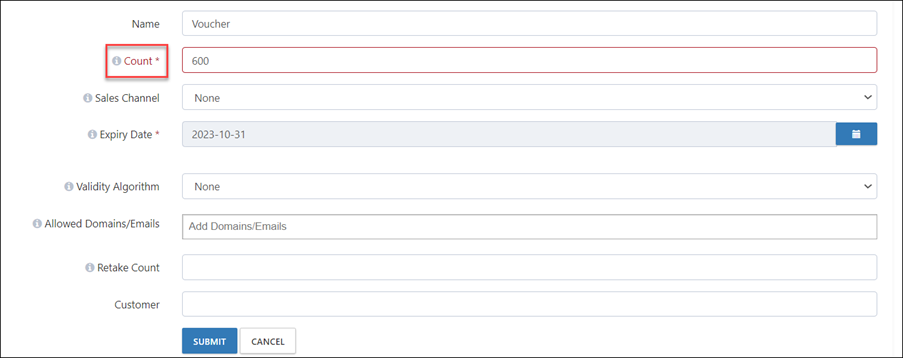
Note: In such cases, need to contact the Spektra team to implement the required adjustments.
12. Inject and Static key Combination (12th February 2024)
Feature Requirement
The Inject Key should include both static and inject keys, with a copy option.
Implementation
GitHub code snippet allows the usage of both static and inject keys simultaneously, with a copy option.
    <inject key="UserName" enableCopy="true" />

     **checkNNumber:** <inject key="UserName" value="StaticValue4" key="UserName" value="StaticValue4"  enableCopy="true" />

     **checkNNumber:** <inject key="AzureAdUserPassword" value="StaticValue2" key="AzureAdUserEmail" value="StaticValue1"  enableCopy="false" />

    **checkNNumber:** <inject key="AzureAdUserPassword" value="StaticValue3" key="UserName" value="StaticValue2" />

     **checkNNumber:** <inject key="UserName" value="StaticValue" key="UserName"  value="StaticValue" />

     **url:** <inject key="AzureAdUserPassword" value="StaticValue2" key="AzureAdUserEmail" value="StaticValue1" enableCopy="false" />
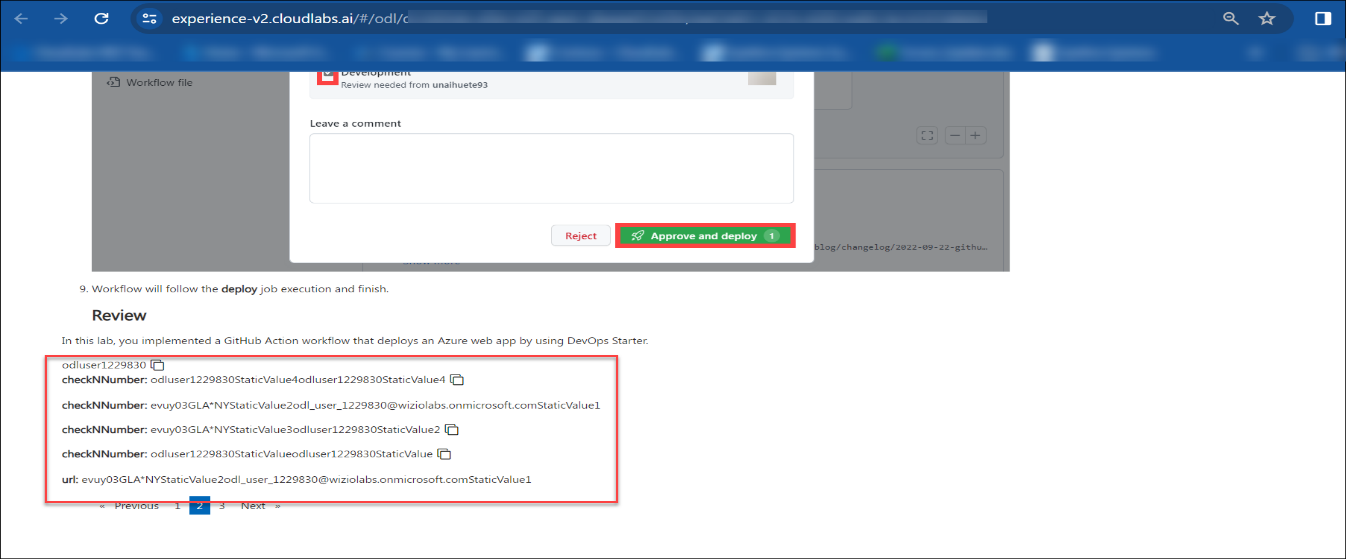
Admin Portal: The below screenshot refers to the rendering of the inject and static key combination in the admin version.
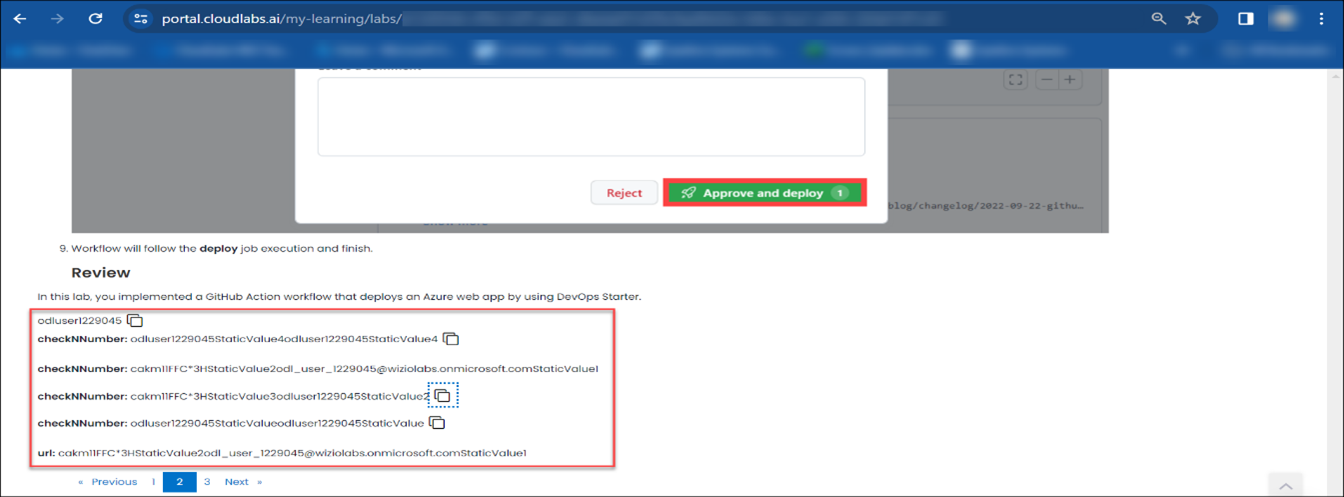
Custom portal: The below screenshot refers to the rendering of the inject and static key combination custom portal.
13. Hide Feature in ODL for catalog view (12th February 2024)
Feature Requirement
Allow ODL or Lab to be visible for the specific domain.
Implementation
Navigate to the On Demand lab, choose the Specific ODL, and click on the Edit option (as highlighted below).
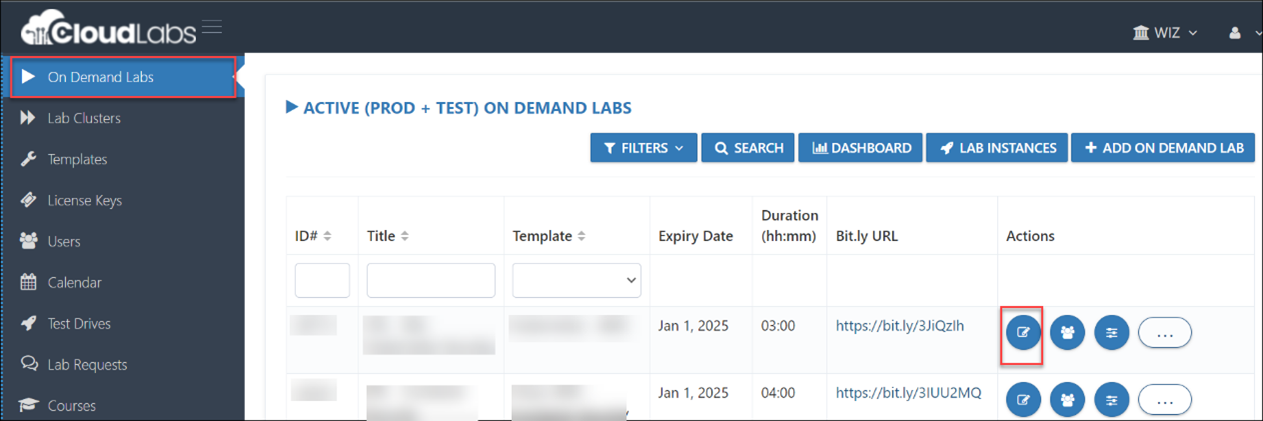
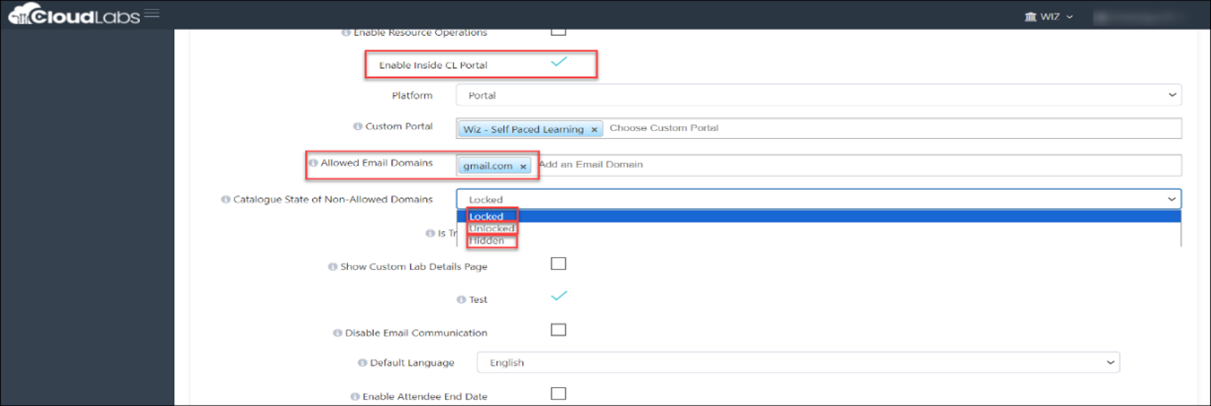
Once we click on Edit look for the Enable Inside CL portal
In the Catalog State of Non-Allowed Domains, there are three options:
o Locked
o Unlocked
o Hidden
Steps for checking the hide feature in ODL for catalog view
Example: For example, the specified domain is Gmail.
Locked
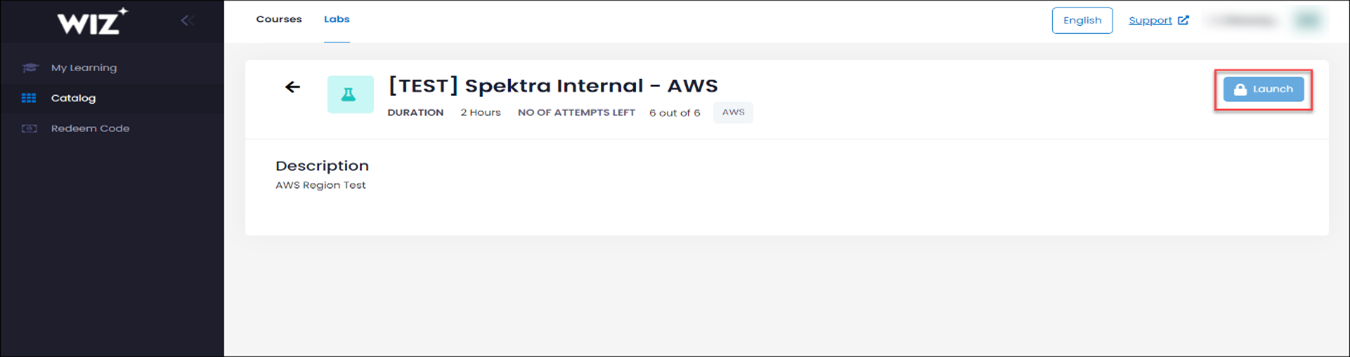
Only the allowed domain will be able to launch the lab, we can check the other domains, but it will remain in lock state.
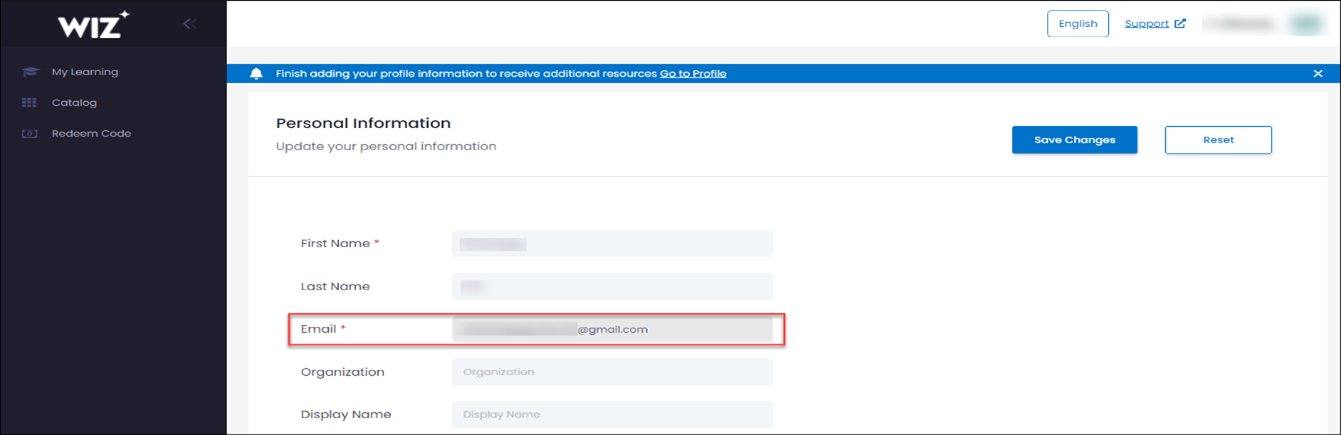
Positive testing: Login using the Gmail domain specified in the ODL is successful.

Negative testing: Login using the other domain is unsuccessful.
Unlocked
All domains can use the launch option regardless of the specified allowed domain.

Hidden
Set the Catalog State of Non-Allowed Domains to hidden, won't be able to view the ODL.
Positive testing: Login using the Gmail domain specified in the ODL is successful.

Negative testing: For Negative Testing, accessing the ODL won't be possible if logged in from the Spektra domain.
14. Custom Portal Catalog (21st March 2024)
Feature Requirement
Separate panel for the active labs with a resume button and a new tab for the retake count with a launch option.
Implementation
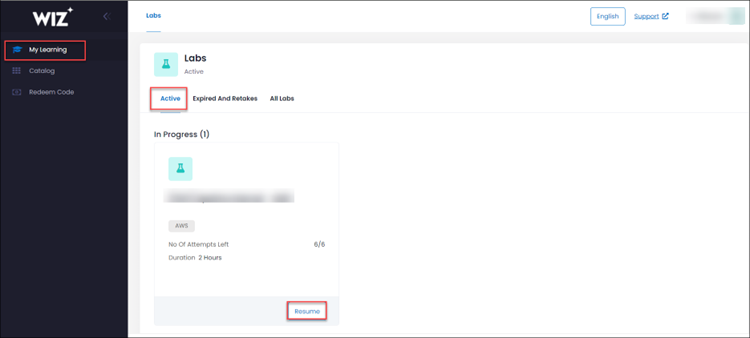
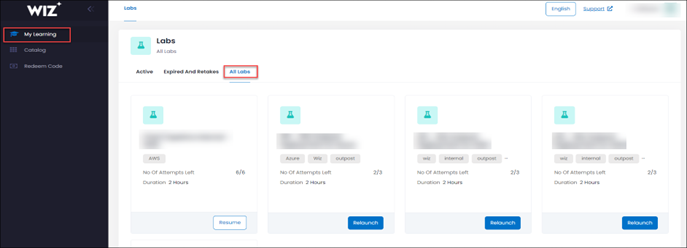
On the custom portal's page under the “My Learning” section, you will be able to see the different panels for Active, Expired, Retake, and All labs.
Checking the custom portal catalog
Active: Labs that are currently active will be displayed in the Active section, accompanied by a Resume button
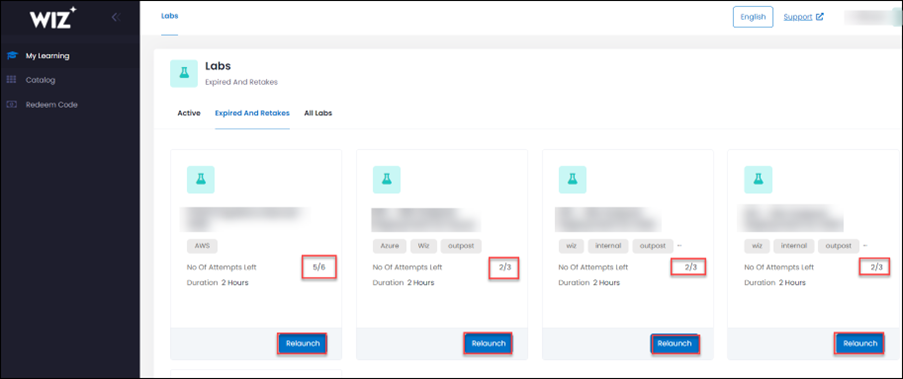
Expired and Retakes: In this section, labs that are currently expired and which have a retake count left can be listed
All Labs: In this section, you can view the entire course list of users based on the Active/Expired and retake counts.
15. Addition of resources to the clean-up script. (22nd April 2024)
Feature Requirement
Implement the attendee resource clean-up for the below list.
- Reports
- Service Accounts
- Data Classifiers
- Automation Rule
- CICD Policy
Implementation:
- Developed the API calls for the cleanup of the resources in the Wiz Portal.
16. GCP Sandbox. (22nd April 2024)
Feature Requirement
Set up the Sandbox feature on the Google Cloud Platform (GCP).
Implementation
We're extending support for the GCP Sandbox feature within CloudLabs.
Steps to enable the GCP Sandbox.
Within the CloudLabs portal, navigate to the "On-Demand Lab" section, Locate the created On-Demand Lab (ODL), and click on the "Edit" option.
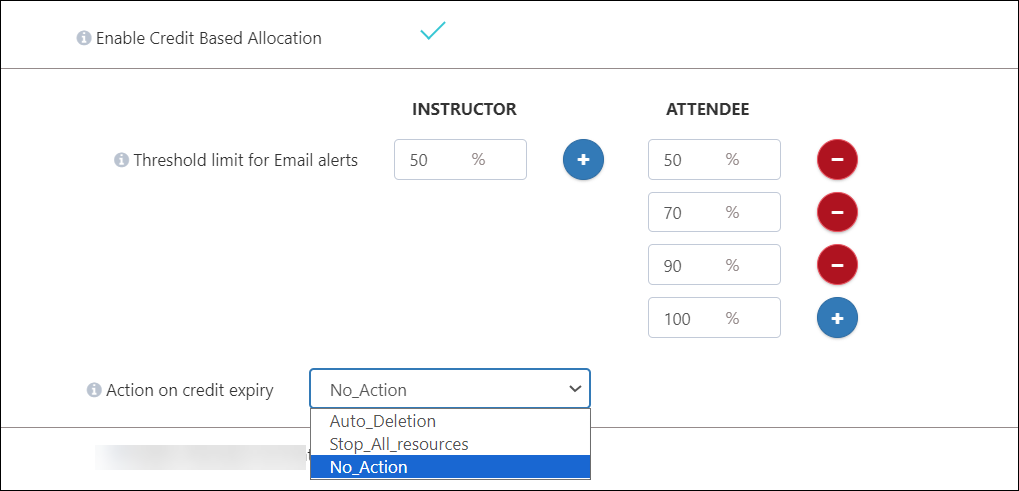
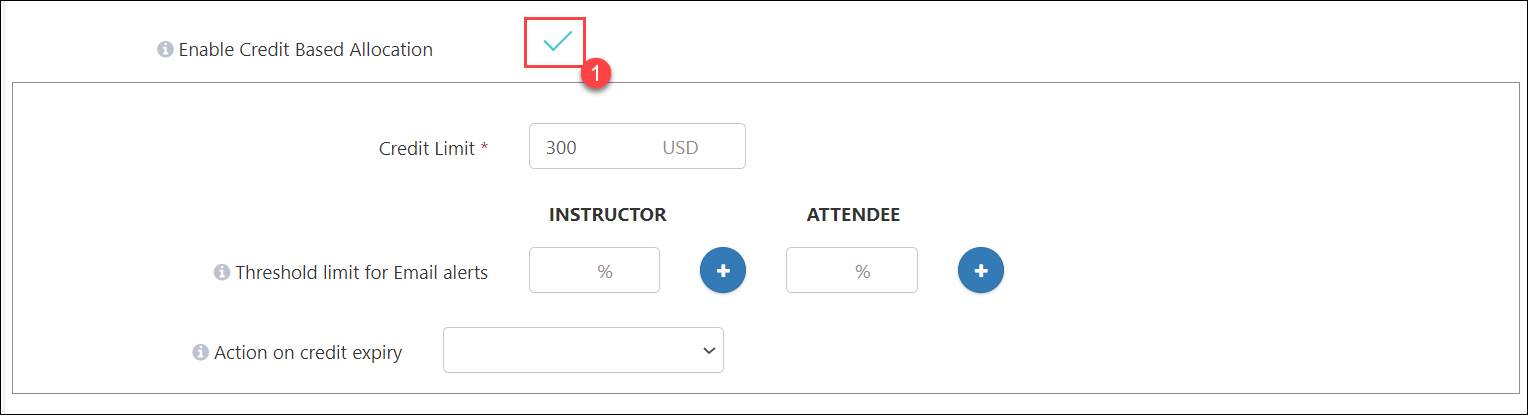
Enable the Credit based allocation option inside the ODL.

Once the credit-based allocation option is enabled, we need to Specify the Credit limit, add the Threshold limit for emails, and Action on Credit expiry.
Credit Limit: Specify credits required to complete the Lab.
Threshold limit for the Emails: CloudLabs will send an email notification to the user or instructor based on the usage specified in the ODL. For example, if the credit limit is set to $10 and the threshold email alert is set to 10%, the user or instructor will receive an alert when the usage reaches $1.
Action on Credit Expiry: What action should be taken when credit expires.
Auto_Deletion: Once the instance reaches the credit limit the instance will get deleted.
Stop_All_Resources: If instances reache the credit limit, it will stop the resources.
No_Action: Once the instances reache the credit limit, no action will be taken on any resources and instances.
Once the Action on Credit Expiry scroll down to Click on submit to update the changes.
Note: Since cloud services provide precise cost details after 24 hours, we'll have the opportunity to receive alerts within a 24 to 48-hour window.
17. Inline Questions. (25th May 2024)
The Inline Lab Guide Questions feature provides the ability to integrate an interactive Q&A module within Lab Guide.
The goal of this feature is to:
Increase lab user engagement by introducing interactive elements in the lab guide.
Assess the knowledge of the lab user by providing questions in the lab guide and grade the user based on question scores.
Collection of valuable feedback from lab users to benefit both educators and CloudLabs.
Ability to force users to answer questions in the current lab guide page to be able to move forward.
The feature supports two types of questions:
Single Choice
Multiple Choice
Configuring OnDemand Lab with Inline Lab Guide Questions:
Step 1: Enable Inline Questions in Template config:
To enable Inline Questions, we need to input the master doc URL in the Template config, which will make the Render Inline Lab Guide Questions checkbox visible.
When the Render Inline Lab Guide Questions checkbox is selected, the feature flag will be enabled in the OnDemand Lab configuration.

Step 2: Enable Inline Questions in OnDemand lab config:
Once the Inline Questions feature has been enabled in the Template config, we need to input the master doc URL in the OnDemand lab config, which will make the Render Inline Lab Guide Questions checkbox visible.
When the Render Inline Lab Guide Questions checkbox is selected, inline questions will be displayed in the lab guide for new deployments.
FAQs:
How to enable Lab Guide questions for ongoing labs:
To enable Inline questions for existing labs, we just need to update the lab guide and enable the ‘Render Inline Lab Guide Questions’ checkbox in the ODL config. It will a take few minutes to register the questions in CloudLabs. Once questions are registered, the changes will reflect for all the new deployments or retakes.
How to update Lab Guide questions for ongoing labs:
In case any Inline question has been updated (Added / Modified / Removed) in the lab guide, it will be synced automatically every 6 hours. To perform an on-demand sync, we can manually edit the ODL config and save it (no changes required in configuration), this will trigger an OnDemand sync of Inline questions.
Once the sync has been completed, changes done on the questions will reflect on existing OR new deployments based on the following rules:
A new lab guide page is added – The questions on that will be available for new deployments/retakes only.
A new question is added - it will be available for new deployments/retakes only.
An existing question is removed - it will be removed for existing as well as new deployments/retakes.
An existing question is updated, depending upon the change it will reflect for existing deployments:
4.1. In case Question Type / Options / Answer is updated- changes will reflect for new deployments/retakes only.
4.2. In Case Question Type, Options and Answer remain unchanged - The changes will reflect for existing deployments as well.
User Lab Experience:
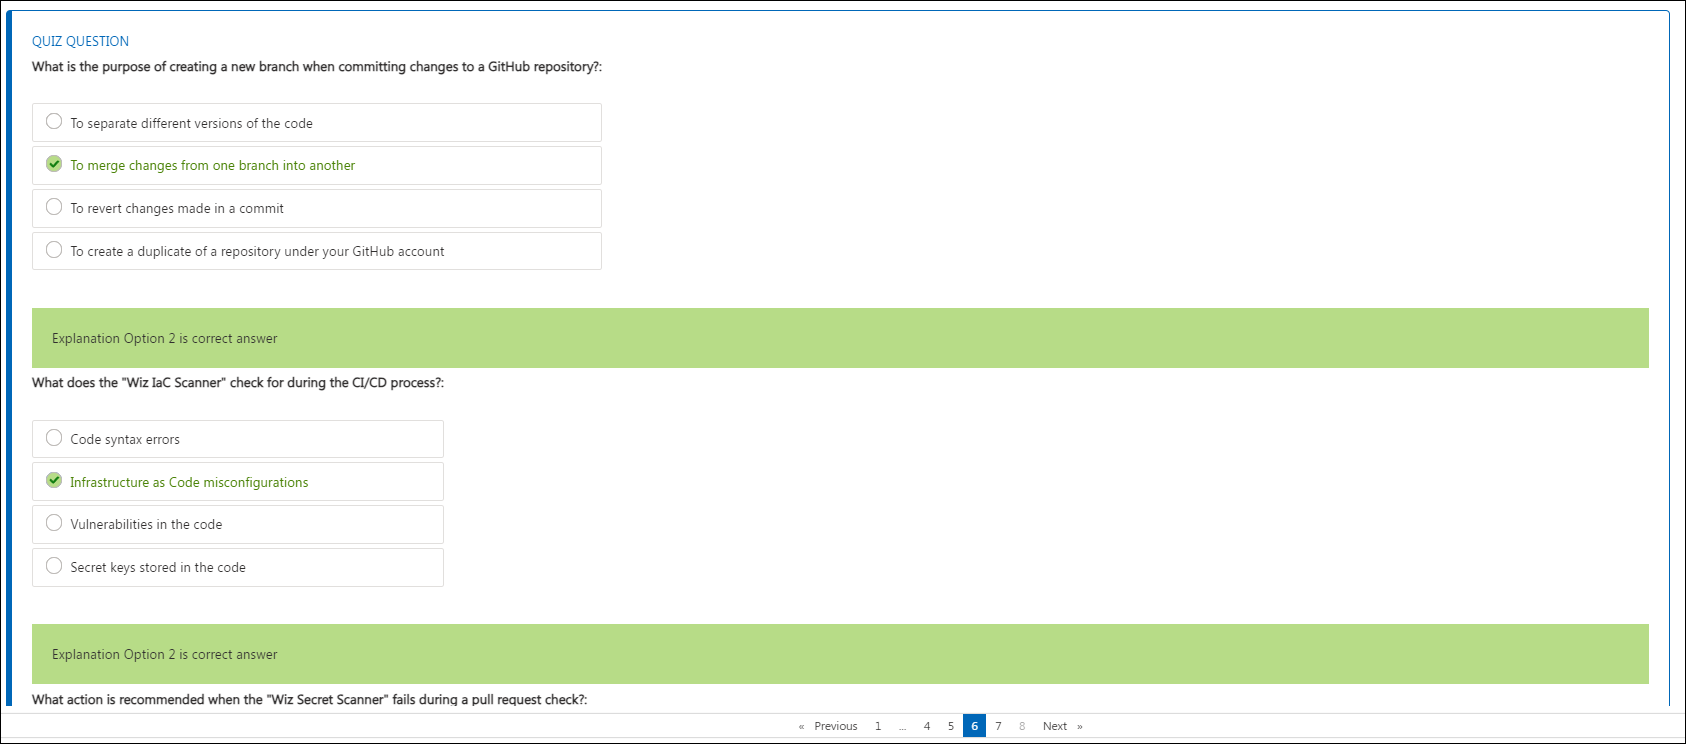
Once the feature has been enabled in the ODL config, attendees will be able to see inline questions like below:
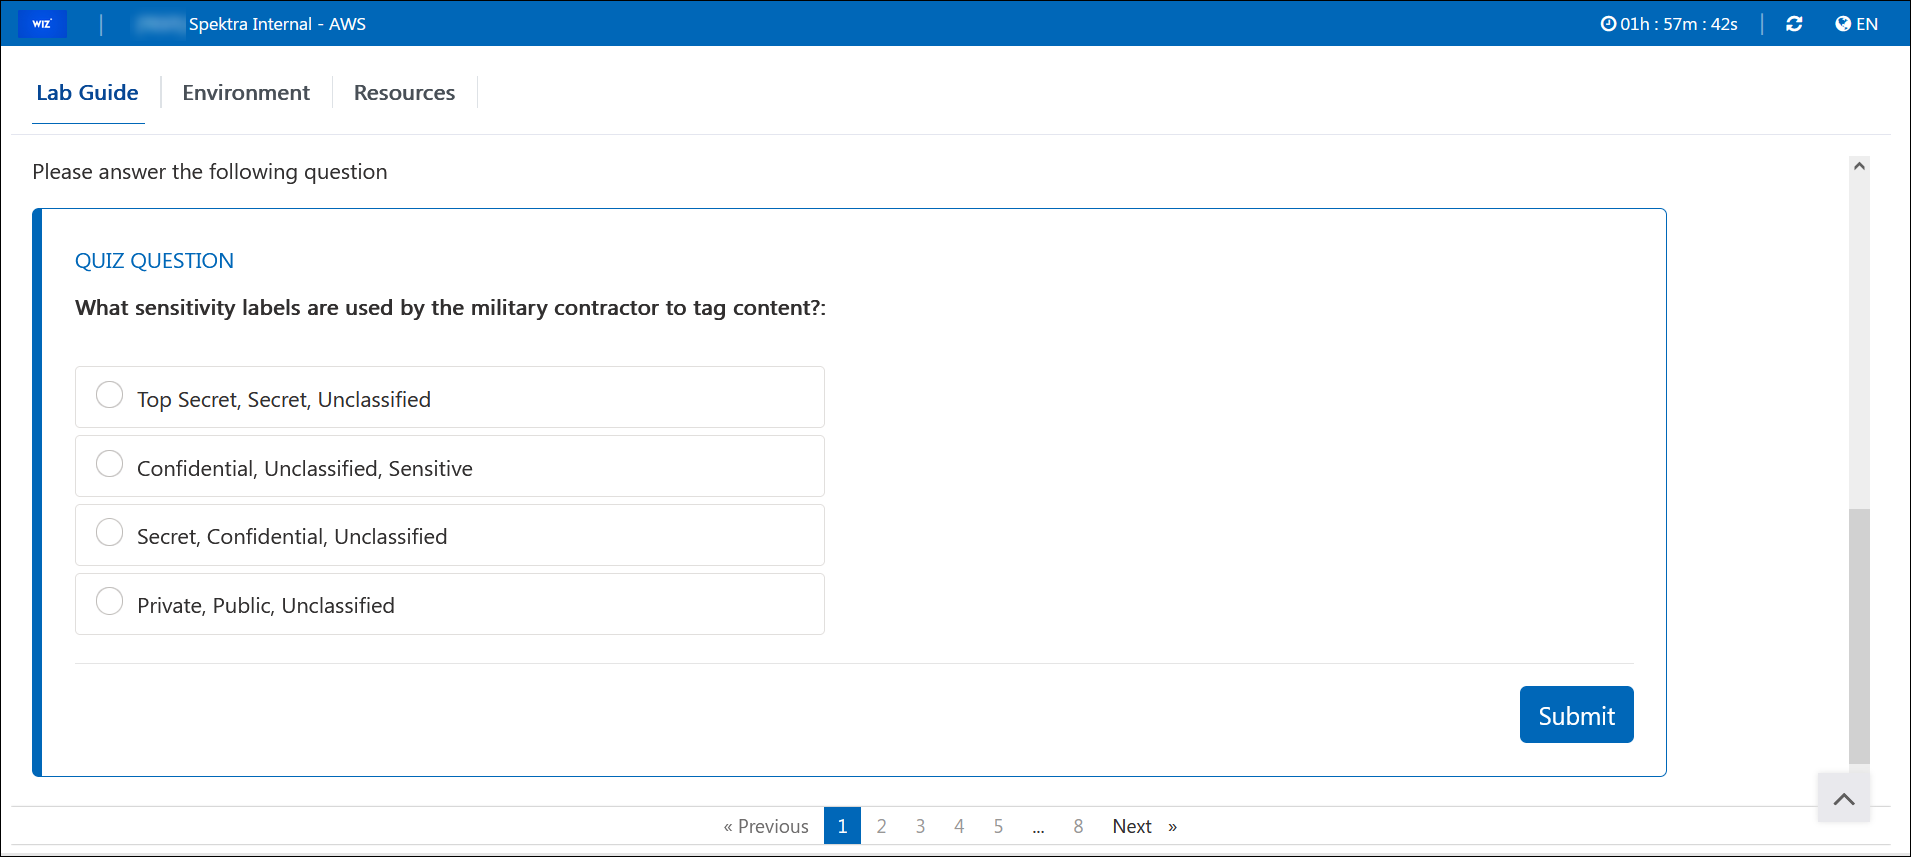
To answer an Inline question, the user needs to select the appropriate option and click the Submit button.
It is possible to group multiple questions, in that case, a single Submit button will be visible to the user for all the questions in the group.
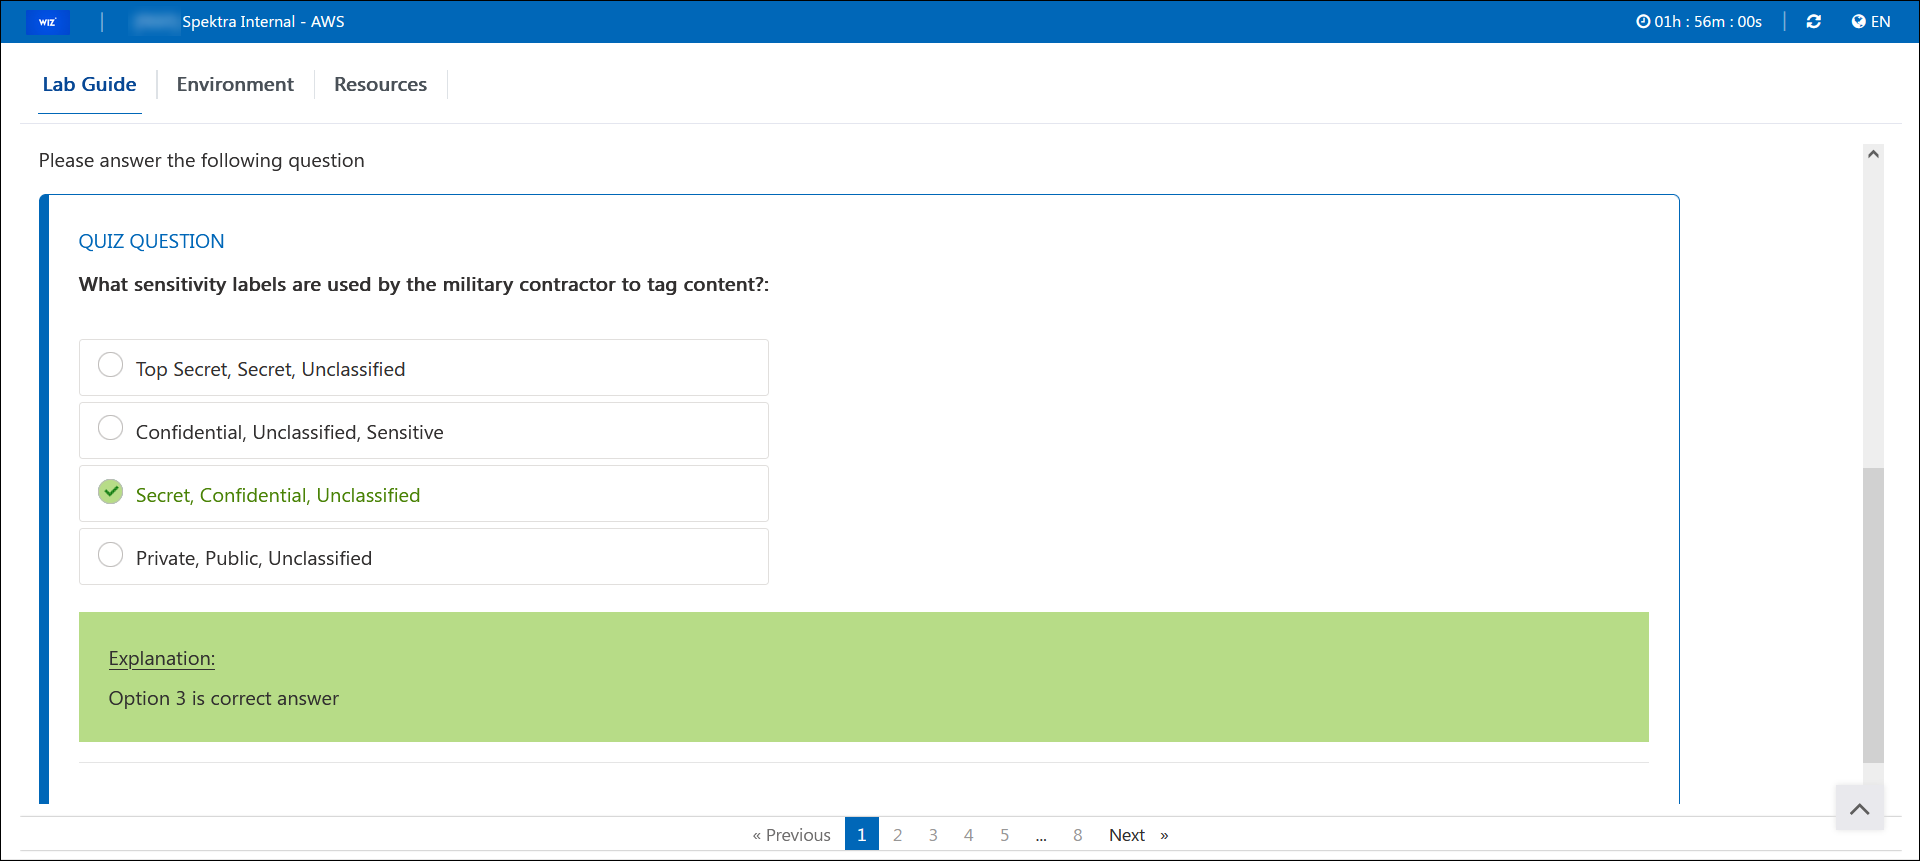
Once the answer has been submitted, the result will be shown instantly like below:
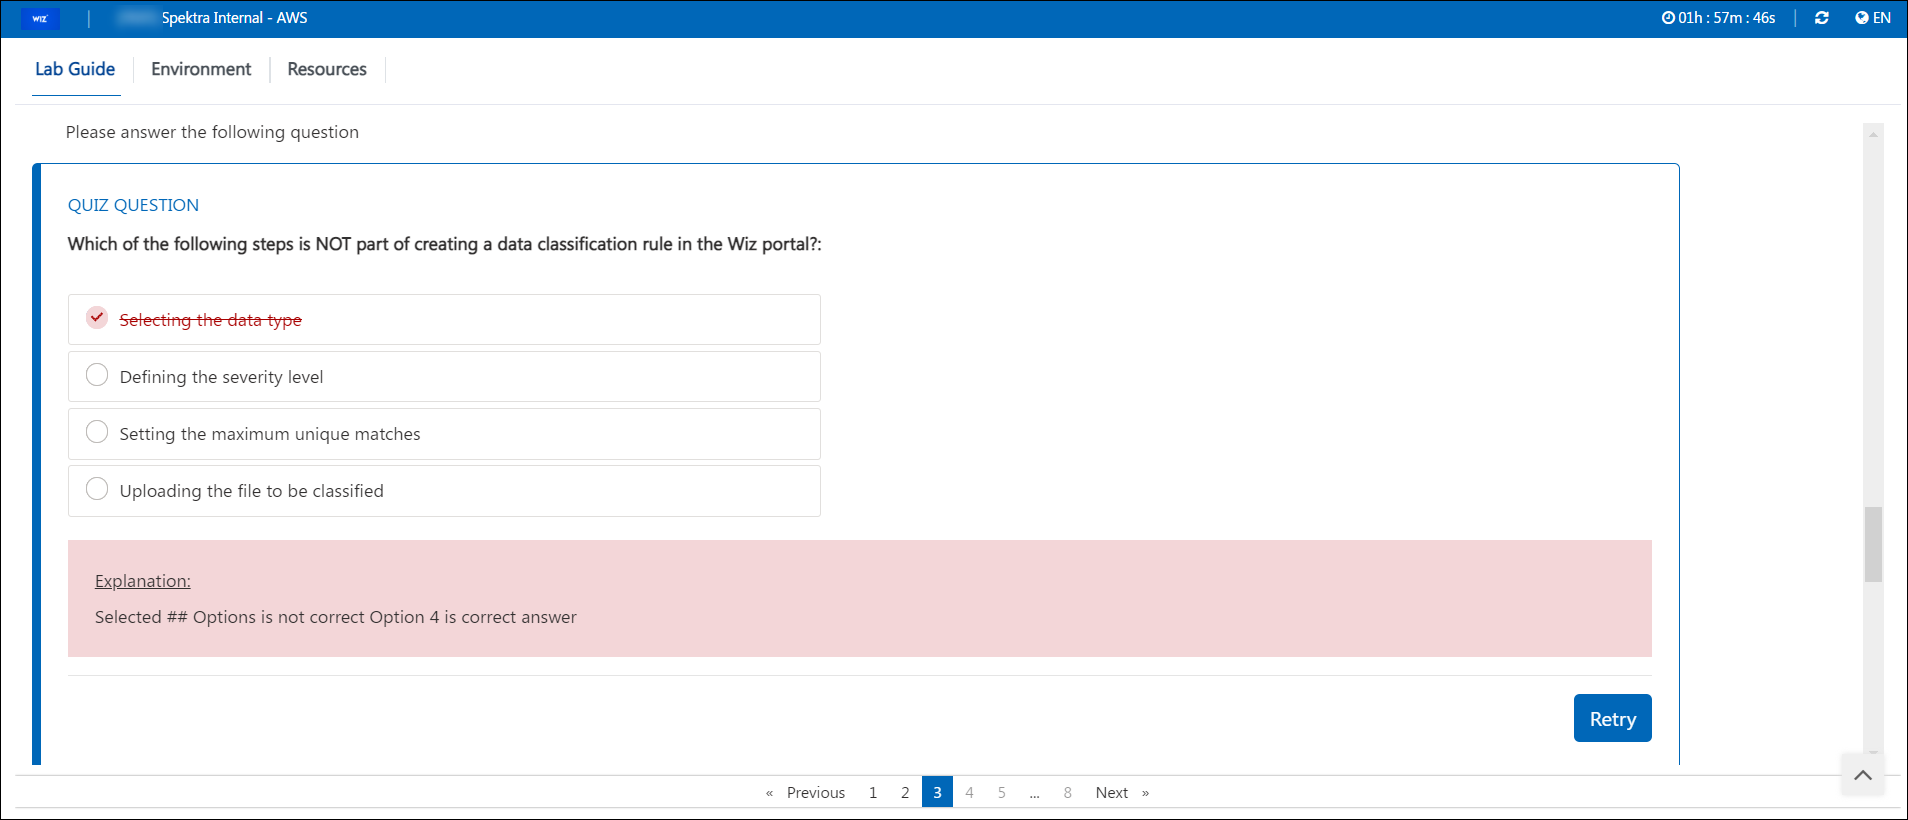
In case the user submits a wrong answer, a Retry button will be visible as below:
Retry option is available for a defined no of retries only which is configured in the lab guide.
Authoring Inline Lab Guide Questions:
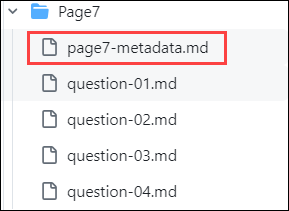
Below are the files that need to be created while authoring lab guide questions:
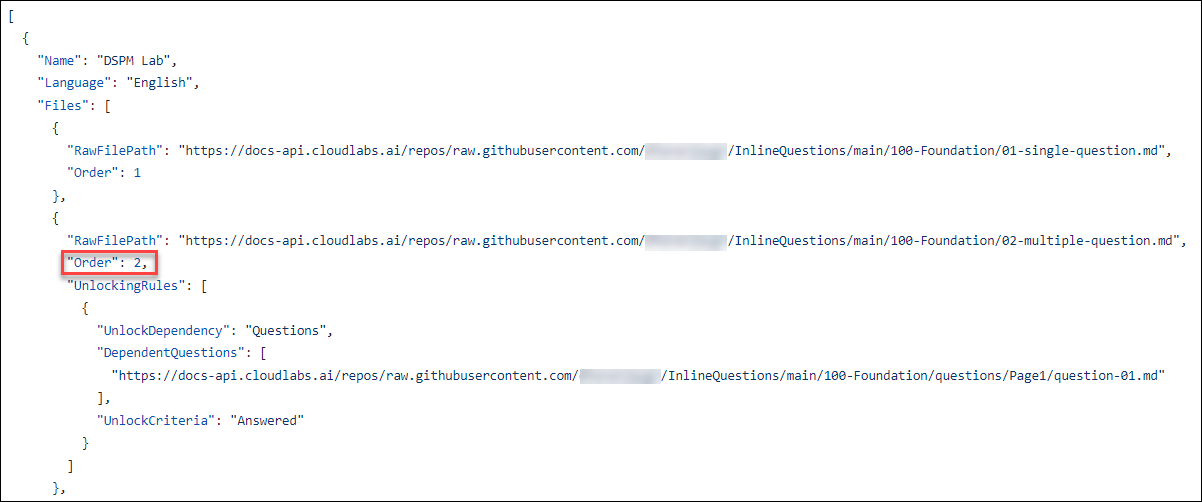
- Master Doc File -
This will be the parent file (JSON file) which is configured in the OnDemand Lab.
Master doc file contains the list of Lab guide page files and page unlocking rules.
[
  {
    "Name": "How to Design a Lab Guide",
    "Language": "English",
    "Files": [
      {
        "RawFilePath": "https://docs-api-qa.cloudlabs.ai/repos/raw.githubusercontent.com/CloudLabs-AI/Practice-Test-Sample/main/qa-lab-guide/lab/01-single-question.md",
        "Order": 1
      },
      {
        "RawFilePath": "https://docs-api-qa.cloudlabs.ai/repos/raw.githubusercontent.com/CloudLabs-AI/Practice-Test-Sample/main/qa-lab-guide/lab/02-multiple-question.md",
        "Order": 2,
        "UnlockingRules": [
          {
            "UnlockDependency": "Questions",
            "DependentQuestions": [ "./questions/Page1/question-01.md", "./questions/Page1/question-02.md" ],
            "UnlockCriteria": "AnsweredCorrectly"
          }
        ]
      }
    ]
  }
]
- Lab Guide Page File –
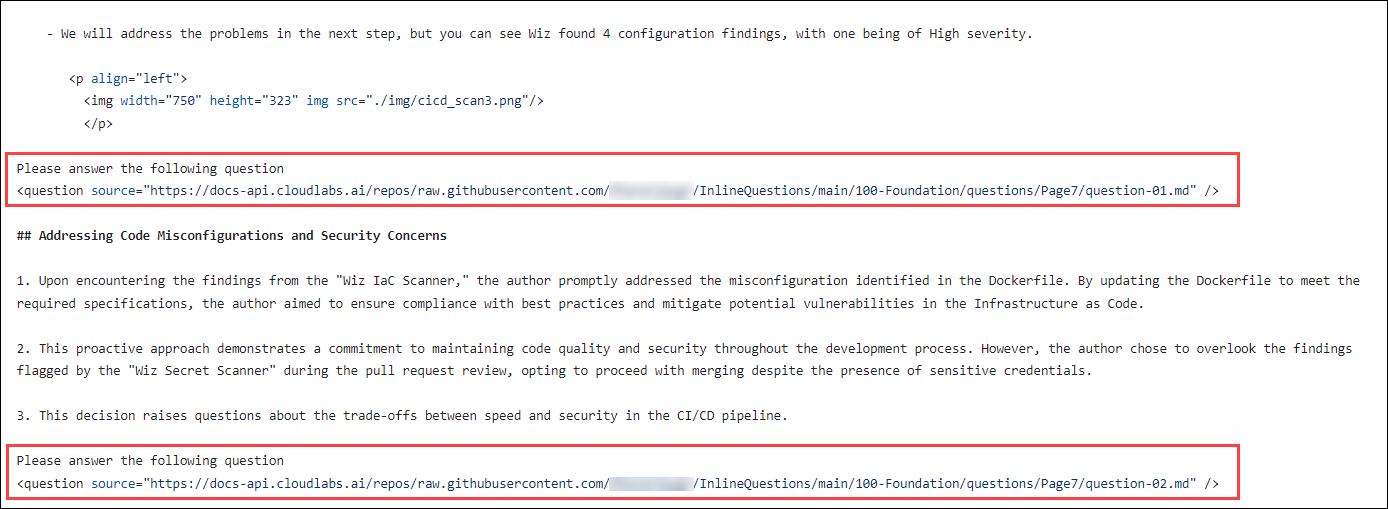
The lab guide page file (markdown file) will contain the content to render on the lab guide page, along with inline question file tags.
To render inline questions in the lab guide page below tags can be used:
For individual questions-
For grouped questions- <grouped-questions source=”{relative question group file path}" /> Please answer the following question
<question source="../questions/Page7/question-01.md" />
Please answer the following question
<question source="../questions/Page7/question-02.md" />
Please answer the following question
<question source="../questions/Page7/question-03.md" />
Please answer the following question
<question source="../questions/Page7/question-04.md" />
Please provide feedback about the lab guide
<grouped-questions source="../questions/Page7/page-7-metadata.md" />
- Question Metadata File –
The question metadata file (markdown file) will contain the question-specific information required to render the question in the front end. It will also contain the correct answer and score for validation purposes and the number of allowed retries to submit the answer.
## Metadata
Question Type : Single Choice
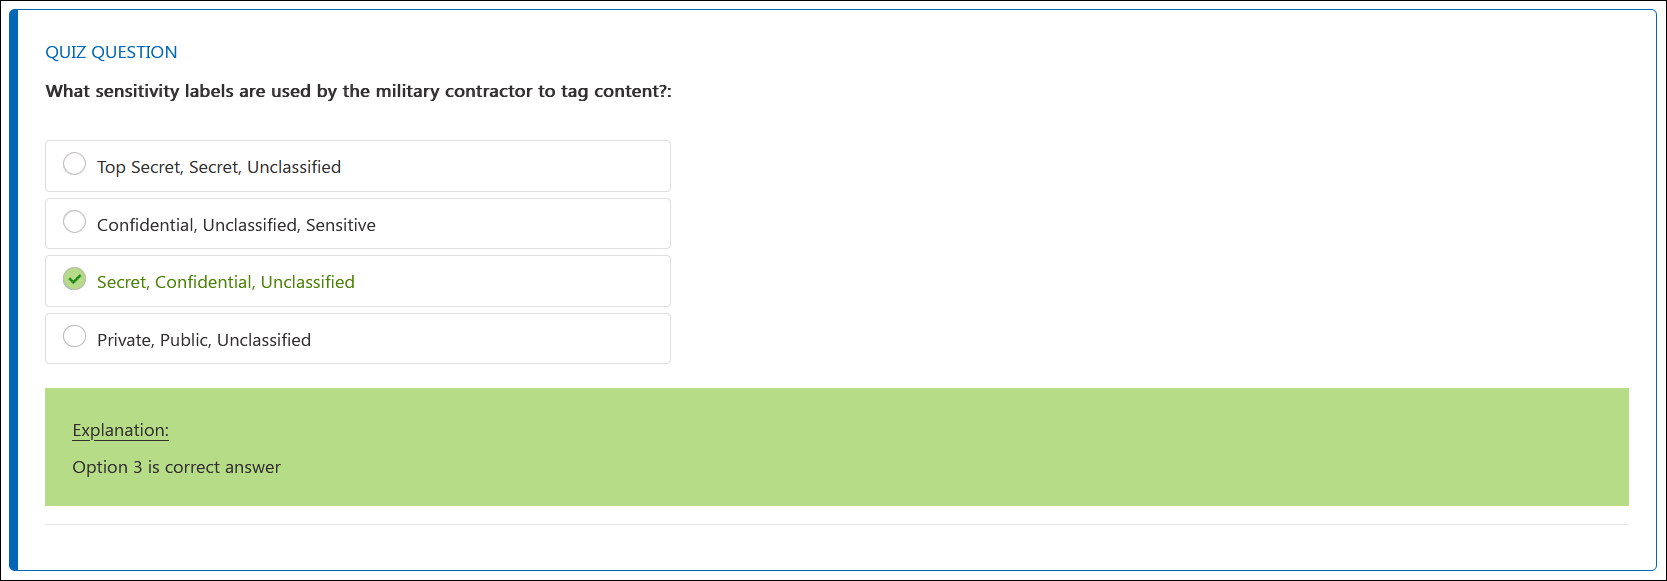
## Question
What sensitivity labels are used by the military contractor to tag content?:
## Options
Option 1: Top Secret, Secret, Unclassified
Option 2: Confidential, Unclassified, Sensitive
Option 3: Secret, Confidential, Unclassified
Option 4: Private, Public, Unclassified
## Answers
Option 3 : 1
## Correct Answer Feedback
Option 3 is the correct answer
## Incorrect Answer Feedback
Selected ## Option is not correct Option 3 is the correct answer
## Tags
tag1
tag2
## Number of Retries
2## Metadata
Question Type : Multiple Choice
Max Answers : 2
## Question
Which severity level is assigned to the "Confidential Classification Rule" in the Wiz portal?:
## Options
Option 1: Low
Option 2: Medium
Option 3: High
Option 4: Critical
## Answers
Option 2 : 1
Option 3 : 1
## Correct Answer Feedback
Option 2, 3 is correct answer
## Incorrect Answer Feedback
Selected ## Options are not correct, Options 2, 3 is correct answer
## Tags
tag1
tag2
## Number of Retries
5Syntax of question metadata file:
Metadata -> Question Type:
It should be one of the below values-
Single Choice (for single choice questions) OR Multiple Choice (for multiple choice questions)
Metadata -> Max Answers:
This field is used in case of multiple-choice questions to control the maximum number of options that can be selected by lab use on the front end. The value must be an integer having 2 as the minimum value OR the number of available options as the maximum value.
Question:
Content placed here will be visible as a question in the lab guide. A maximum of 4000 characters are allowed.
Options:
Content placed here (after :) will be visible as options in the lab guide.
Content placed before the colon (:) is not visible to the lab user (It is used as an identifier for the given answers).
Lab users can select one of more options and submit the answer.
Answers:
Content placed here will be used by CloudLabs to validate user answers and calculate user scores.
In the case of a Single-Choice question, there can be only a single answer.
In the case of Multiple-choice questions, there can be multiple answers (one answer in each row).
The Value placed before the colon (:) is the identifier of the correct answer out of the given option.
The Value placed after the colon (:) is the score.
Correct answer feedback:
Upon submission of the correct answer, this text will be shown to the lab user in the front end.
Incorrect answer feedback:
When the user submits an incorrect answer, this text will be shown to the lab user in the front end.
Tags:
This field is used as a tag and currently is not displayed anywhere. You can place any value here.
Number of Retries:
An integer value is used to control the number of allowed retries to submit the answer.
To allow unlimited retries, set it to zero ‘0’. This field is not required in the case of grouped questions.
- Question Group File –
The question group file (markdown file) will contain the name of the question files that are part of the grouped question and the number of allowed retries to submit the answer.
Syntax of question group file:
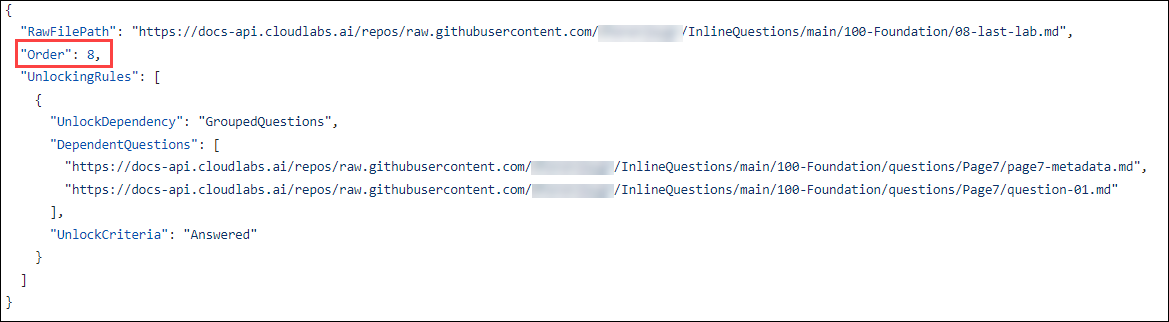
Page Unlocking Rules:
Below page unlocking rules can be applied in the master doc:
Answered - Ensures that the given list of questions has been answered by the user before proceeding further.
"UnlockingRules": [
          {
            "UnlockDependency": "GroupedQuestions",
            "DependentQuestions": [ "./questions/Page7/page-7-metadata.md", "./questions/Page7/question-02.md" ],
            "UnlockCriteria": "Answered"
          }
        ]
Answered Correctly - Ensures that the given list of questions has been answered correctly before proceeding further.
"UnlockingRules": [
          {
            "UnlockDependency": "GroupedQuestions",
            "DependentQuestions": [ "./questions/Page5/question-05.md" ],
            "UnlockCriteria": "AnsweredCorrectly"
          }
        ]
Score - Ensures that for the given list of questions, the user has received the required score before proceeding further.
"UnlockingRules": [
          {
            "UnlockDependency": "GroupedQuestions",
            "DependentQuestions": [ "./questions/Page4/page-4-metadata.md" ],
            "UnlockCriteria": "Score",
            "UnlockPercentageThreshold": 50
          }
        ]
Example Scenarios:
Scenario 01:
Single answer questions:
Note: To ensure the questions are properly synchronized with the lab guide, create a dedicated folder for questions. This will make the questions well-organized and easily accessible.
Here is the question Markdown used in the Single Answer Question format:
## Metadata
Question Type : Single Choice

## Question
What sensitivity labels are used by the military contractor to tag content?:

## Options
Option 1: Top Secret, Secret, Unclassified

Option 2: Confidential, Unclassified, Sensitive

Option 3: Secret, Confidential, Unclassified

Option 4: Private, Public, Unclassified

## Answers
Option 3 : 1

## Correct Answer Feedback
Option 3 is the correct answer

## Incorrect Answer Feedback
Selected ## Options is not correct Option 3 is the correct answer

## Tags
tag1
tag2

## Number of Retries
2
Now, include the question Markdown file on the first page of the lab guide.
Here is the inline question file tag used on the first page of the lab guide.
Note: We can place question file tags wherever they're needed on the page, ensuring proper syntax is followed. Additionally, there's flexibility to include any number of questions.
Note: We can include the full raw question Markdown file in both the lab guide and the master document.
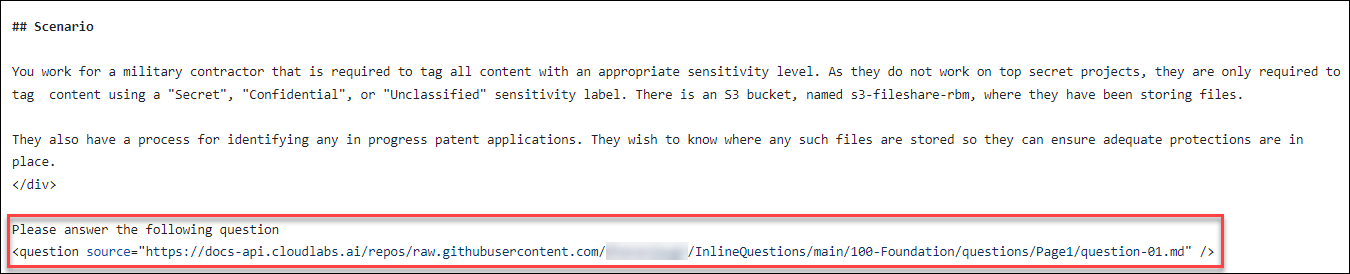
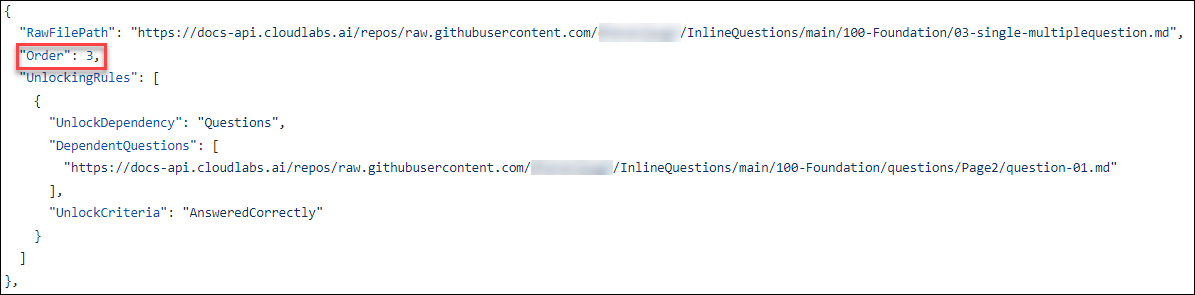
To incorporate the unlocking rules for the first page, the question Markdown file should be included in the second order of the raw file path within the Master Doc file.
Here are the unlocking rules for this question: It is marked as Answered. Therefore, even if the answer is incorrect, it should still allow progression to the next page. However, without attempting to answer it, progression to the next page will be blocked.
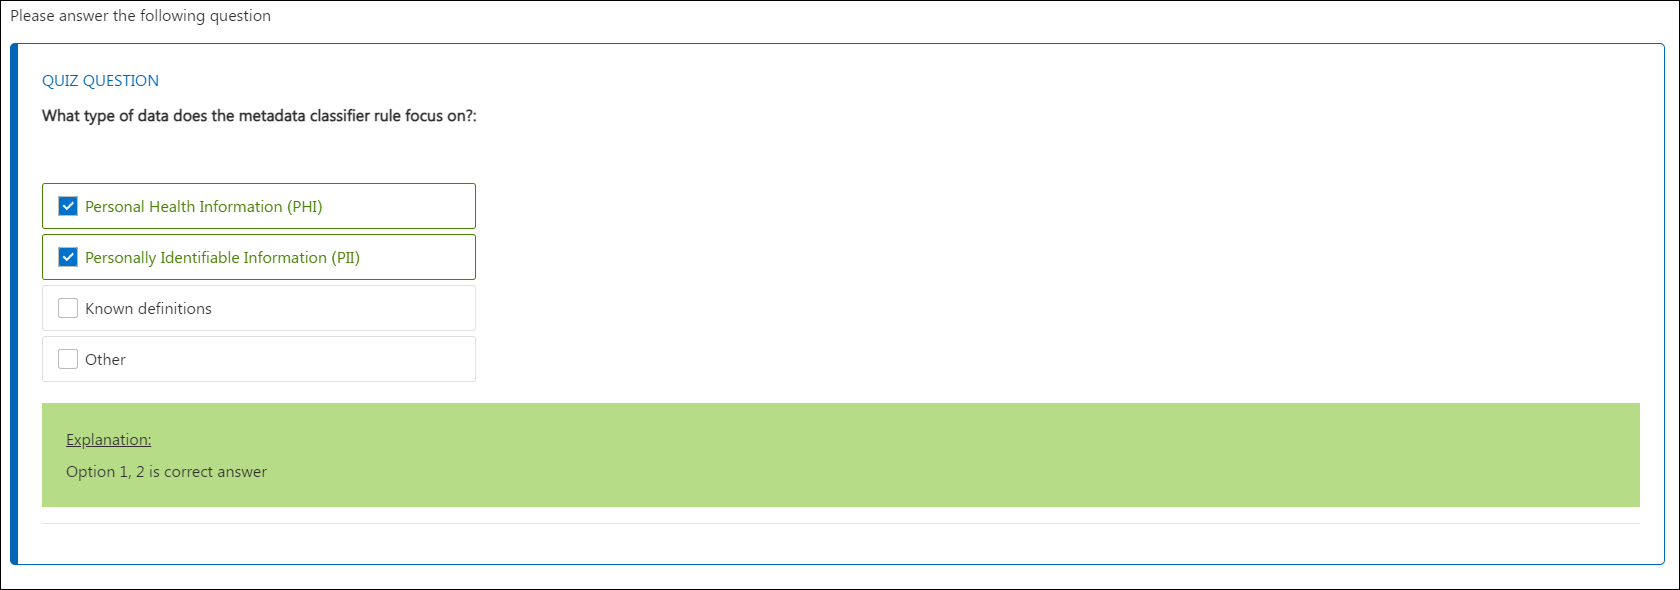
Attendees will be able to see inline questions like below:
Attendees can proceed to the next page by either answering the question correctly or incorrectly, based on the unlocking rules.
Scenario 02:
Multiple answers questions:
Here is the question Markdown used in the Multiple Answers Question format:
## Metadata
Question Type : Multiple Choice

Max Answers : 2


## Question
Which severity level is assigned to the "Confidential Classification Rule" in the Wiz portal?:

## Options
Option 1: Low

Option 2: Medium

Option 3: High

Option 4: Critical

## Answers
Option 2 : 1
Option 3 : 1

## Correct Answer Feedback
Option 2, 3 is the correct answer

## Incorrect Answer Feedback
Selected ## Options are not correct, Option 2, 3 is the correct answer

## Tags
tag1
tag2

## Number of Retries
5
Now, include the question Markdown files on the second page of the lab guide.
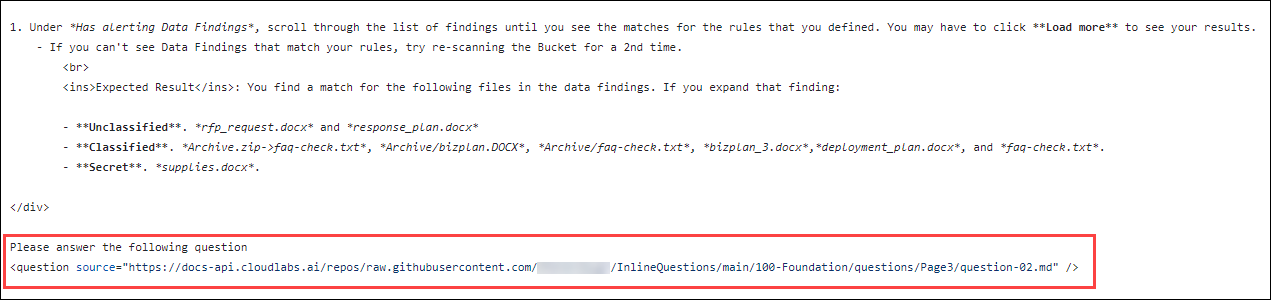
Here is the inline question file tag used on the second page of the lab guide.
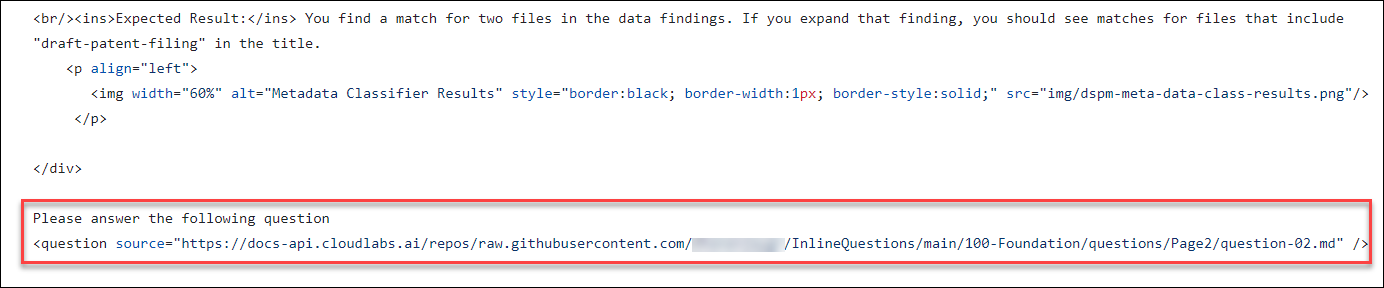
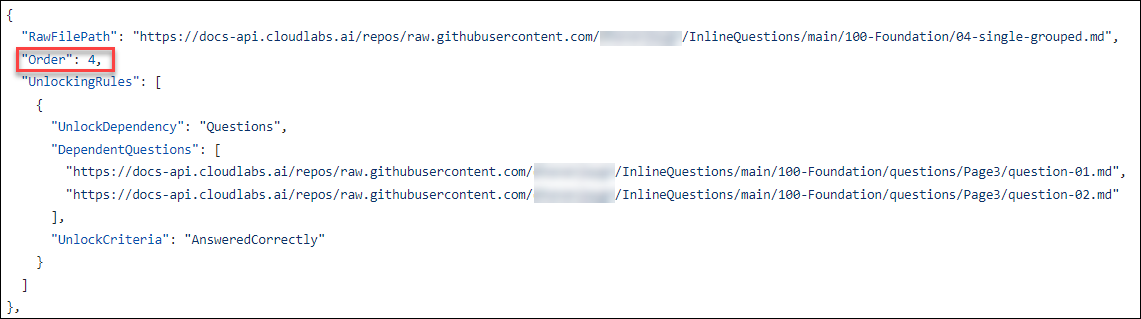
To include the unlocking rules for the second page, the question Markdown file should be included in the third order of the raw file path within the Master Doc file.
Here are the unlocking rules for this question: It is marked as AnsweredCorrectly. Therefore, the answer should be correct to proceed to the next page.
Attendees will be able to see inline questions like below:
Attendees can proceed to the next page by answering the question correctly, based on the unlocking rules.
Scenario 03:
Single and Multiple answers questions:
Here is the question Markdown used in the Single and Multiple Answers Question format:
## Metadata
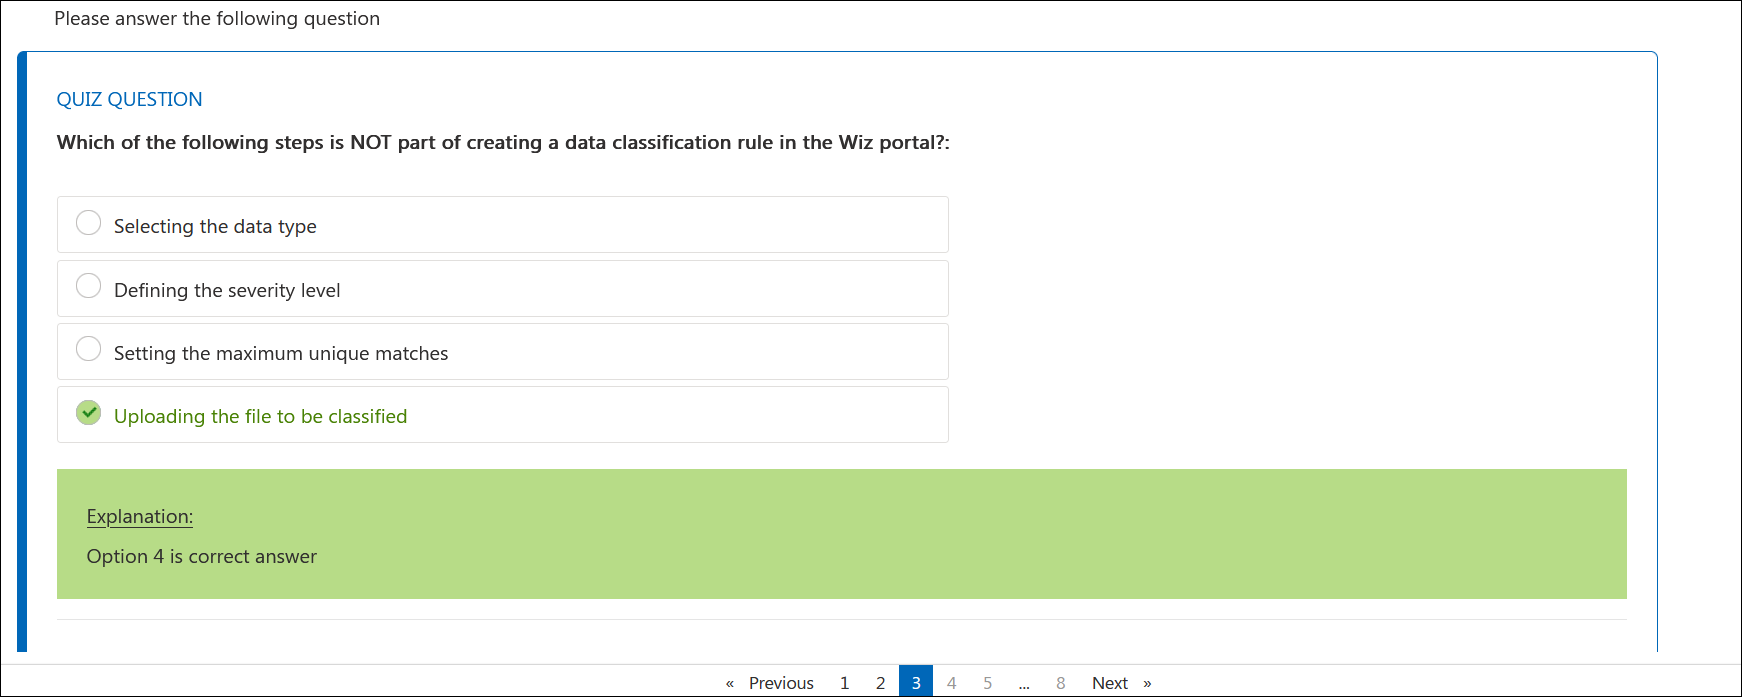
Question Type : Single Choice
## Question
Which of the following steps is NOT part of creating a data classification rule in the Wiz portal?:
## Options
Option 1: Selecting the data type
Option 2: Defining the severity level
Option 3: Setting the maximum unique matches
Option 4: Uploading the file to be classified
## Answers
Option 4 : 1
## Correct Answer Feedback
Option 4 is the correct answer
## Incorrect Answer Feedback
Selected ## Options are not correct Option 4 is the correct answer
## Tags
tag1
tag2
## Number of Retries
4## Metadata
Question Type : Multiple Choice
Max Answers : 3
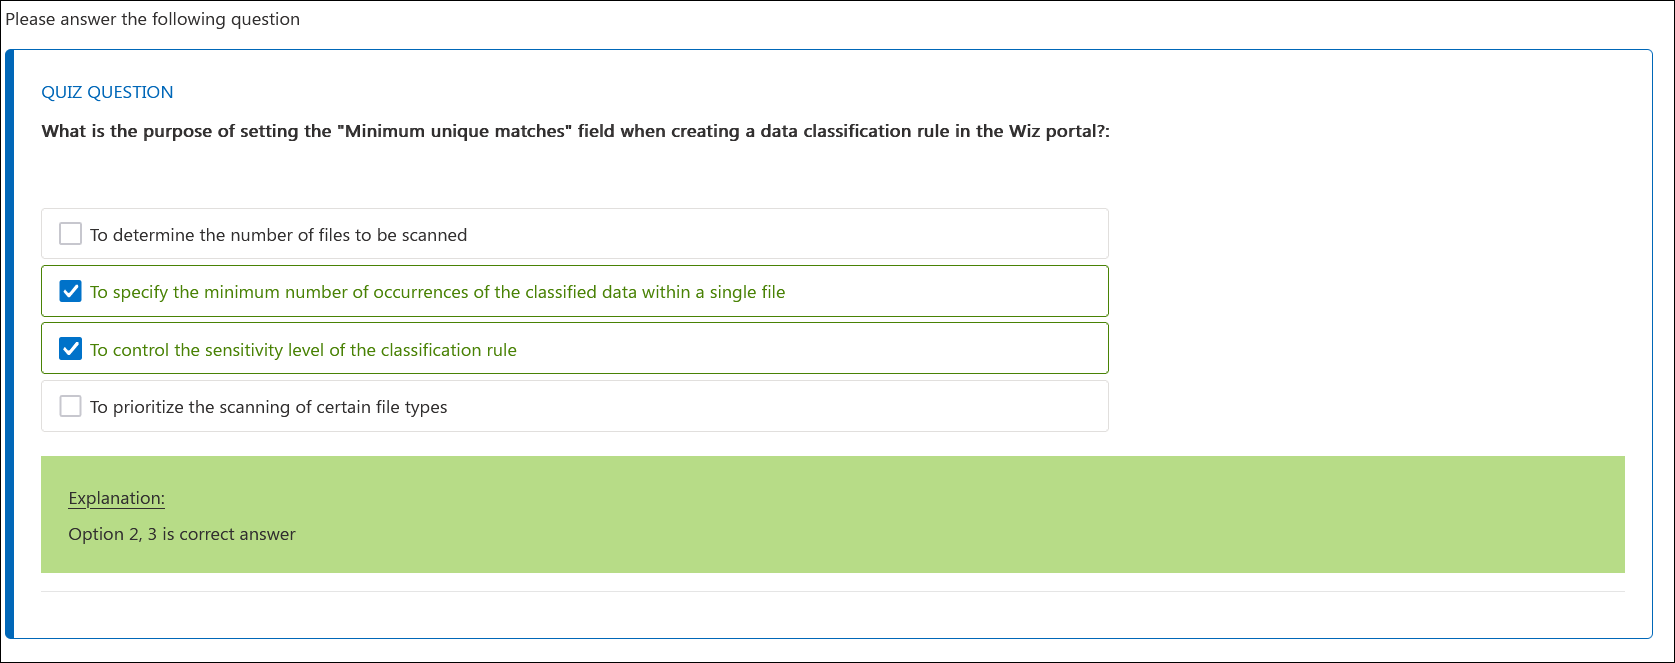
## Question
What is the purpose of setting the "Minimum unique matches" field when creating a data classification rule in the Wiz portal?:
## Options
Option 1: To determine the number of files to be scanned
Option 2: To specify the minimum number of occurrences of the classified data within a single file
Option 3: To control the sensitivity level of the classification rule
Option 4: To prioritize the scanning of certain file types
## Answers
Option 2 : 1
Option 3 : 1
## Correct Answer Feedback
Option 2, 3 is the correct answer
## Incorrect Answer Feedback
Selected ## Options is not correct Option 2, 3 is the correct answer
## Tags
tag1
tag2
## Number of Retries
4Now, include the question Markdown file on the Third page of the lab guide.
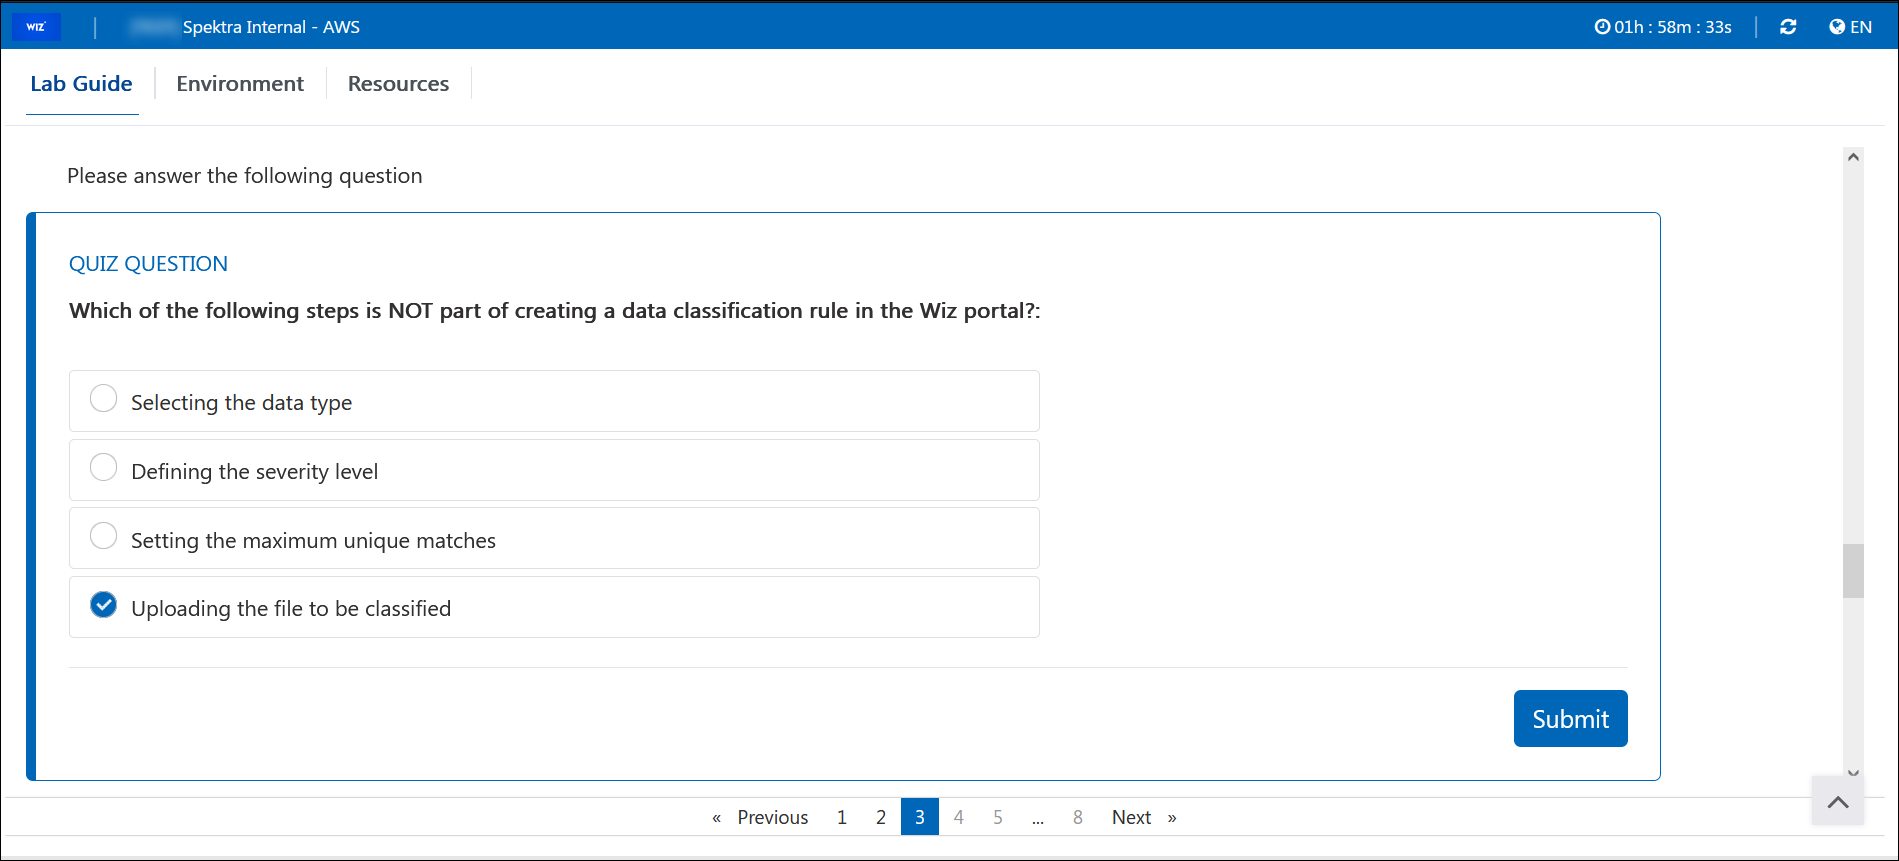
Here are the inline questions file tags used on the Third page of the lab guide.

To include the unlocking rules for the Third page, the question Markdown file should be included in the fourth order of the raw file path within the Master Doc file.
Here are the unlocking rules for this question: It is marked as AnsweredCorrectly. Therefore, the answer should be correct to proceed to the next page.
Attendees will be able to see inline questions like below:
Attendees can proceed to the next page by answering the question correctly, based on the unlocking rules.
Scenario 04:
Grouped single answer questions:
Here are the question Markdowns used in the Grouped single answer questions format:
## Metadata
Question Type : Single Choice

## Question
What is the purpose of setting the "Minimum unique matches" field when creating a data classification rule in the Wiz portal?:

## Options
Option 1: To determine the number of files to be scanned

Option 2: To specify the minimum number of occurrences of the classified data within a single file

Option 3: To control the sensitivity level of the classification rule

Option 4: To prioritize the scanning of certain file types

## Answers
Option 2 : 1

## Correct Answer Feedback
Option 2 is the correct answer

## Incorrect Answer Feedback
Selected ## Option is not correct, Option 2 is the correct answer

## Tags
tag1
tag2

## Number of Retries
5
## Metadata
Question Type : Single Choice
## Question
Which of the following steps is NOT part of creating a data classification rule in the Wiz portal?:
## Options
Option 1: Selecting the data type
Option 2: Defining the severity level
Option 3: Setting the maximum unique matches
Option 4: Uploading the file to be classified
## Answers
Option 4 : 1
## Correct Answer Feedback
Option 4 is the correct answer
## Incorrect Answer Feedback
Selected ## Option is not correct, Option 4 is the correct answer
## Tags
tag1
tag2
## Number of Retries
5Now, include the question Markdown file on the fourth page of the lab guide.
Here is the inline question file tag used on the fourth page of the lab guide.
Note: As these are grouped questions, we need to have a grouped Markdown file (metadata file) in the same group where the actual questions related to this metadata are located.


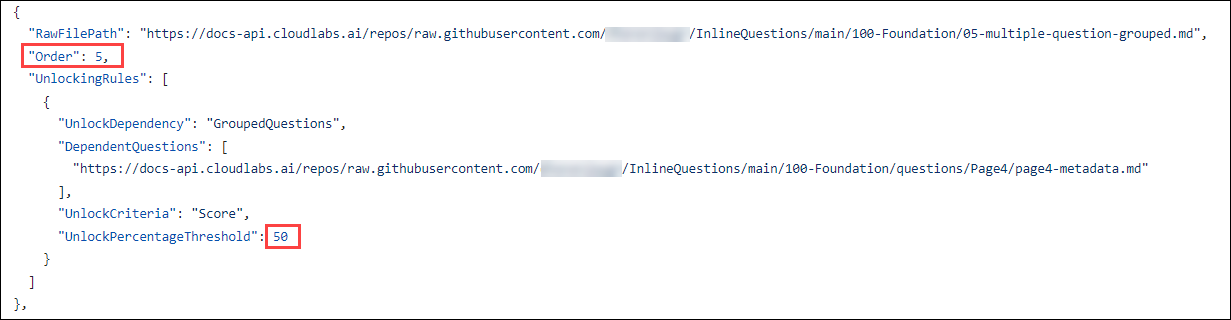
To include the unlocking rules for the fourth page, the question Markdown file should be included in the fifth order of the raw file path within the Master Doc file.
Here are the unlocking rules for this question: It is marked as Score. Therefore, the answer should be based on the score, and one should meet the threshold. Since there are two questions, the combined score should meet the 50% threshold to proceed to the next page.
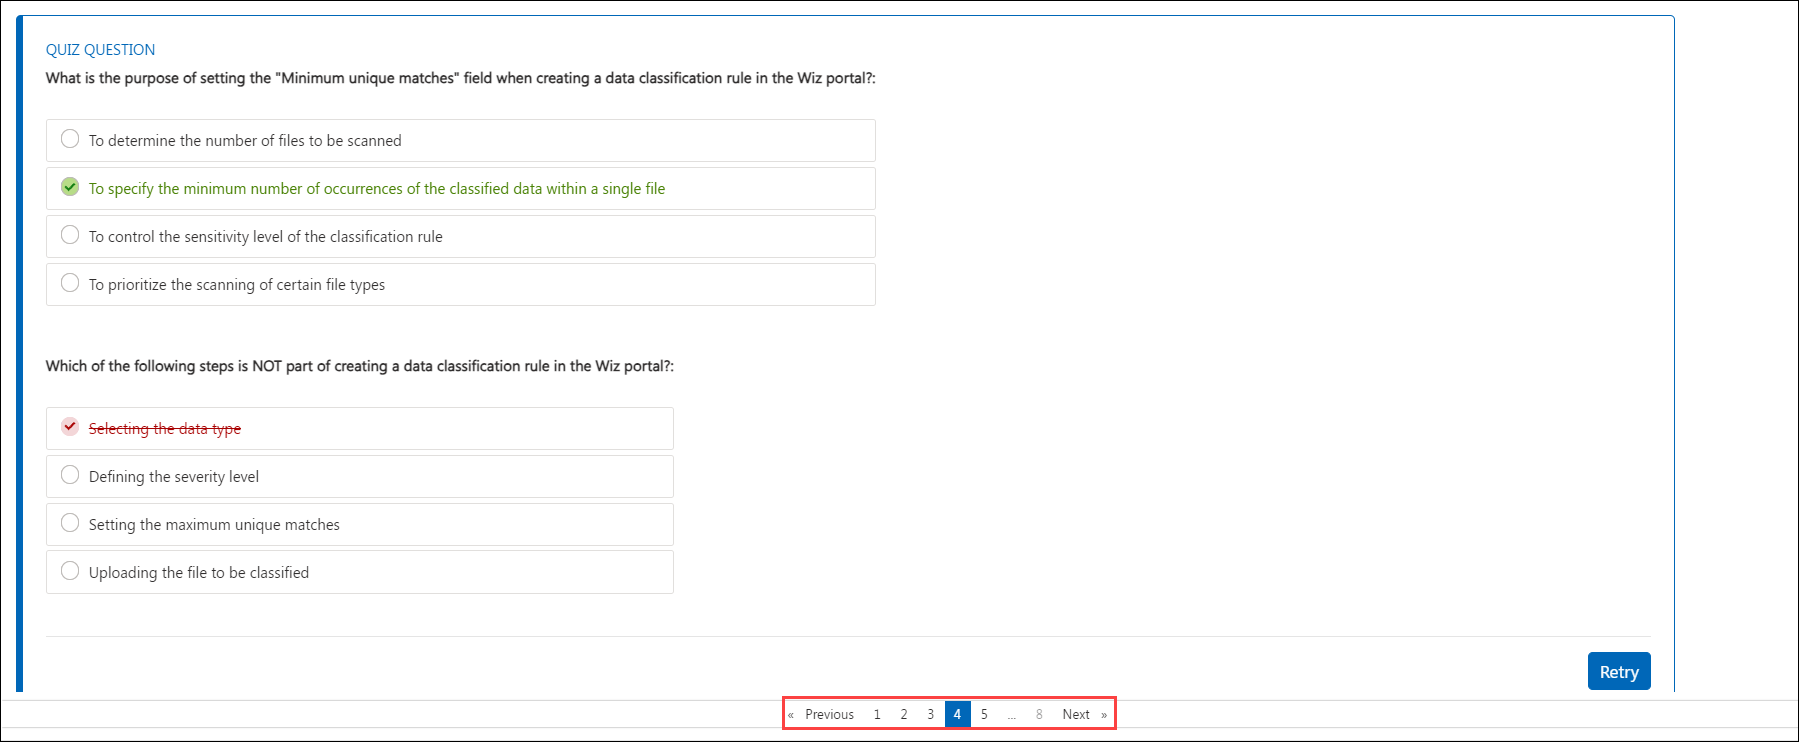
Attendees will be able to see inline questions like below:
The score will not be displayed as of now, but based on two questions and a 50% threshold, if at least one is answered correctly, it will allow progression to the next page.
Scenario 05:
Grouped Multiple answers questions:
Here are the question Markdowns used for the Grouped Multiple Answers Questions format:
## Metadata
Question Type : Multiple Choice
Max Answers : 2

## Question
In the context of GitHub, what does the term "fork" mean?:

## Options
Option 1: To create a duplicate of a repository under your GitHub account

Option 2: To merge changes from one branch into another

Option 3: To create a new branch from an existing one

Option 4: To revert changes made in a commit

## Answers
Option 1 : 1
Option 3 : 1

## Correct Answer Feedback
Options 1, 3 are the correct answer

## Incorrect Answer Feedback
Selected ## Options are not correct, Options 1, 3 are the correct answer

## Tags
tag1
tag2

## Number of Retries
5
## Metadata
Question Type : Multiple Choice
Max Answers : 2
## Question
What is the purpose of a pull request in GitHub?:
## Options
Option 1: To request changes to a repository
Option 2: To review changes made in a branch before merging them into another branch
Option 3: To undo changes made in a commit
Option 4: To create a new branch from an existing one
## Answers
Option 1 : 1
Option 2 : 1
## Correct Answer Feedback
Option 1, 2 is the correct answer
## Incorrect Answer Feedback
Selected ## Options are not correct, Options 1, 2 are the correct answer
## Tags
tag1
tag2
## Number of Retries
5Now, include the question Markdown file on the fifth page of the lab guide.
Here is the inline question file tag used on the fifth page of the lab guide.
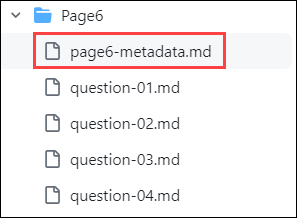
Note: As these are grouped questions, we need to have a grouped Markdown file (metadata file) in the same group where the actual questions related to this metadata are located.


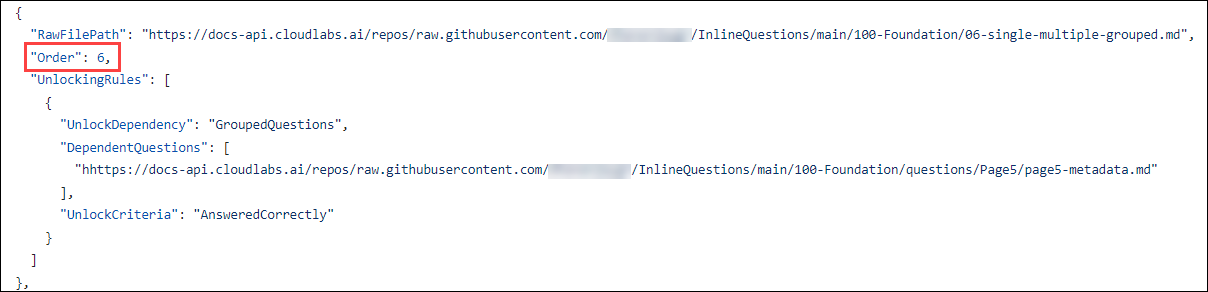
To include the unlocking rules for the fifth page, the question Markdown file should be included in the sixth order of the raw file path within the Master Doc file.
Here are the unlocking rules for this question: It is marked as AnsweredCorrectly. Therefore, the answer should be correct to proceed to the next page.
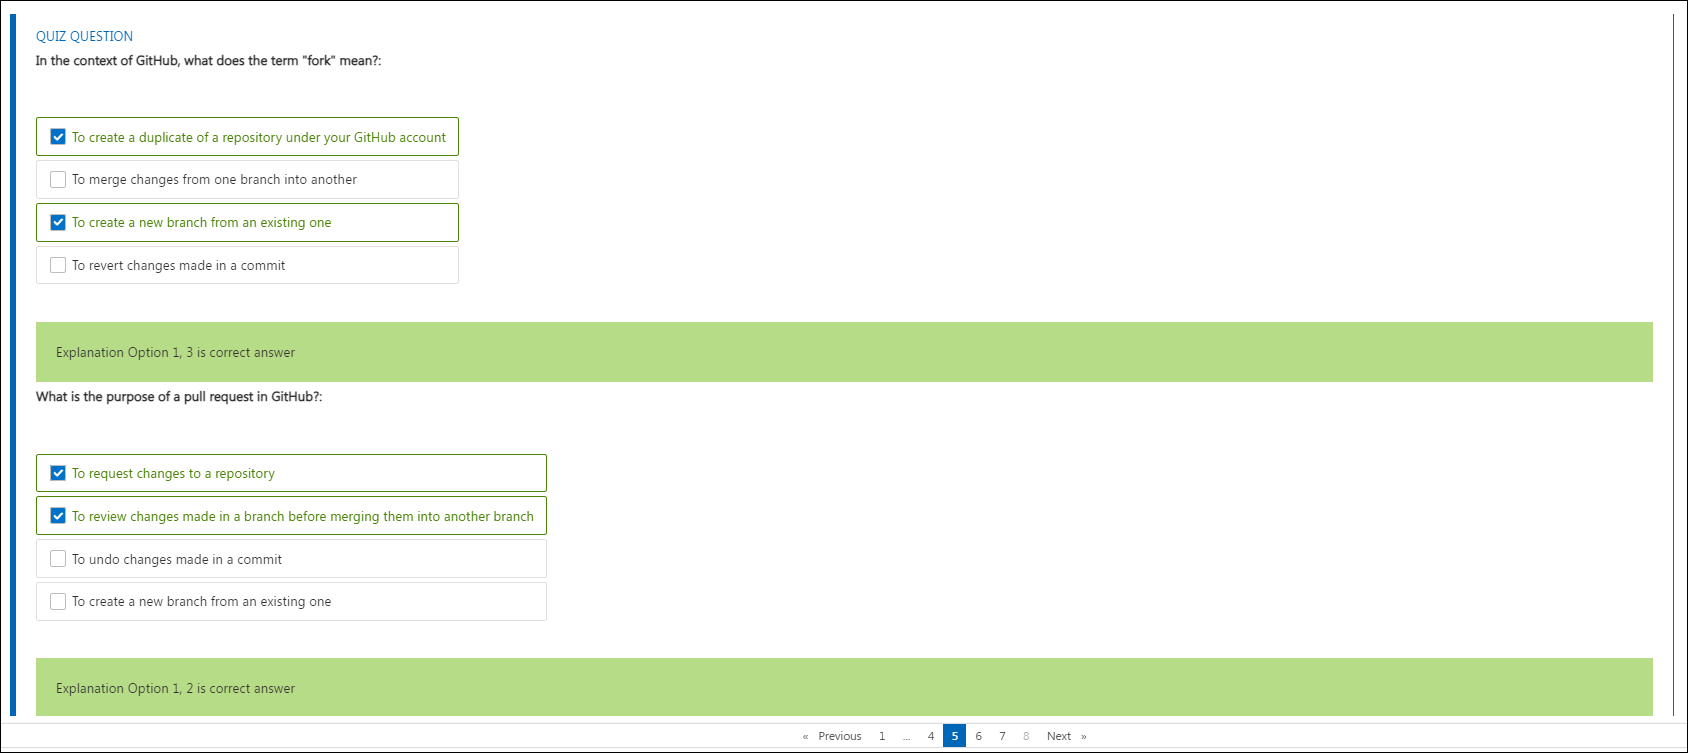
Attendees will be able to see inline questions like below:
Attendees can proceed to the next page by answering the question correctly, based on the unlocking rules.
Scenario 06:
Grouped Single and Multiple answers questions:
Here are the question Markdowns used for the Grouped Single and Multiple Answers Questions format:
## Metadata
Question Type : Single Choice

## Question
What is the purpose of creating a new branch when committing changes to a GitHub repository?:

## Options
Option 1: To separate different versions of the code

Option 2: To merge changes from one branch into another

Option 3: To revert changes made in a commit

Option 4: To create a duplicate of a repository under your GitHub account

## Answers
Option 2 : 1

## Correct Answer Feedback
Option 2 is the correct answer

## Incorrect Answer Feedback
Selected ## Options is not correct Option 2 is the correct answer

## Tags
tag1
tag2

## Number of Retries
5
## Metadata
Question Type : Single Choice
## Question
What does the "Wiz IaC Scanner" check for during the CI/CD process?:
## Options
Option 1: Code syntax errors
Option 2: Infrastructure as Code misconfigurations
Option 3: Vulnerabilities in the code
Option 4: Secret keys stored in the code
## Answers
Option 2 : 1
## Correct Answer Feedback
Option 2 is the correct answer
## Incorrect Answer Feedback
Selected ## Options is not correct Option 2 is the correct answer
## Tags
tag1
tag2
## Number of Retries
5## Metadata
Question Type : Multiple Choice
Max Answers : 2
## Question
What action is recommended when the "Wiz Secret Scanner" fails during a pull request check?:
## Options
Option 1: Ignore the findings and proceed with merging
Option 2: Address the identified secrets in the code
Option 3: Submit the pull request without addressing the issues
Option 4: Revert the changes made in the pull request
Option 5: Ignore the findings
## Answers
Option 2 : 1
Option 3 : 1
## Correct Answer Feedback
Option 2,3 is the correct answer
## Incorrect Answer Feedback
Selected ## Options is not correct Option 2,3 is the correct answer
## Tags
tag1
tag2
## Number of Retries
2## Metadata
Question Type : Multiple Choice
Max Answers : 2
## Question
Why is it important to address the issues found by the Wiz scanners during the CI/CD process?:
## Options
Option 1: To increase the number of commits in the repository
Option 2: To enhance the code quality and security
Option 3: To speed up the deployment process
Option 4: To create more branches in the repository
Option 5: To only increase the number of commits
## Answers
Option 2 : 1
Option 3 : 1
## Correct Answer Feedback
Option 2,3 is the correct answer
## Incorrect Answer Feedback
Selected ## Options is not correct Option 2,3 is the correct answer
## Tags
tag1
tag2
## Number of Retries
2Now, include the question Markdown file on the sixth page of the lab guide.
Here is the inline question file tag used on the sixth page of the lab guide.
Note: As these are grouped questions, we need to have a grouped Markdown file (metadata file) in the same group where the actual questions related to this metadata are located.


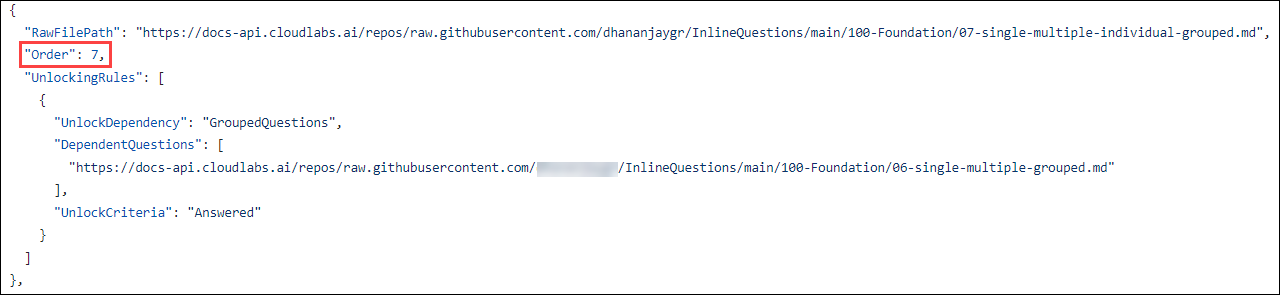
To include the unlocking rules for the sixth page, the question Markdown file should be included in the seventh order of the raw file path within the Master Doc file.
Here are the unlocking rules for this question: It is marked as Answered. Therefore, even if the answer is incorrect, it should still allow progression to the next page. However, without attempting to answer it, progression to the next page will be blocked.
Attendee will be able to see inline questions like below:
Attendees can proceed to the next page by either answering the question correctly or incorrectly, based on the unlocking rules.

Scenario 07:
Single and Multiple answers questions:
Grouped Single and Multiple answers questions:
Here are the question Markdowns used for Single and Multiple Answers question format, as well as for Grouped Single and Multiple Answers question format:
## Metadata
Question Type : Single Choice
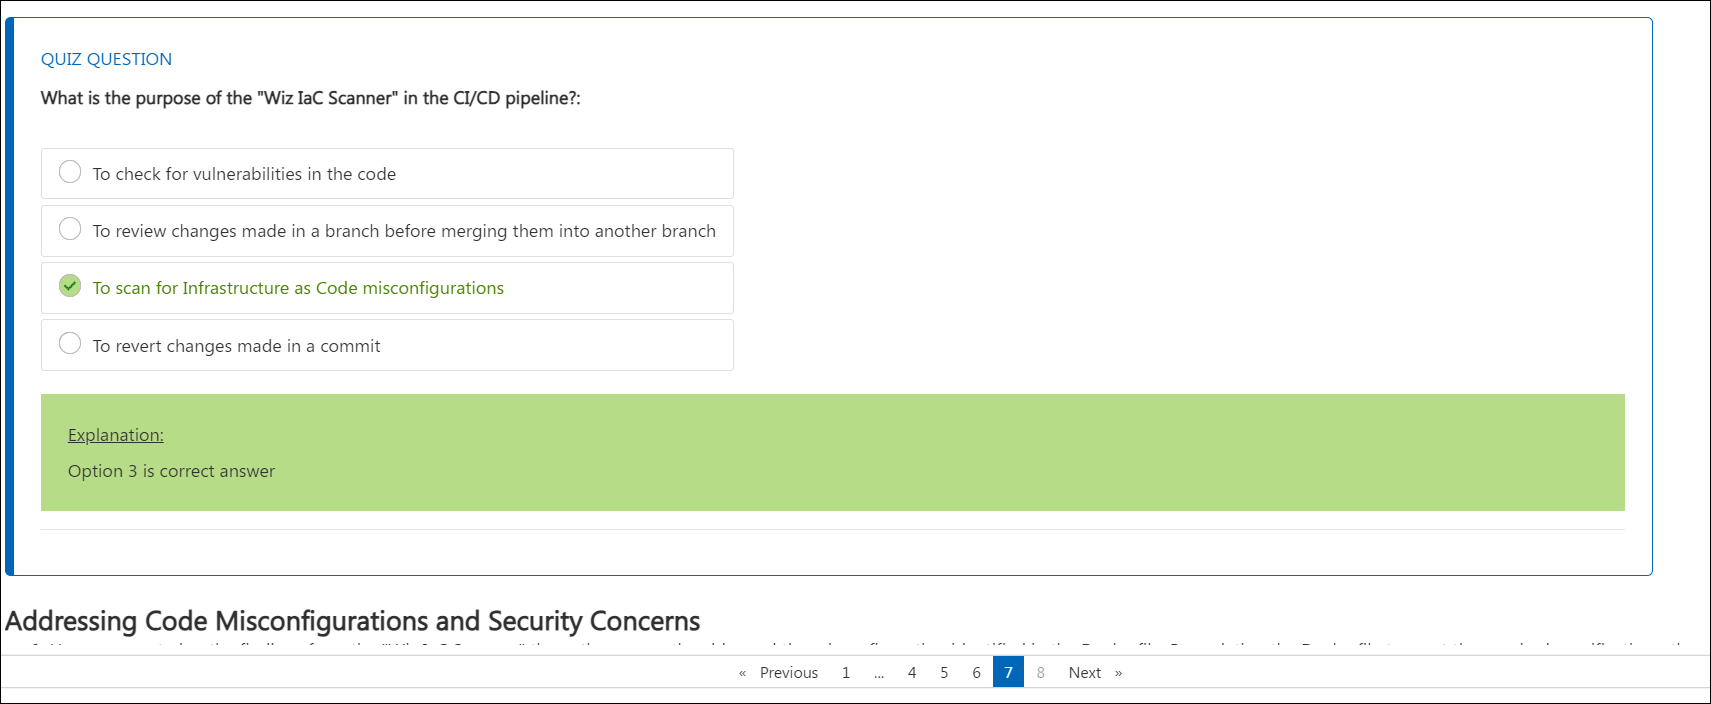
## Question
What is the purpose of the "Wiz IaC Scanner" in the CI/CD pipeline?:
## Options
Option 1: To check for vulnerabilities in the code
Option 2: To review changes made in a branch before merging them into another branch
Option 3: To scan for Infrastructure as Code misconfigurations
Option 4: To revert changes made in a commit
## Answers
Option 3 : 1
## Correct Answer Feedback
Option 3 is the correct answer
## Incorrect Answer Feedback
Selected ## Options is not correct Option 3 is the correct answer
## Tags
tag1
tag2
## Number of Retries
2## Metadata
Question Type : Multiple Choice
Max Answers : 2
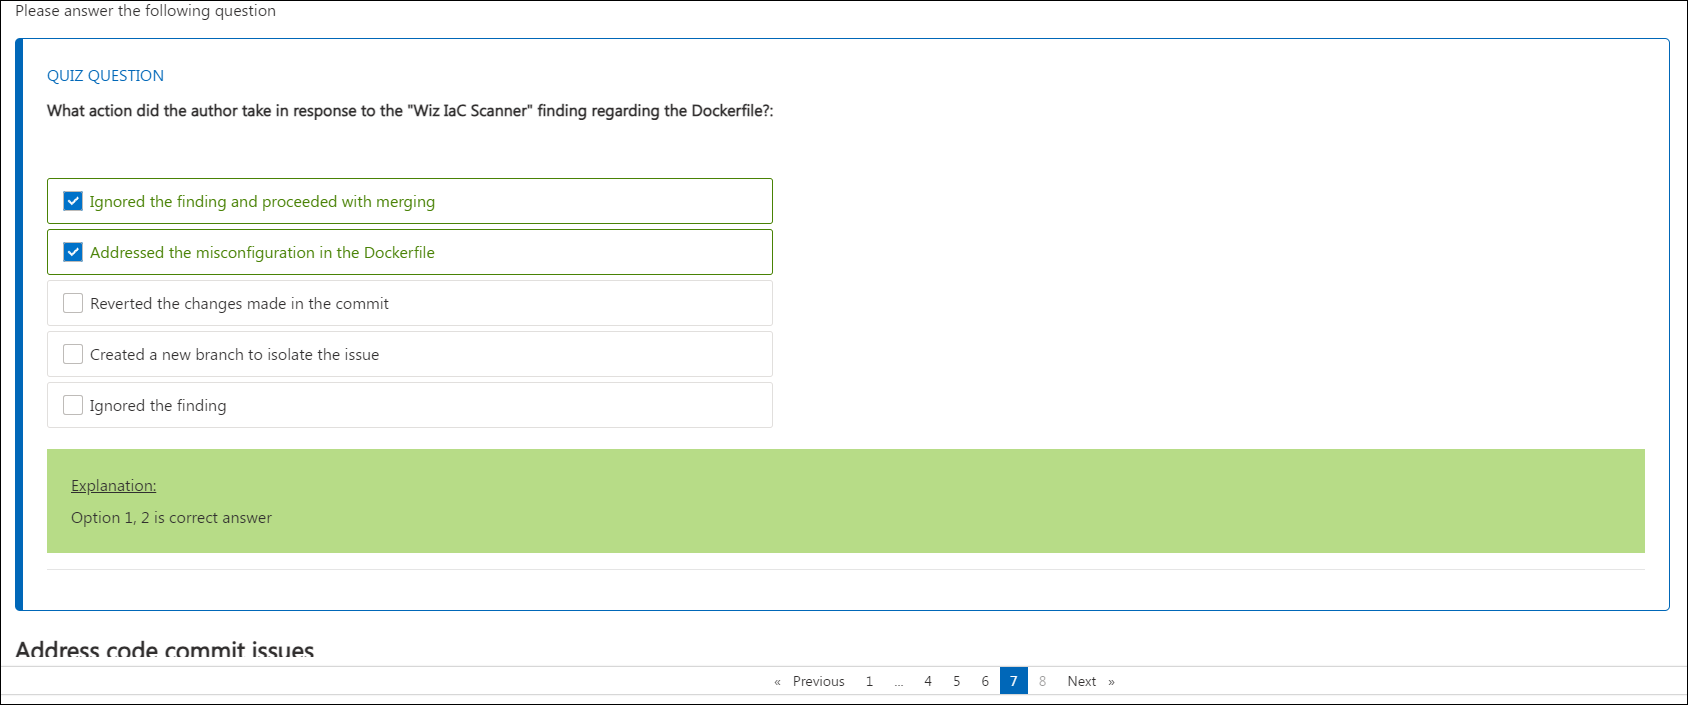
## Question
What action did the author take in response to the "Wiz IaC Scanner" finding regarding the Dockerfile?:
## Options
Option 1: Ignored the finding and proceeded with merging
Option 2: Addressed the misconfiguration in the Dockerfile
Option 3: Reverted the changes made in the commit
Option 4: Created a new branch to isolate the issue
Option 5: Ignored the finding
## Answers
Option 1 : 1
Option 2 : 1
## Correct Answer Feedback
Option 1, 2 is correct answer
## Incorrect Answer Feedback
Selected ## Options is not correct Option 1, 2 is correct answer
## Tags
tag1
tag2
## Number of Retries
5## Metadata
Question Type : Single Choice
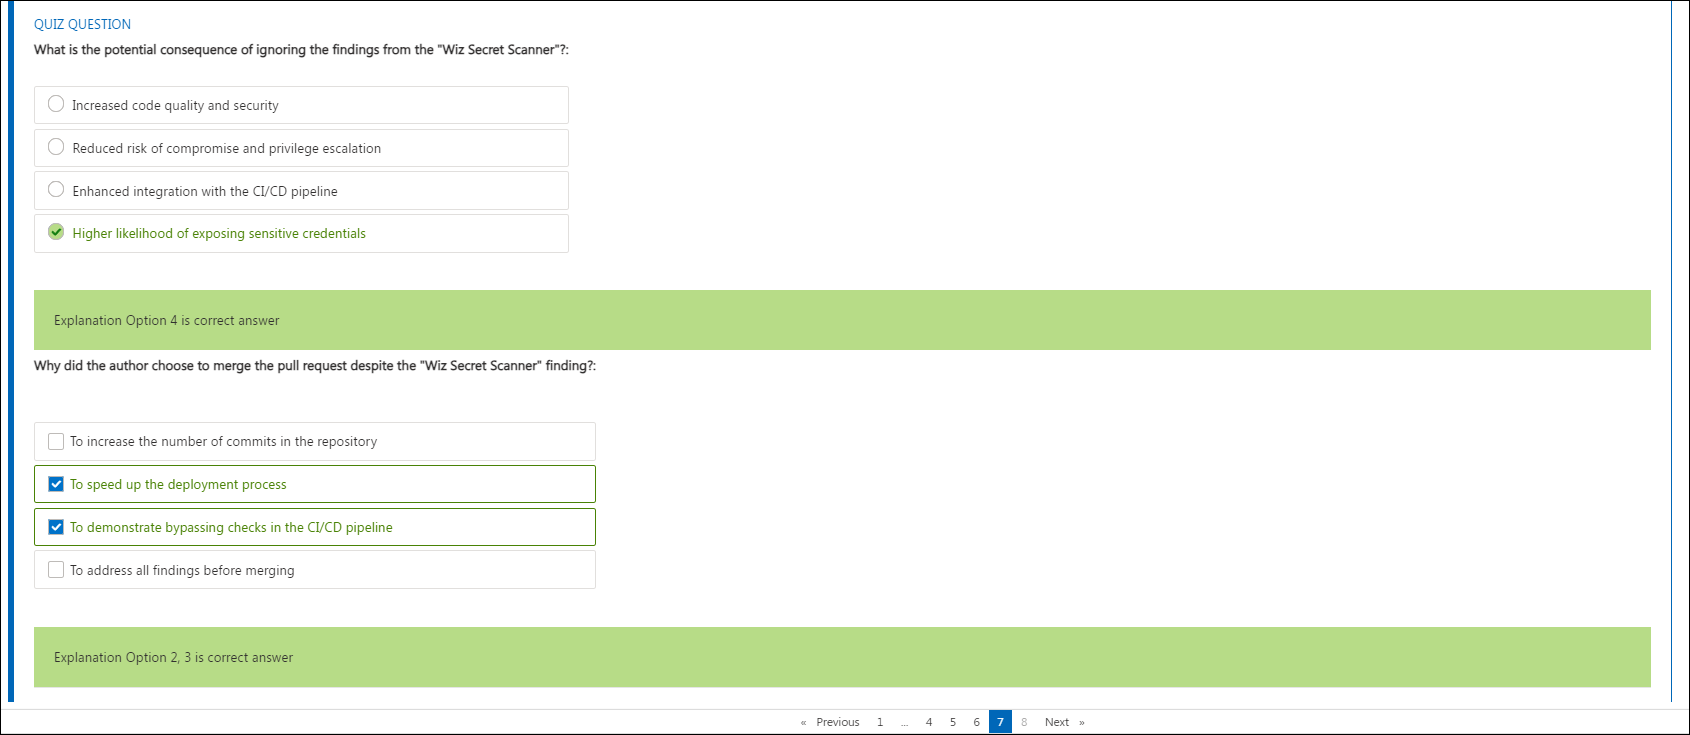
## Question
What is the potential consequence of ignoring the findings from the "Wiz Secret Scanner"?:
## Options
Option 1 : Increased code quality and security
Option 2 : Reduced risk of compromise and privilege escalation
Option 3 : Enhanced integration with the CI/CD pipeline
Option 4 : Higher likelihood of exposing sensitive credentials
## Answers
Option 4 : 1
## Correct Answer Feedback
Option 4 is correct answer
## Incorrect Answer Feedback
Selected ## Options is not correct Option 4 is correct answer
## Tags
tag1
tag2
## Number of Retries
5## Metadata
Question Type : Multiple Choice
Max Answers : 2
## Question
Why did the author choose to merge the pull request despite the "Wiz Secret Scanner" finding?:
## Options
Option 1: To increase the number of commits in the repository
Option 2: To speed up the deployment process
Option 3: To demonstrate bypassing checks in the CI/CD pipeline
Option 4: To address all findings before merging
## Answers
Option 2 : 1
Option 3 : 1
## Correct Answer Feedback
Option 2, 3 is correct answer
## Incorrect Answer Feedback
Selected ## Options is not correct Option 2, 3 is correct answer
## Tags
tag1
tag2
## Number of Retries
2Now, include the question Markdown file on the seventh page of the lab guide.
Here is the inline question file tag used on the seventh page of the lab guide.
Note: As these are grouped questions, we need to have a grouped Markdown file (metadata file) in the same group where the actual questions related to this metadata are located.


To include the unlocking rules for the seventh page, the question Markdown file should be included in the eighth order of the raw file path within the Master Doc file.
Here are the unlocking rules for this question: It is marked as Answered. Therefore, even if the answer is incorrect, it should still allow progression to the next page. However, without attempting to answer it, progression to the next page will be blocked.
Attendees will be able to see inline questions like below:
Attendees can proceed to the next page by either answering the question correctly or incorrectly, based on the unlocking rules.
18. Adding a ReadOnly Access Permission to the AWS Template (2nd July 2024)
Overview
CloudLabs Template is the base of the hands-on lab environment. You can do a variety of configurations under Templates, such as adding prerequisites, enabling ReadOnly Access Permission, custom policies for users, and much more.
Here we will learn more about how to add ReadOnly Access Permission using the CloudLabs Template.
Prerequisites
Before you begin adding ReadOnly Access permission, ensure you have the following prerequisites:
- Admin access to CloudLabs Admin Portal (If access is unavailable, kindly reach out to your point of contact or CloudLabs Support).
Add a ReadOnly Access Permission to the Template
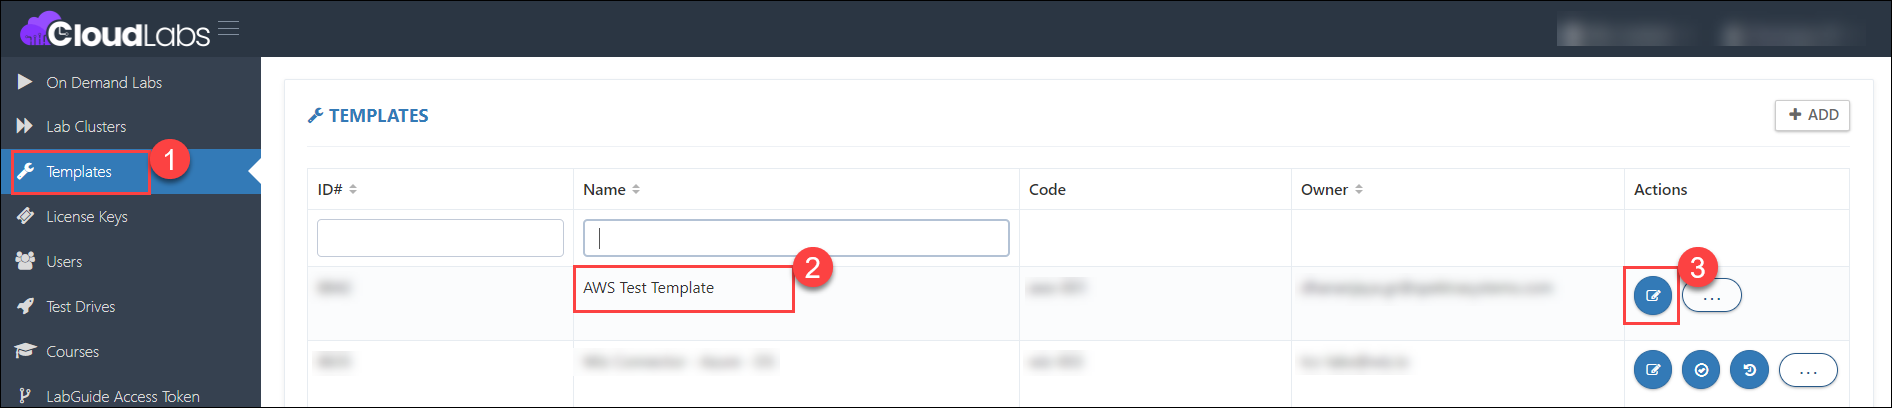
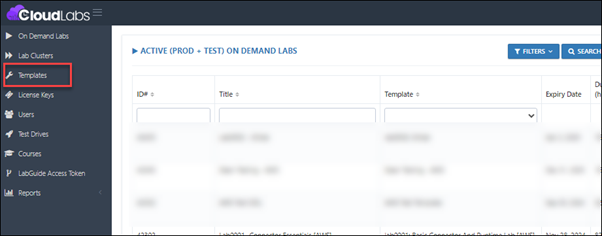
Log in to the CL portal and navigate to the required tenant (WIZ). On the left-hand side of the page, you will see the Template section.
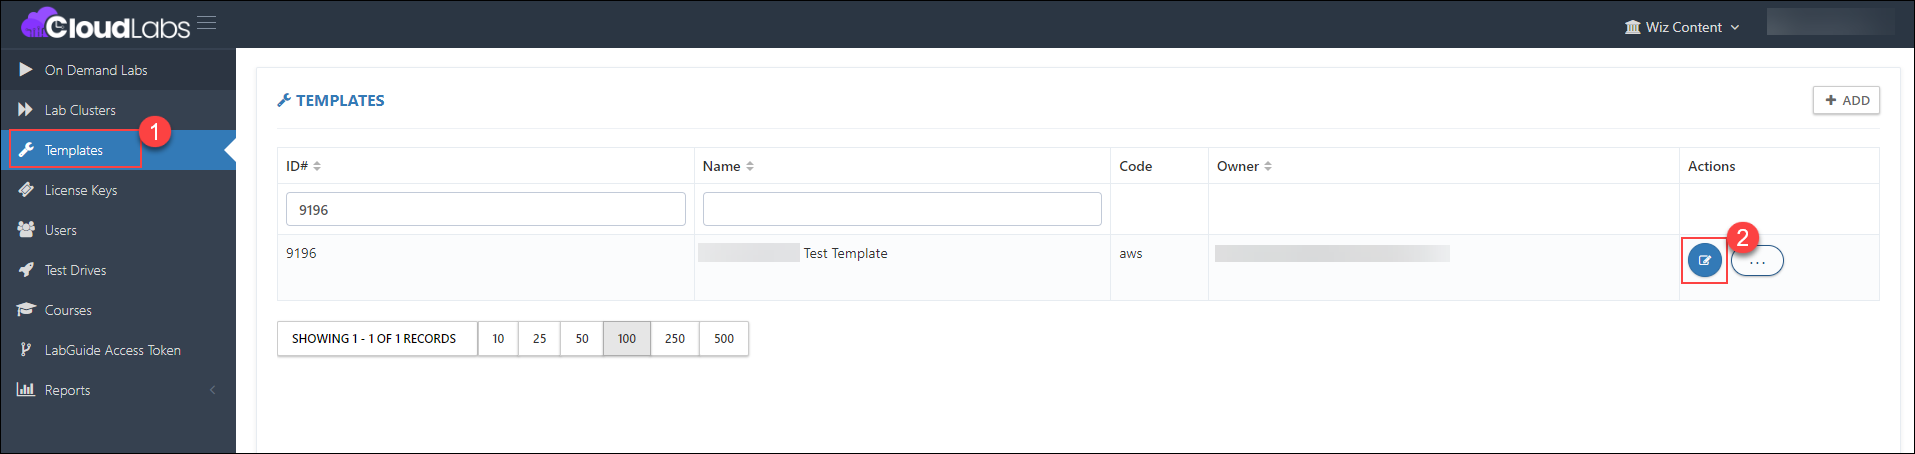
Navigate to the Templates (1) section in the left menu (1), select an existing template (2), and click the Edit button (3) in the Template section.
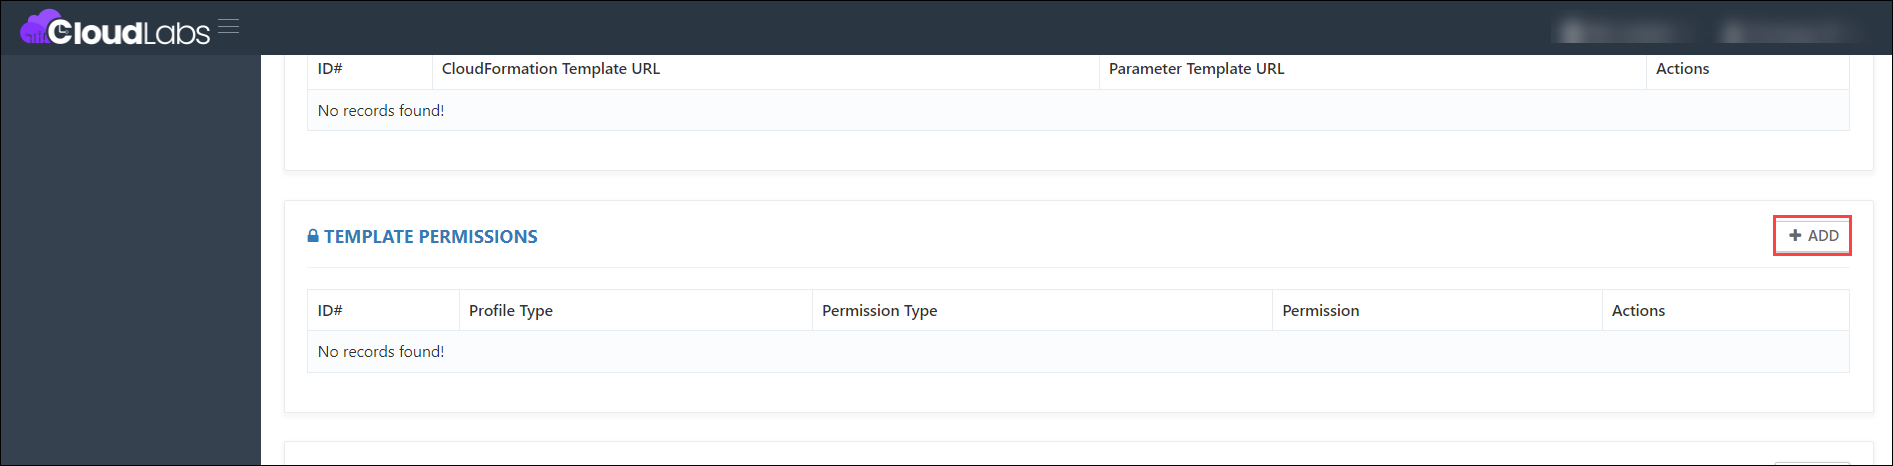
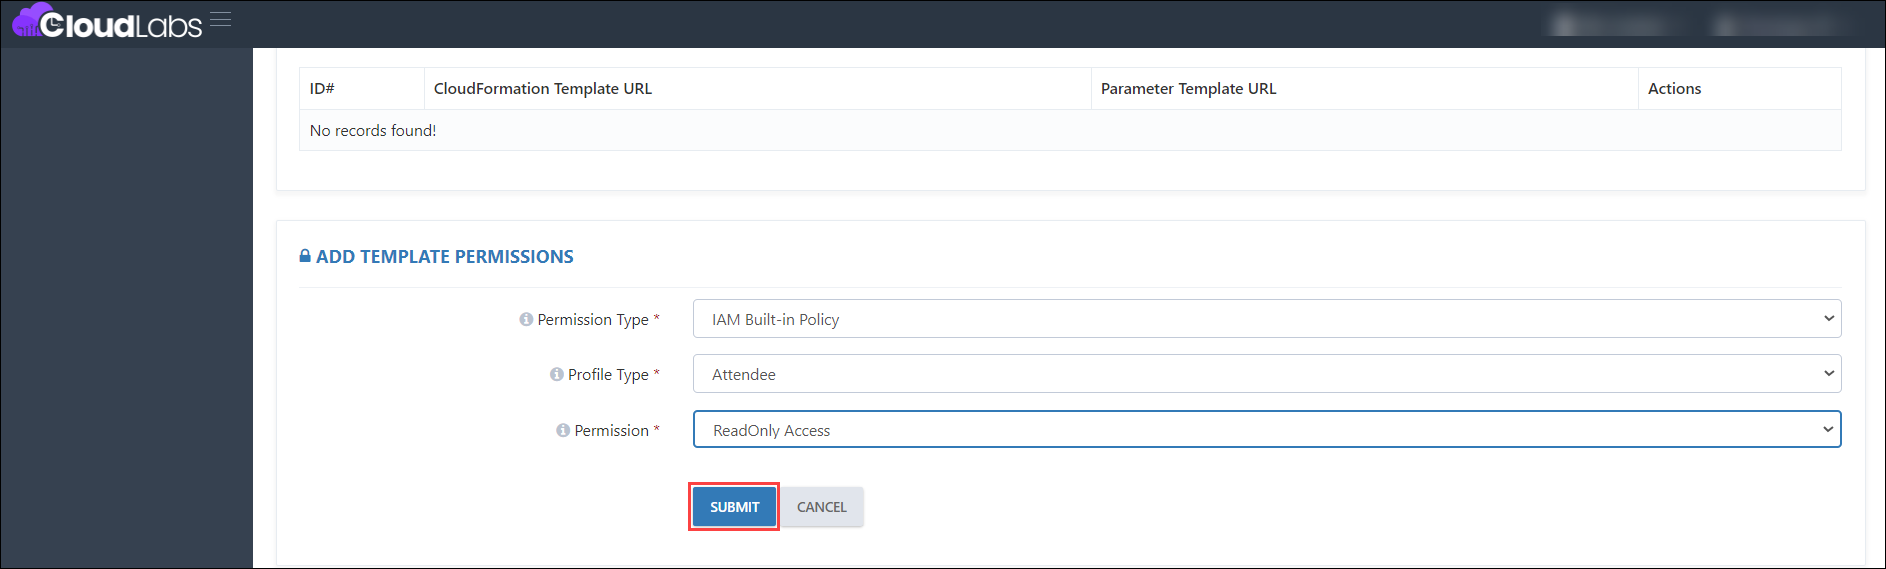
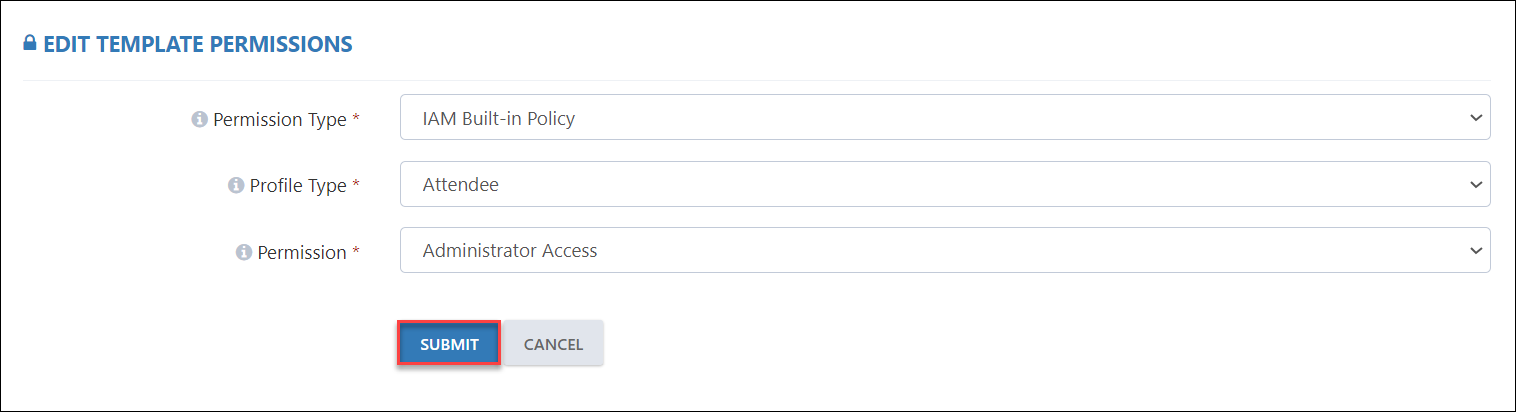
Then scroll down to the Template Permissions section and click on the Add button.
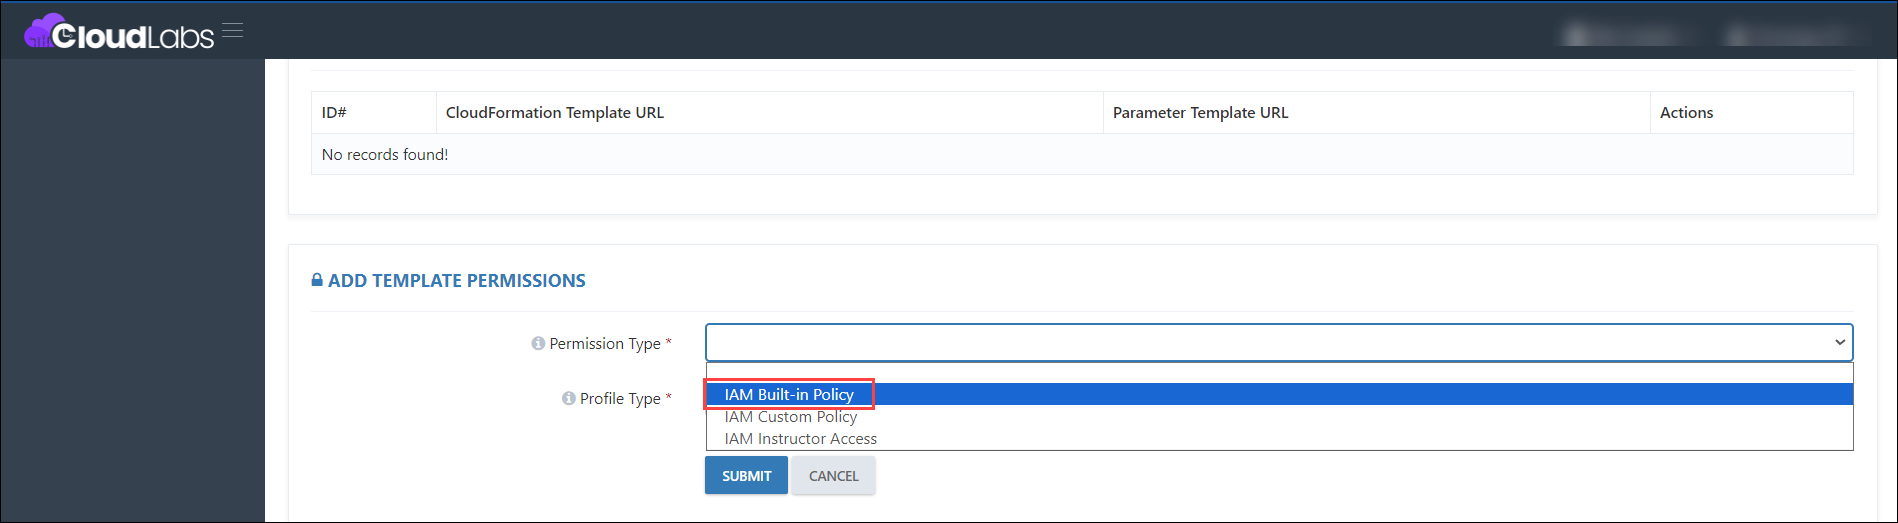
Under Permission type, select IAM Built-in Policy from the drop-down.
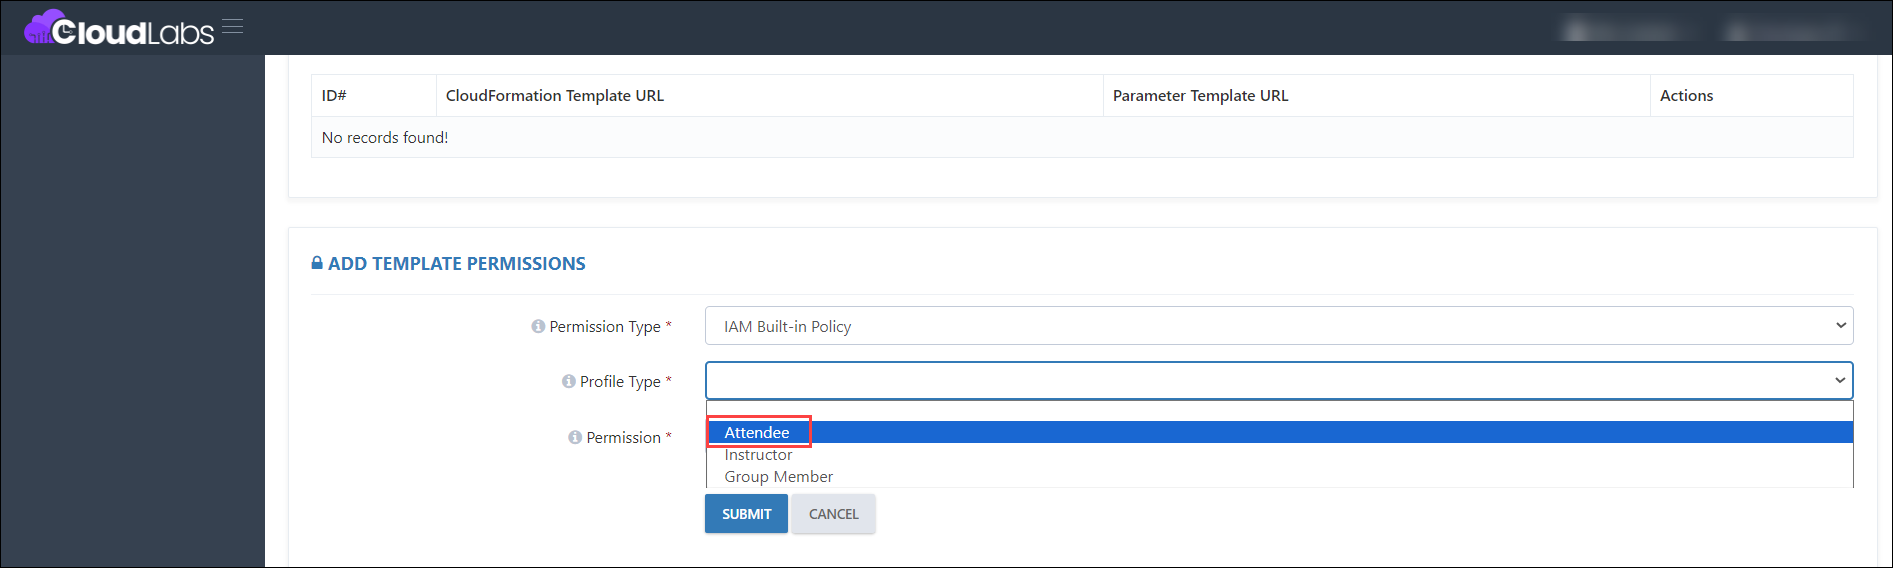
Under Profile type, select Attendee from the drop-down.
Under Permission, select ReadOnly Access from the drop-down.
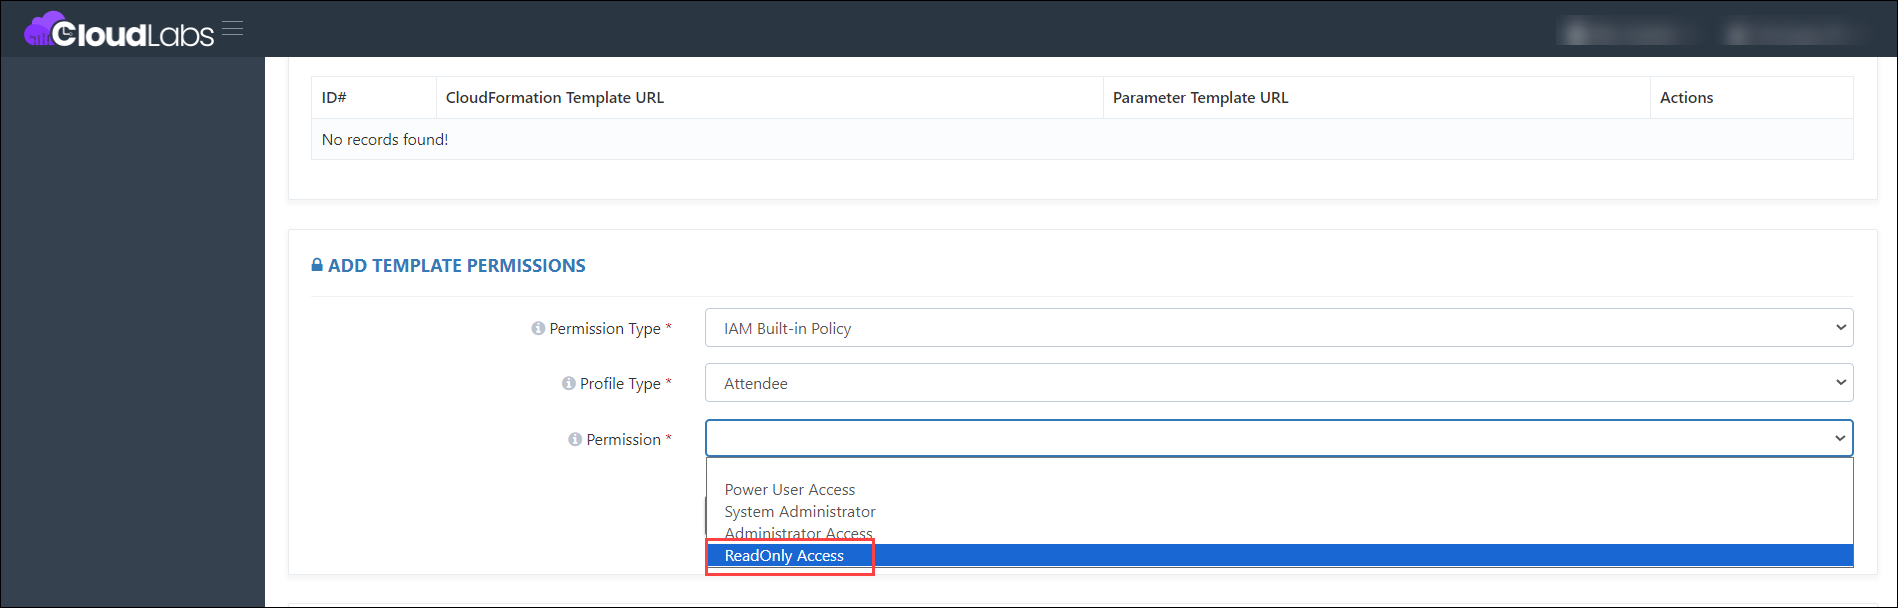
Then click on the Submit button.
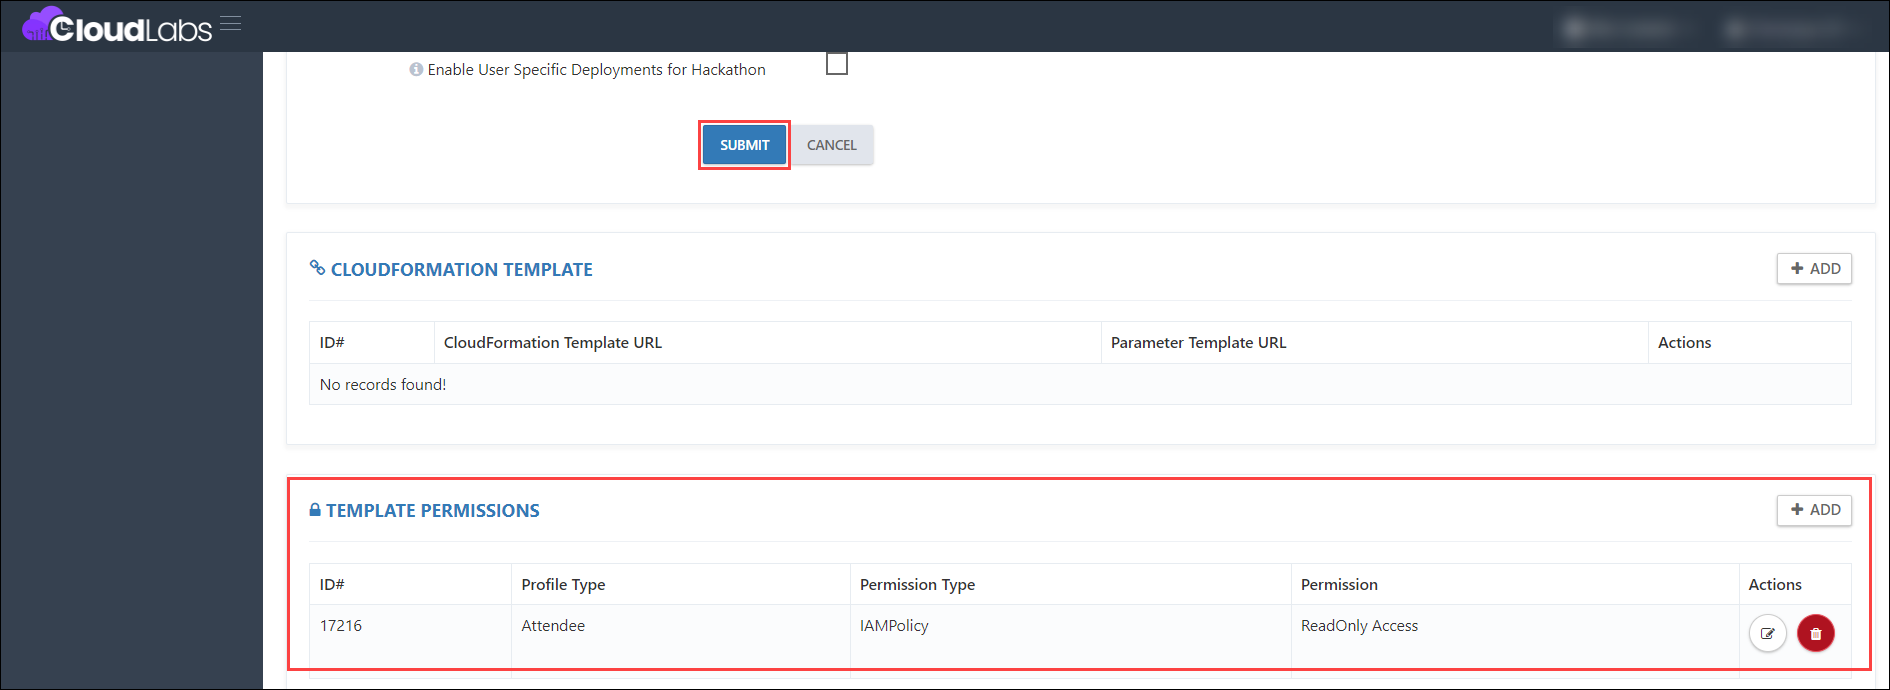
After submitting the Template permissions, click the Submit button for the template.
Setup Template on CloudLabs
Follow the below-mentioned guide to set up a new AWS Template on CloudLabs.
19. Manage Permissions through Control Panel(AWS) - (12 July 2024)
Feature requirement:
Manage AWS permissions for all the Attendees through the Control Panel.
Implementation:
Enabled the feature that will allow us to manage the AWS permissions from the Control Panel.
Steps for managing permissions from the Control Panel:
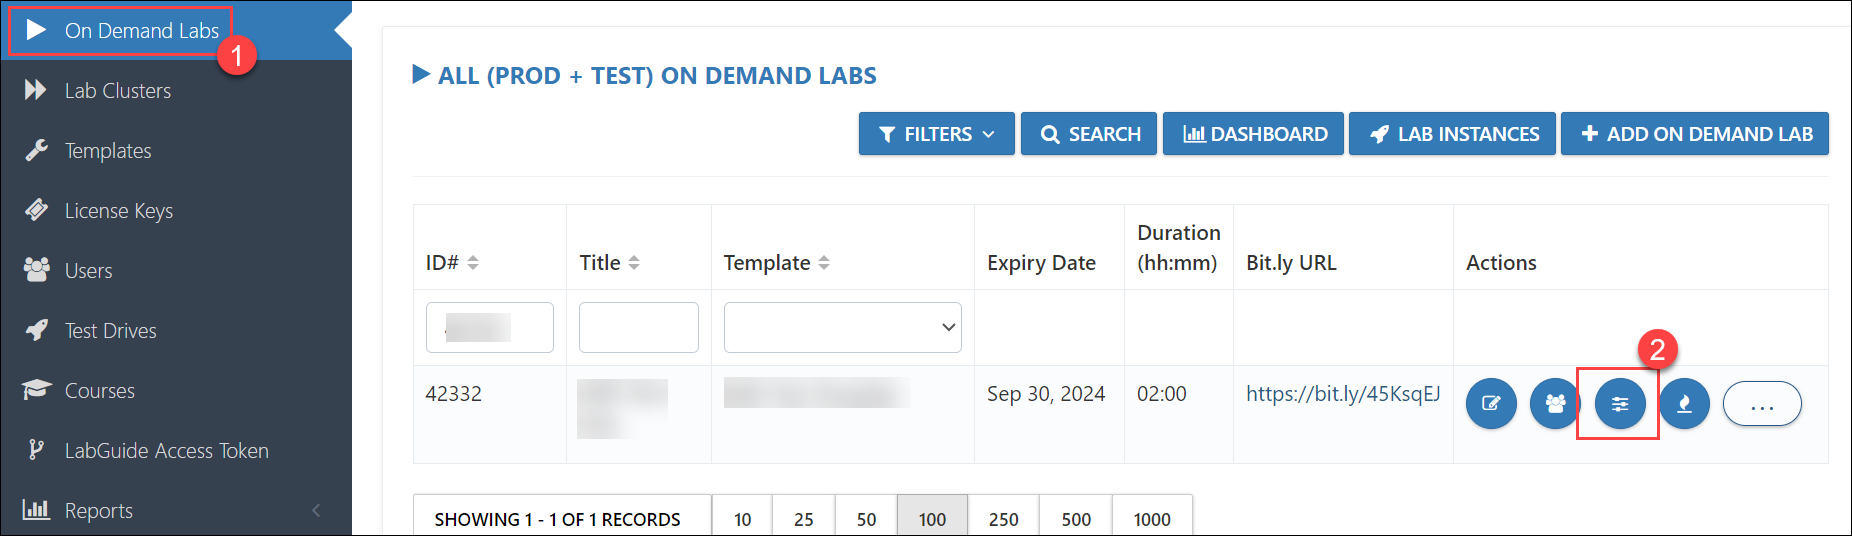
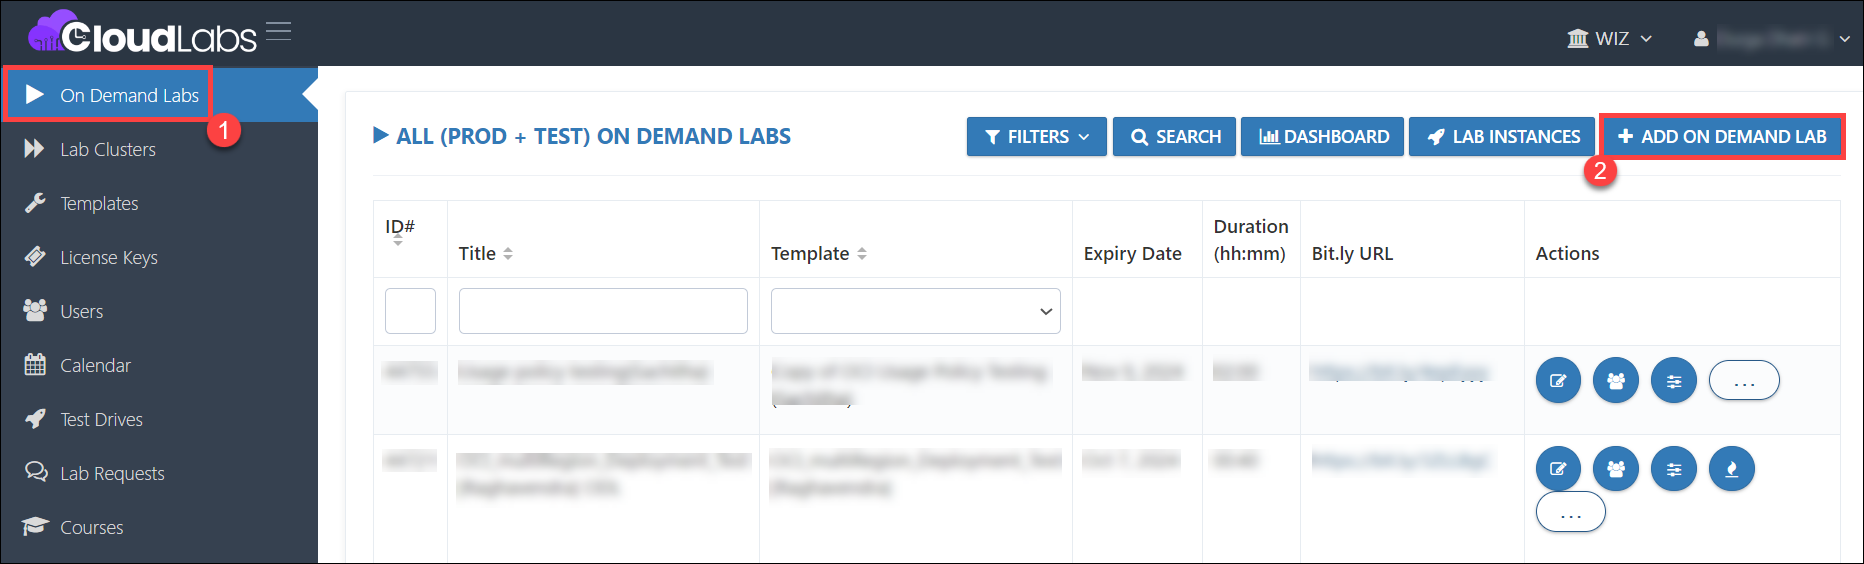
Navigate to the On Demand Labs (1) page on the Cloud Labs Admin portal, select the On Demand Lab that you have created, and click on the Control Panel (2) button under the Actions.
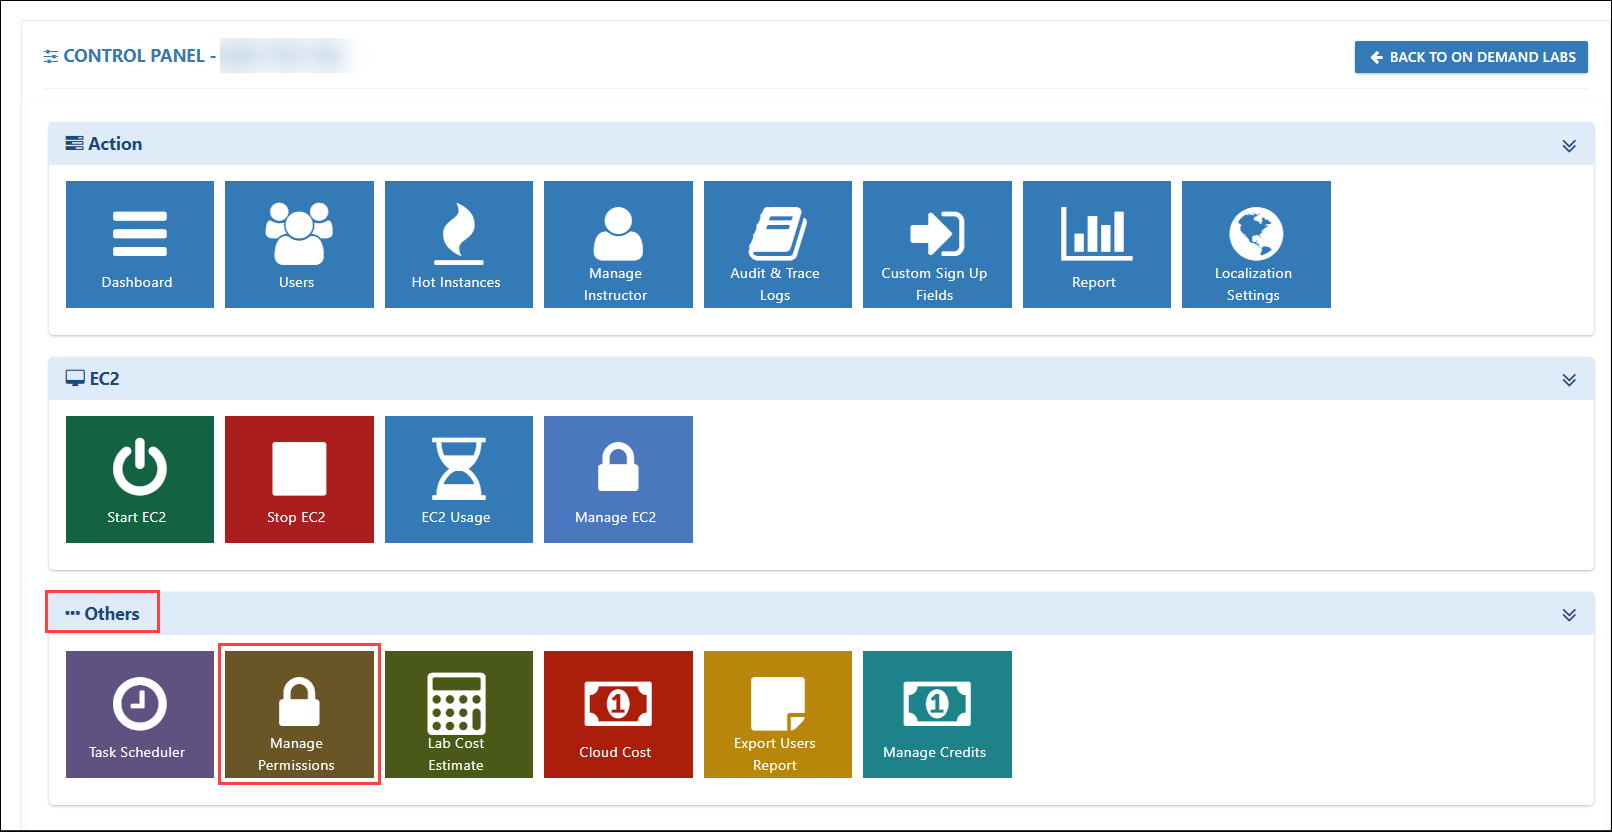
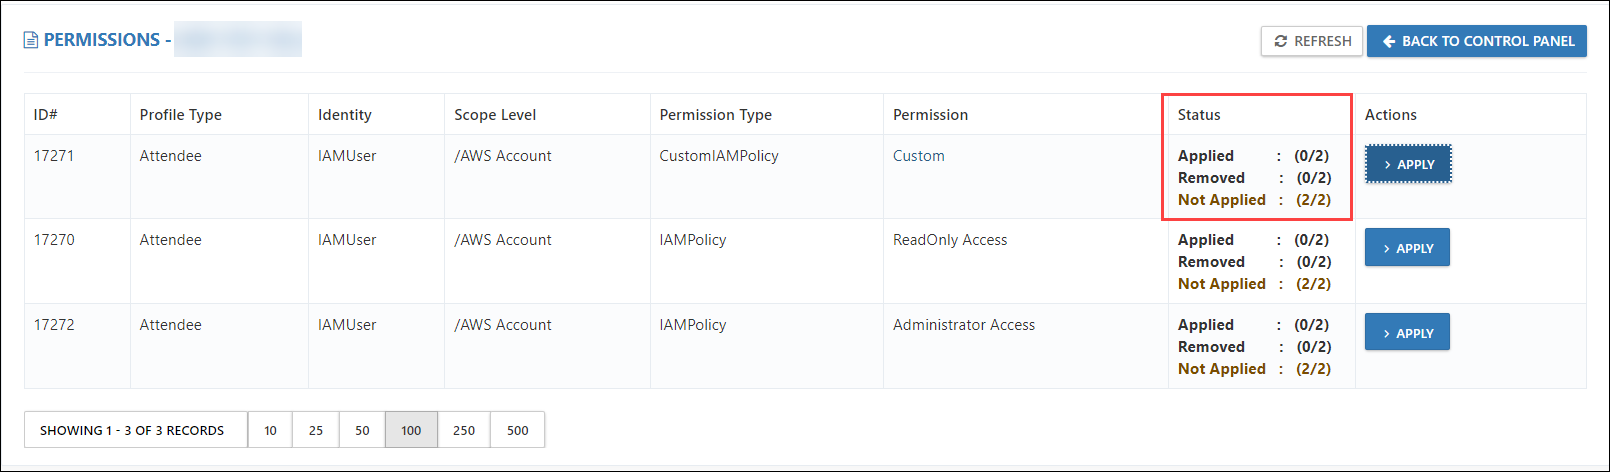
On the Control Panel page, scroll down and click on the Manage Permissions options under the Others.
On the Permissions page, verify the Status of the permission like Applied, Removed, or Not Applied.
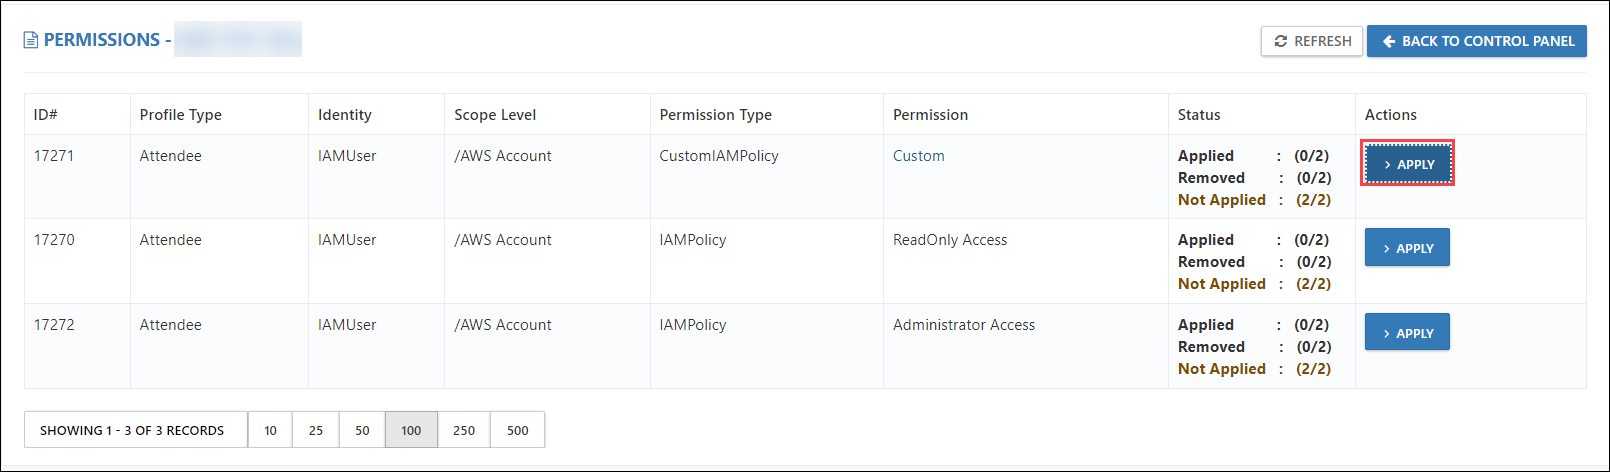
If you want to Apply the permission to all the Attendees then click on the Apply button under the Actions tab.
Note: This action will apply permission to all the current active deployments present in the On-Demand Lab.
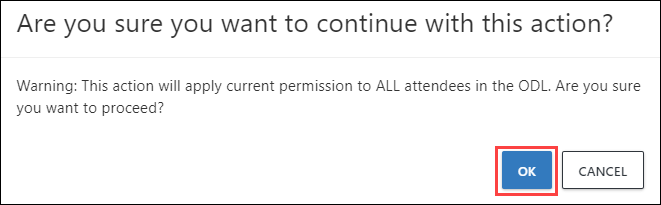
Click on OK on the pop-up "This action will apply current permission to ALL attendees in the ODL. Are you sure you want to proceed?" if you want to Apply the permission to all the Attendees present in the On Demand Lab.
Verify that permission status is Applied under the Status tab.
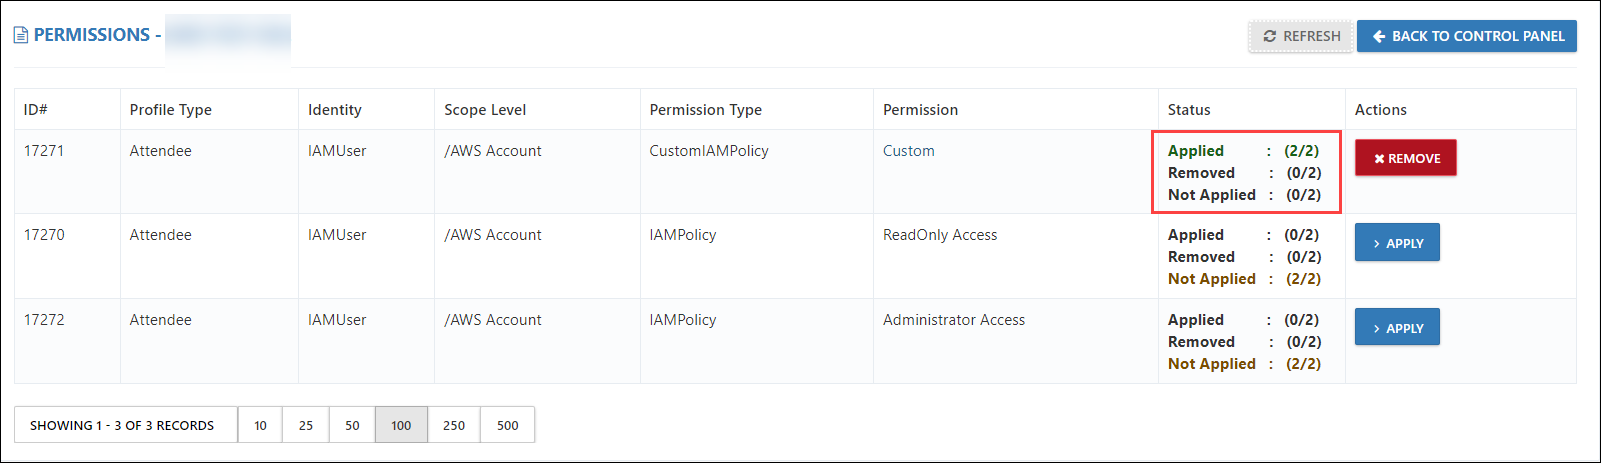
Note: If the changes are not reflected automatically, click on the Refresh button to verify the latest changes.
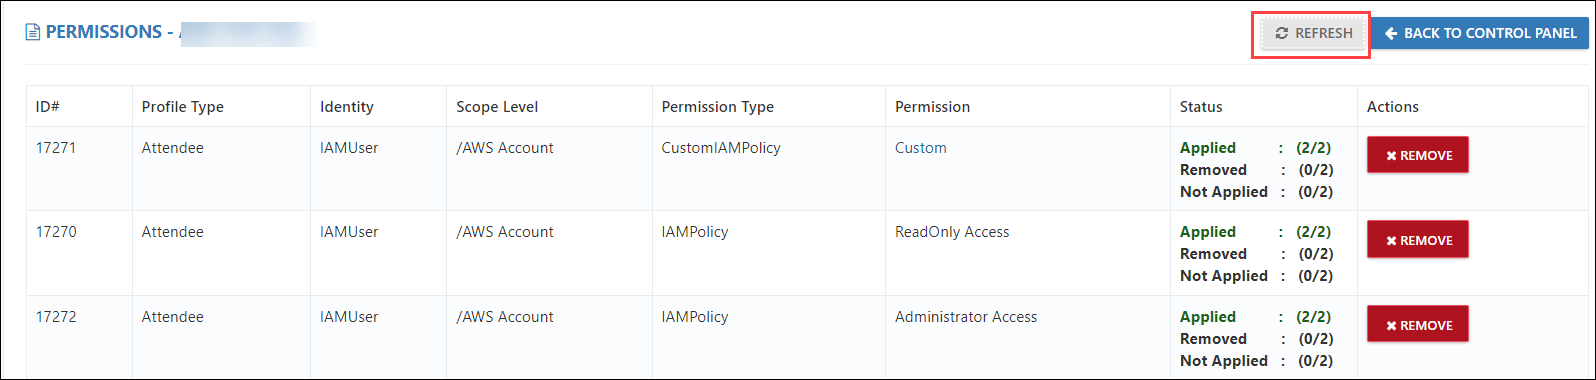
If you want to Remove the permission from all the attendees, click on the Remove button under the Actions tab.

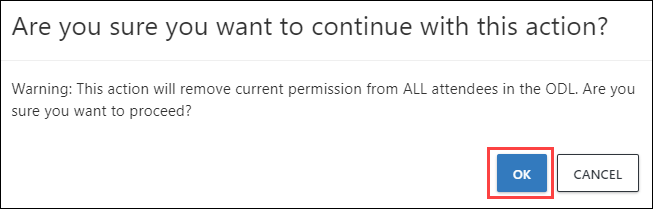
Note: This action will remove the permission from all the currently active deployments present in the On Demand Lab.
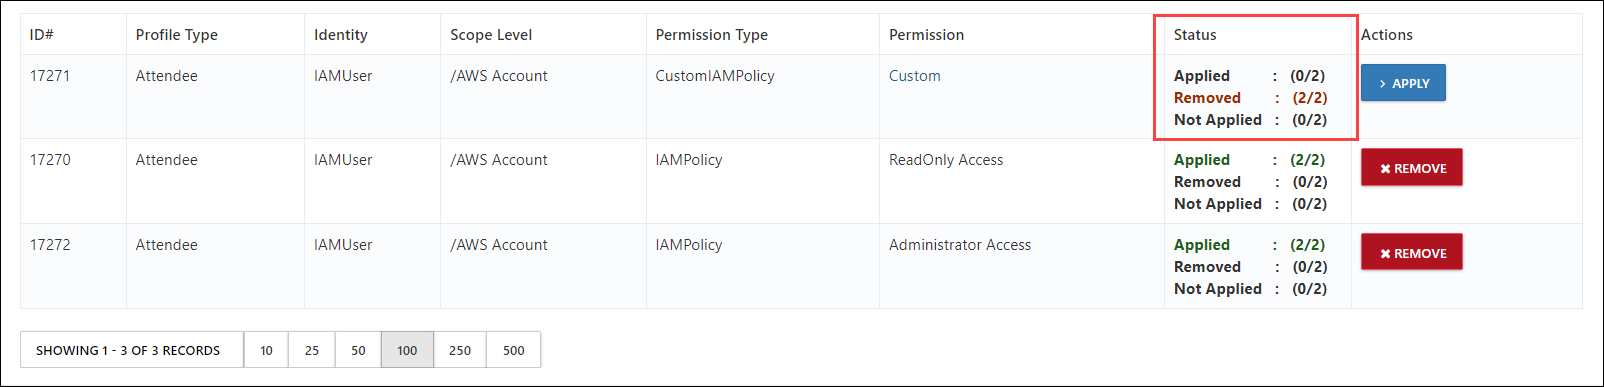
Click OK on the pop-up that says, This action will remove current permissions from ALL attendees in the ODL. Are you sure you want to proceed? if you want to Remove the permission from all the attendees present in the On Demand Lab.
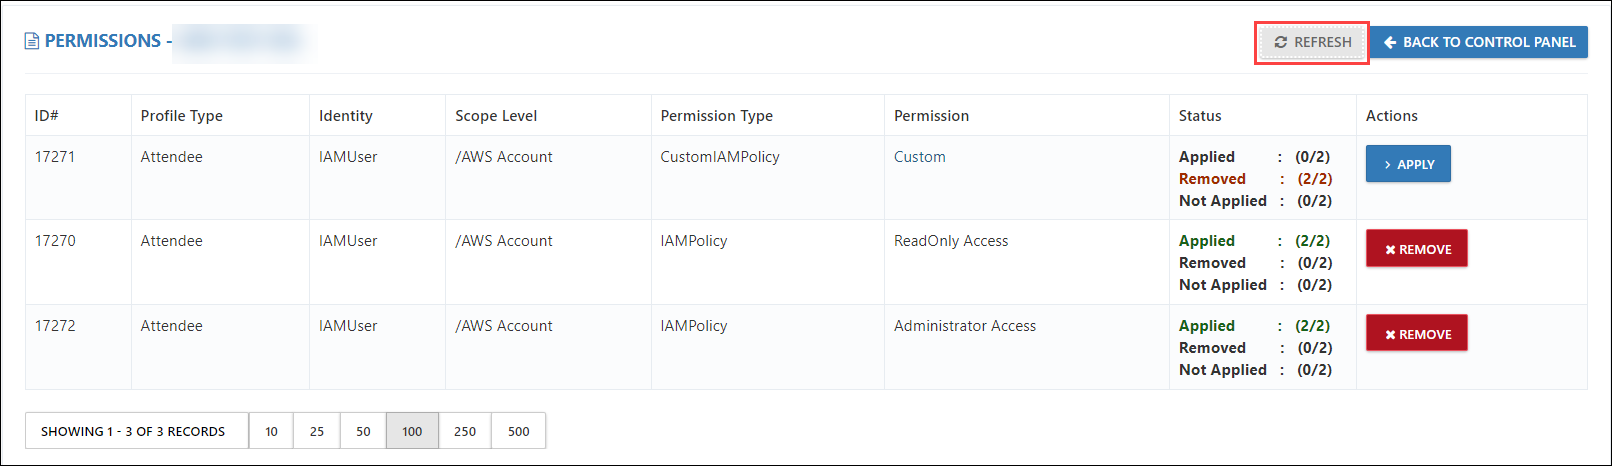
Verify that the permission status is Removed under the Status tab.
Note: If the changes are not reflected automatically, click on the Refresh button to verify the latest changes.
20. Adding Organization Account Access Role for Instructor(AWS) - (12 July 2024)
Feature Requirement:
Add an organization Account access role to instructor user profile.
Implementation:
Enabled template permission which will allow you to add the organization Account access role to instructor user profile.
Steps to Add an organization Account access role to the instructor user profile.
Assign permission to the instructor.
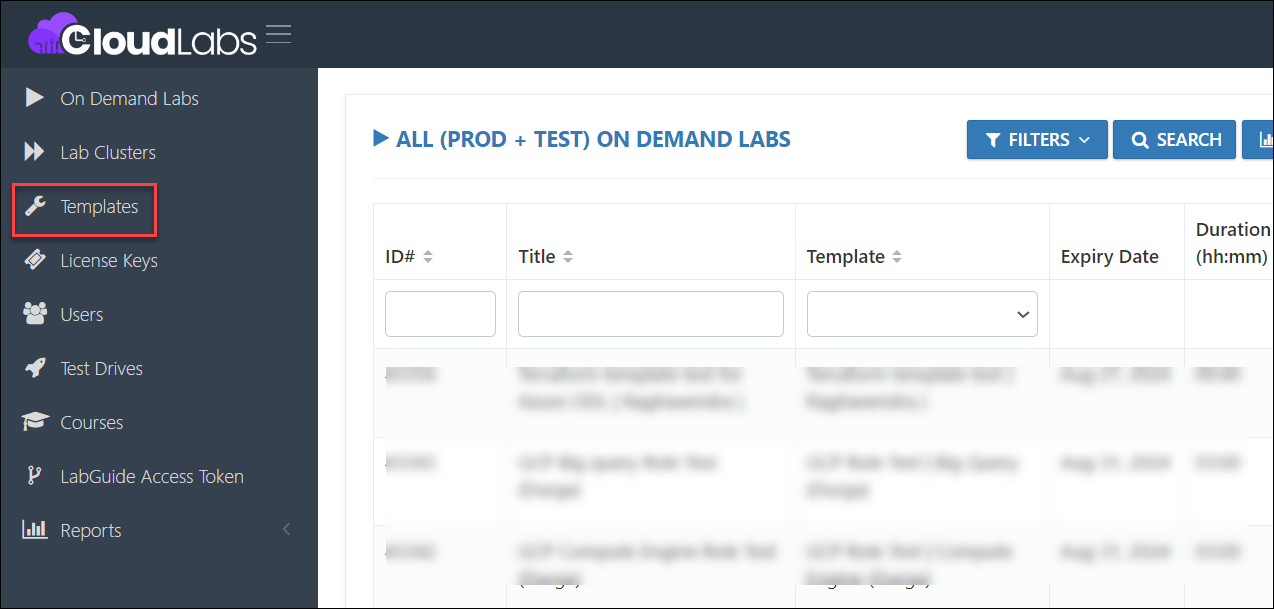
Navigate to the Templates on the CloudLabs admin portal from the left-hand panel.
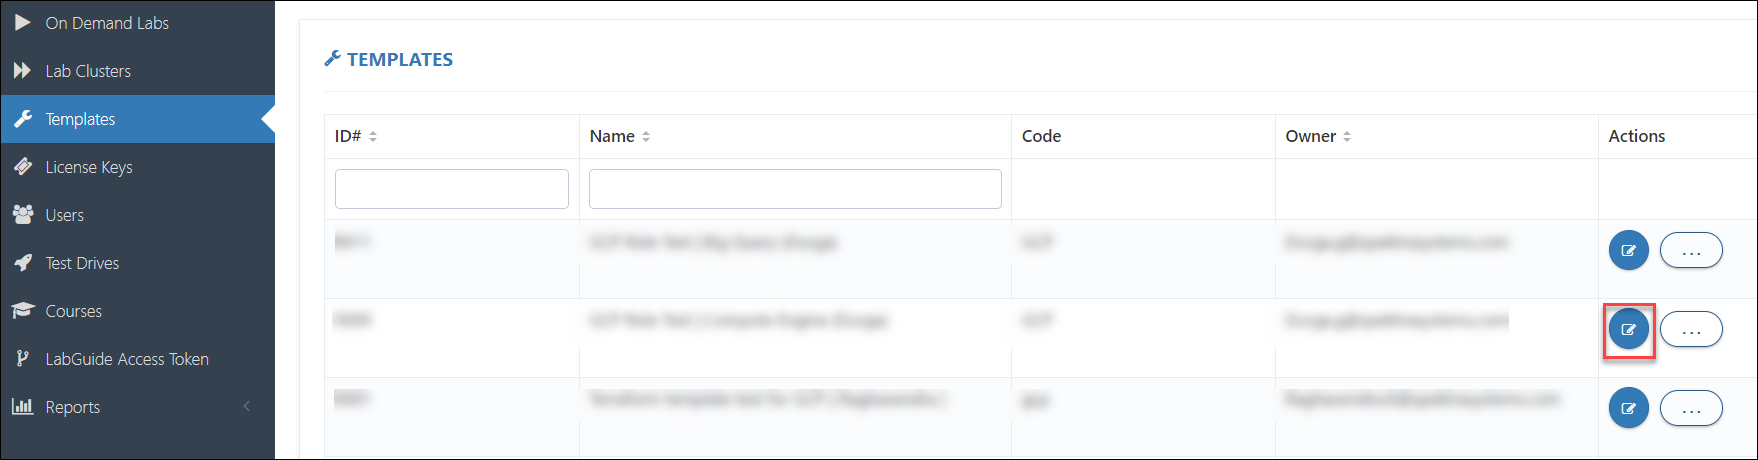
Click on Edit for the template where you want to assign the Organization Account Access role to the Instructor.

Navigate to the Template Permission section and click on +ADD.

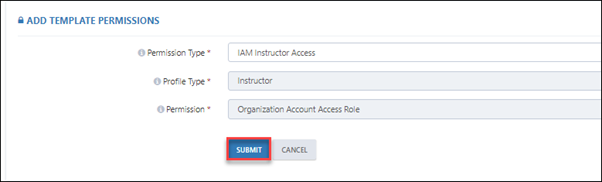
Choose the configurations as specified below, then click Submit:
Permission Type: IAM Instructor Access
Profile Type: Instructor
Permission: Organization Account Access Role
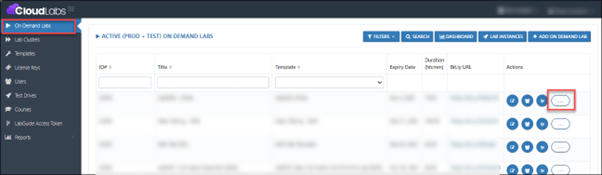
Add the Instructor at the ODL level:
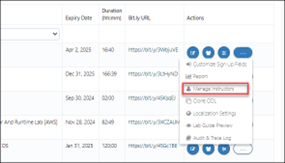
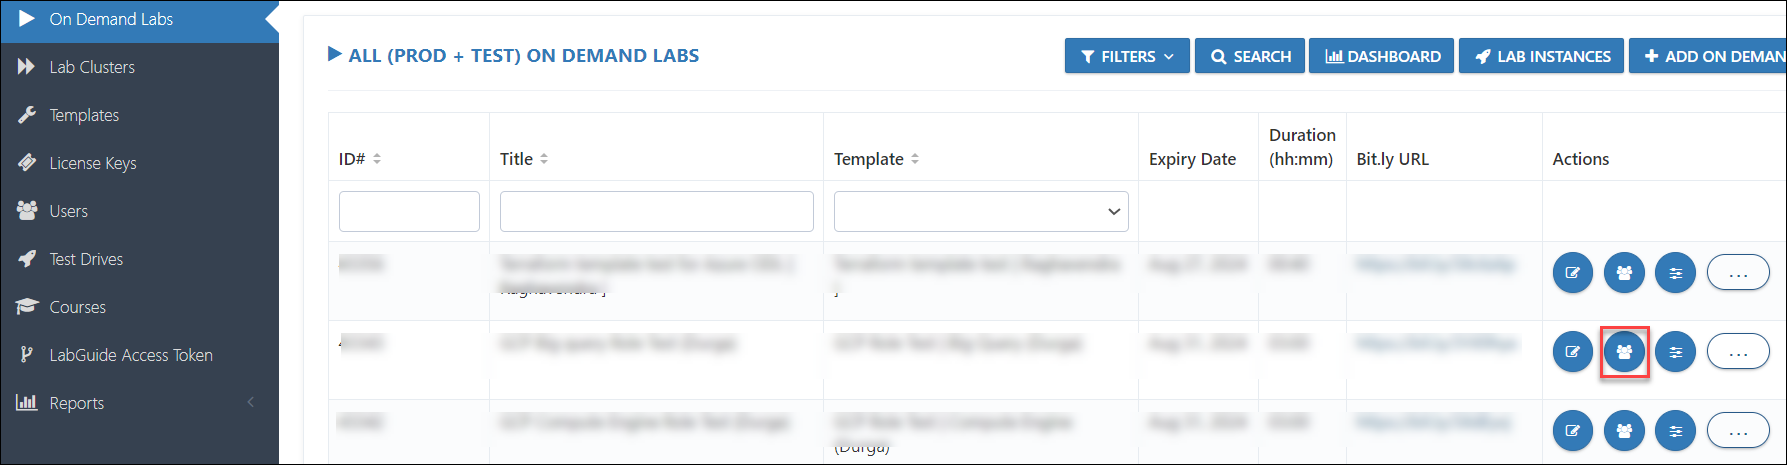
In the On Demand Lab section, choose the ODL (On Demand Lab) where you wish to add the instructor, then click on the icon indicated in the image below:
Select the Manage Instructors.
In the Manage Instructor section, click on +ADD INSTRUCTOR.

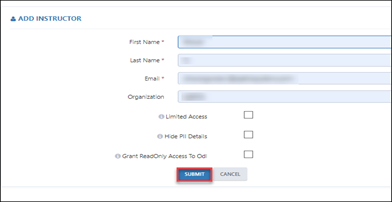
In the ADD INSTRUCTOR section, enter the First Name, Last Name, Email, and Organization of the Instructor, then click SUBMIT.
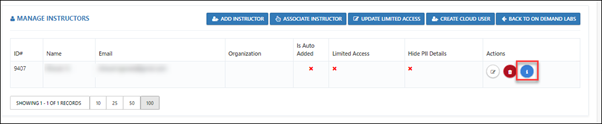
On the Manage Instructor page, once the instructor is created to obtain the cloud credentials, click on the symbol indicated in the image below in the Actions section.
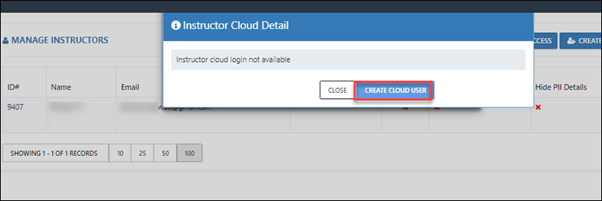
In the Instructor Cloud details popup, click on Create Cloud User.
Once you click on Create Cloud User you can obtain the cloud credentials for the instructor in the Instructor Cloud Details section.
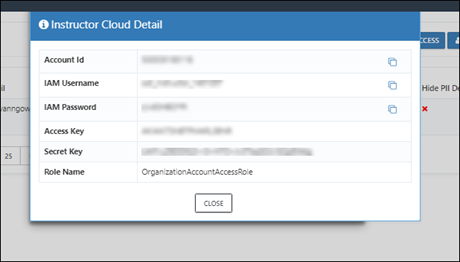
Note: Using the above credentials, instructors can switch to user accounts through the Organization Account Access Role.
Switch to the User Account with Instructor credentials.
Log in to the admin portal using the instructor credentials.
In the On Demand Lab section, click on the user icon for the assigned On Demand Lab (ODL).

Click on Lab Details for the succeeded instance in the user's section under Actions and Copy the Account ID of the User.
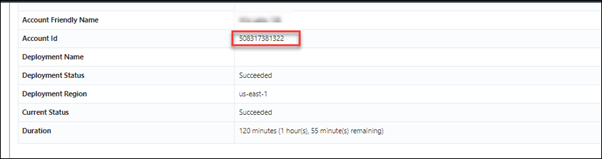
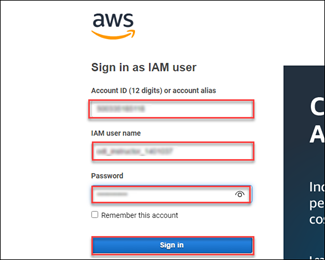
Sign in to the AWS Console using the credentials provided when adding the instructor to the On Demand Lab (ODL).
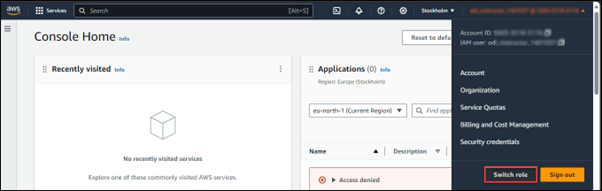
Once logged into the instructor environment, if the instructor needs to access the users' environment, click on Switch role.
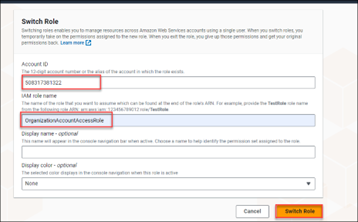
In the Switch role section, enter the Account ID of the user that you copied in the previous step. For the IAM Role Name, enter OrganizationAccountAccessRole and click on Switch role to switch to the user's environment.
21. GCP Custom Role - (15 August 2024)
Feature Requirement
GCP Custom Role for tailoring access to meet the specific needs.
Implementation
The GCP custom role in JSON format can be loaded into a template and that can be effectively applied onto the users.
Steps for Implementing GCP Custom Role
- Create a GCP Custom Role in JSON Format. The example below is a GCP role that grants tailored permissions to the Big Query service.
{
  "role": {
      "title": "bigquerydemo",
      "includedPermissions": [
        "bigquery.datasets.get",
        "bigquery.datasets.getIamPolicy",
        "bigquery.models.export",
        "bigquery.models.getData",
        "bigquery.models.getMetadata",
        "bigquery.models.list",
        "bigquery.routines.get",
        "bigquery.routines.list",
        "bigquery.tables.createSnapshot",
        "bigquery.tables.export",
        "bigquery.tables.get",
        "bigquery.tables.getData",
        "bigquery.tables.getIamPolicy",
        "bigquery.tables.list",
        "bigquery.tables.replicateData",
        "resourcemanager.projects.get",
        "resourcemanager.projects.list"
      ],
      "description": "bigquery role"
  },
  "roleId": "bigqueryroletest"
}
Note : In the above given Role,
- title is the name given to a Role for easy identification on the GCP Console.
- includedPermissions is a set of permissions that are granted to a user. More permissions can be added or removed for a customized Role. A Role can have permissions for different services or for a single service.
- description, is used to describe the function of the Role.
- roleId is a unique identifier for the custom role.
- Store the JSON Role file in a Google Cloud Storage Bucket or AWS S3 bucket and copy the URL of the file.
Note : The stored file in the bucket should be accessible.
Log in to the CL portal and navigate to the required tenant (WIZ). On the left-hand side of the page, you will see the Template section.
Click on Edit for the template where you want to upload the Custom role.
Navigate to the IAM section and click on +ADD.

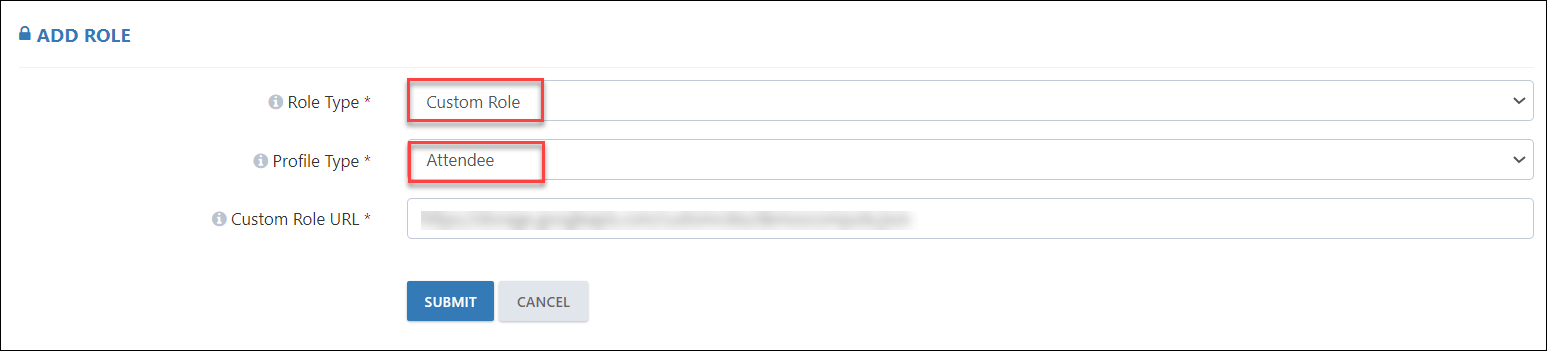
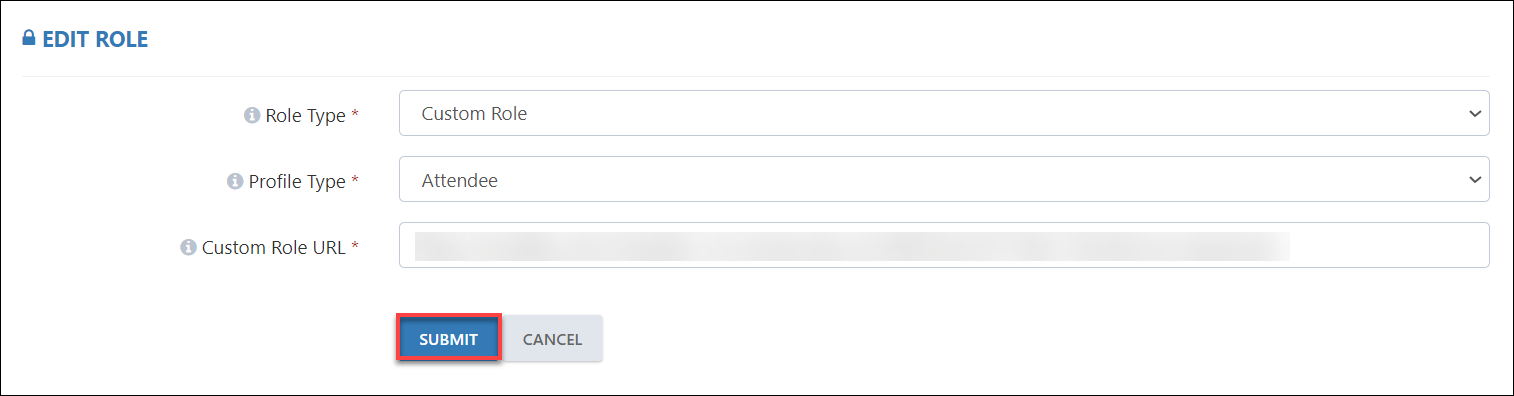
Choose the configurations as specified below, then click Submit:
Role Type: Custom Role
Profile Type: Attendee
Custom Role URL: Paste the copied URL of the Custom Role here
Now, navigate to On Demand Labs section and click on users for the ODL associated with the GCP Role Template.
Click on Add User, fill out the user details, and launch the environment.
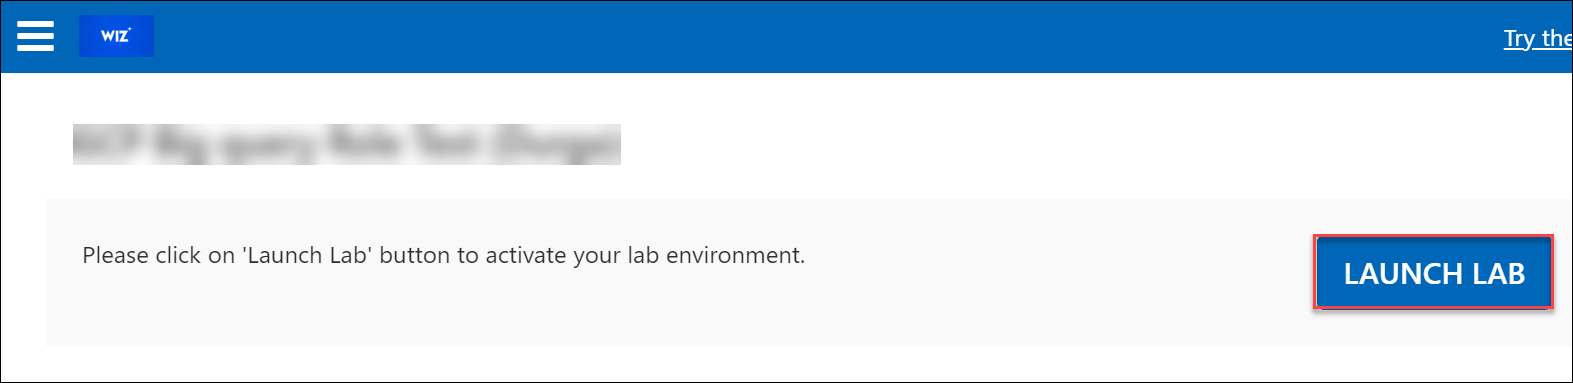
Copy the GCP Console link and login credentials as shown below.
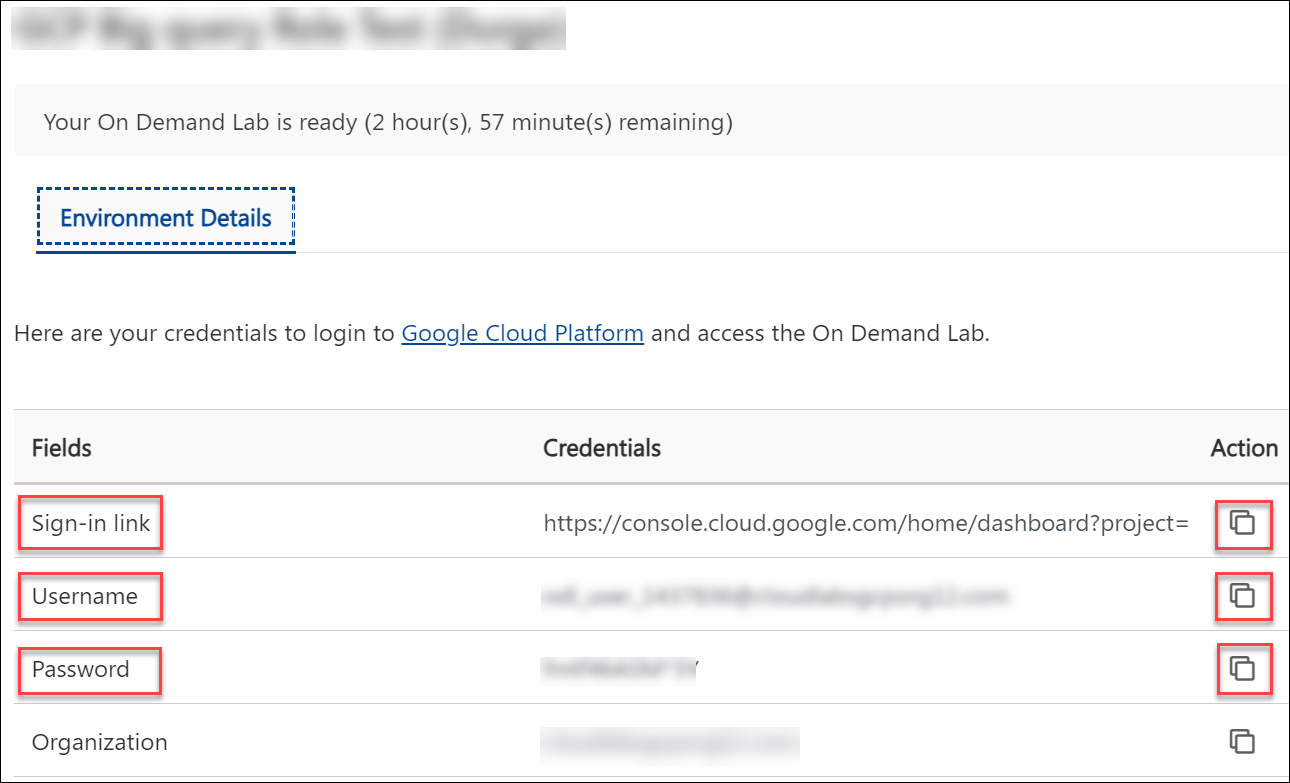
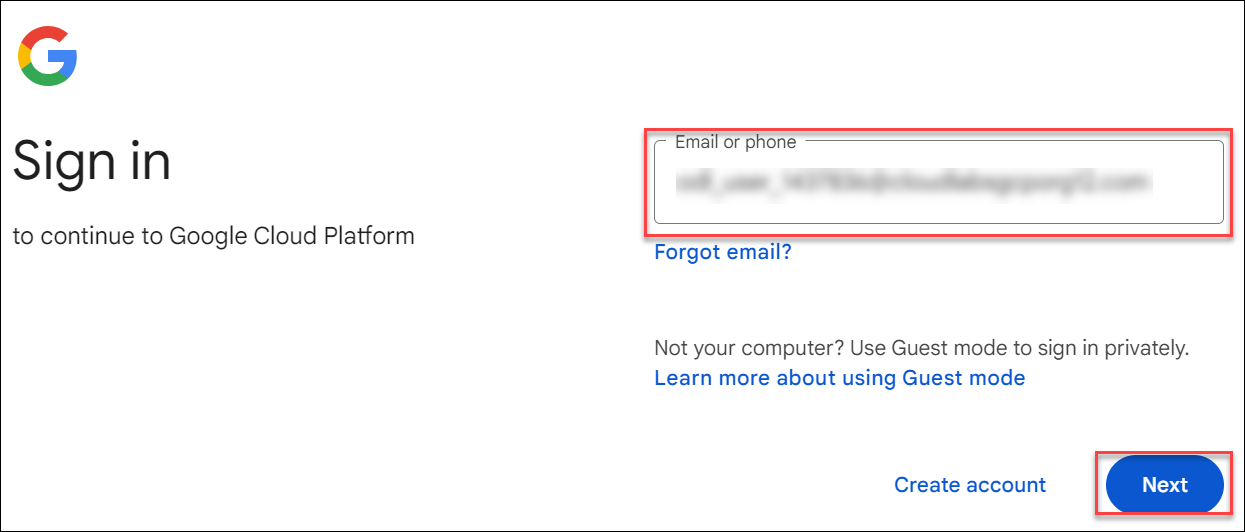
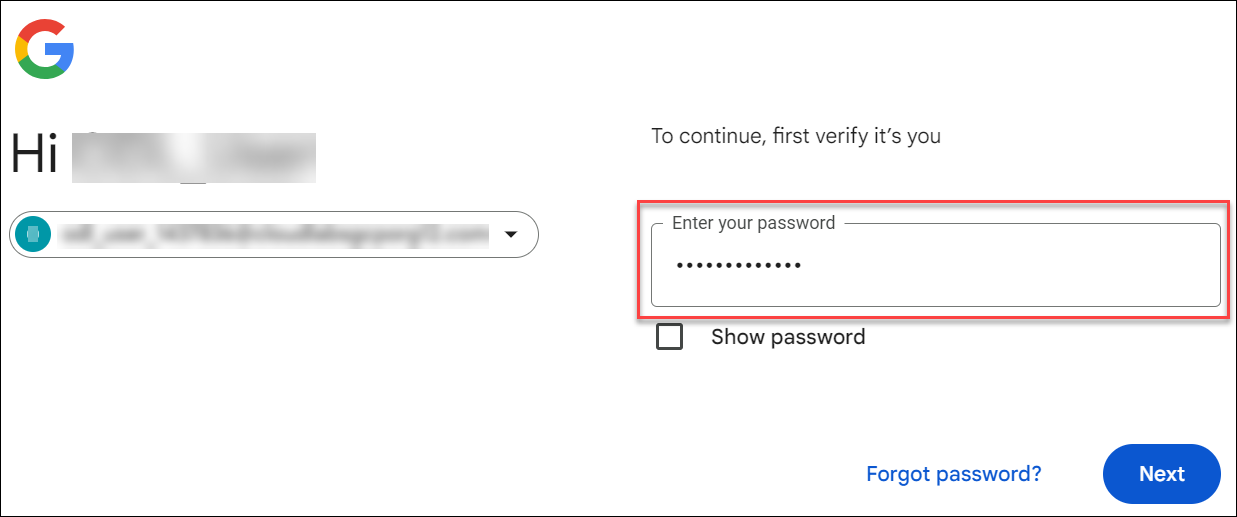
Login to the GCP Console by entering the copied Username and Password.
On the GCP Console, under the Admin Project, type Roles in the search bar and navigate to that Section.
Note : The GCP user should have permission to view the IAM and Admin Console to follow Step 13 and 14.
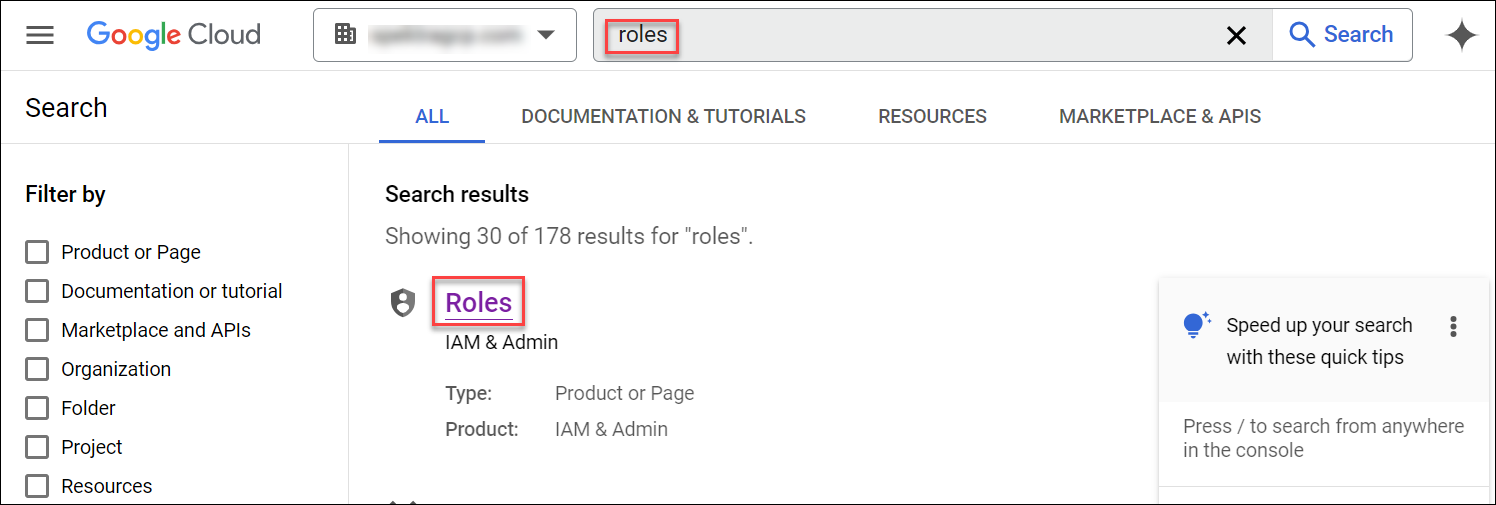
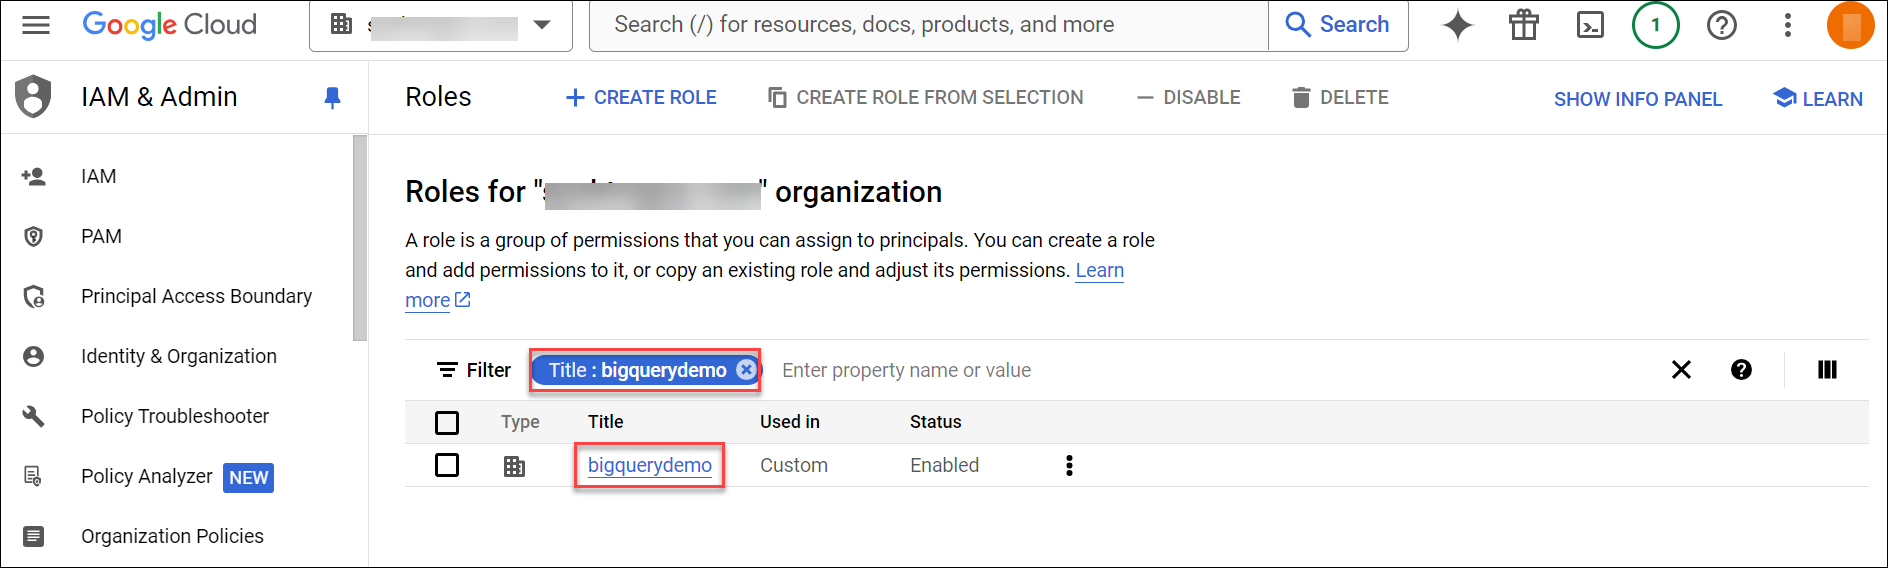
Search for the title bigquerydemo in the filter section. The Custom Role that was applied from CL can be found in the Roles section. Since the title given in the JSON custom Role was bigquerydemo, the Role will be saved under the same name.
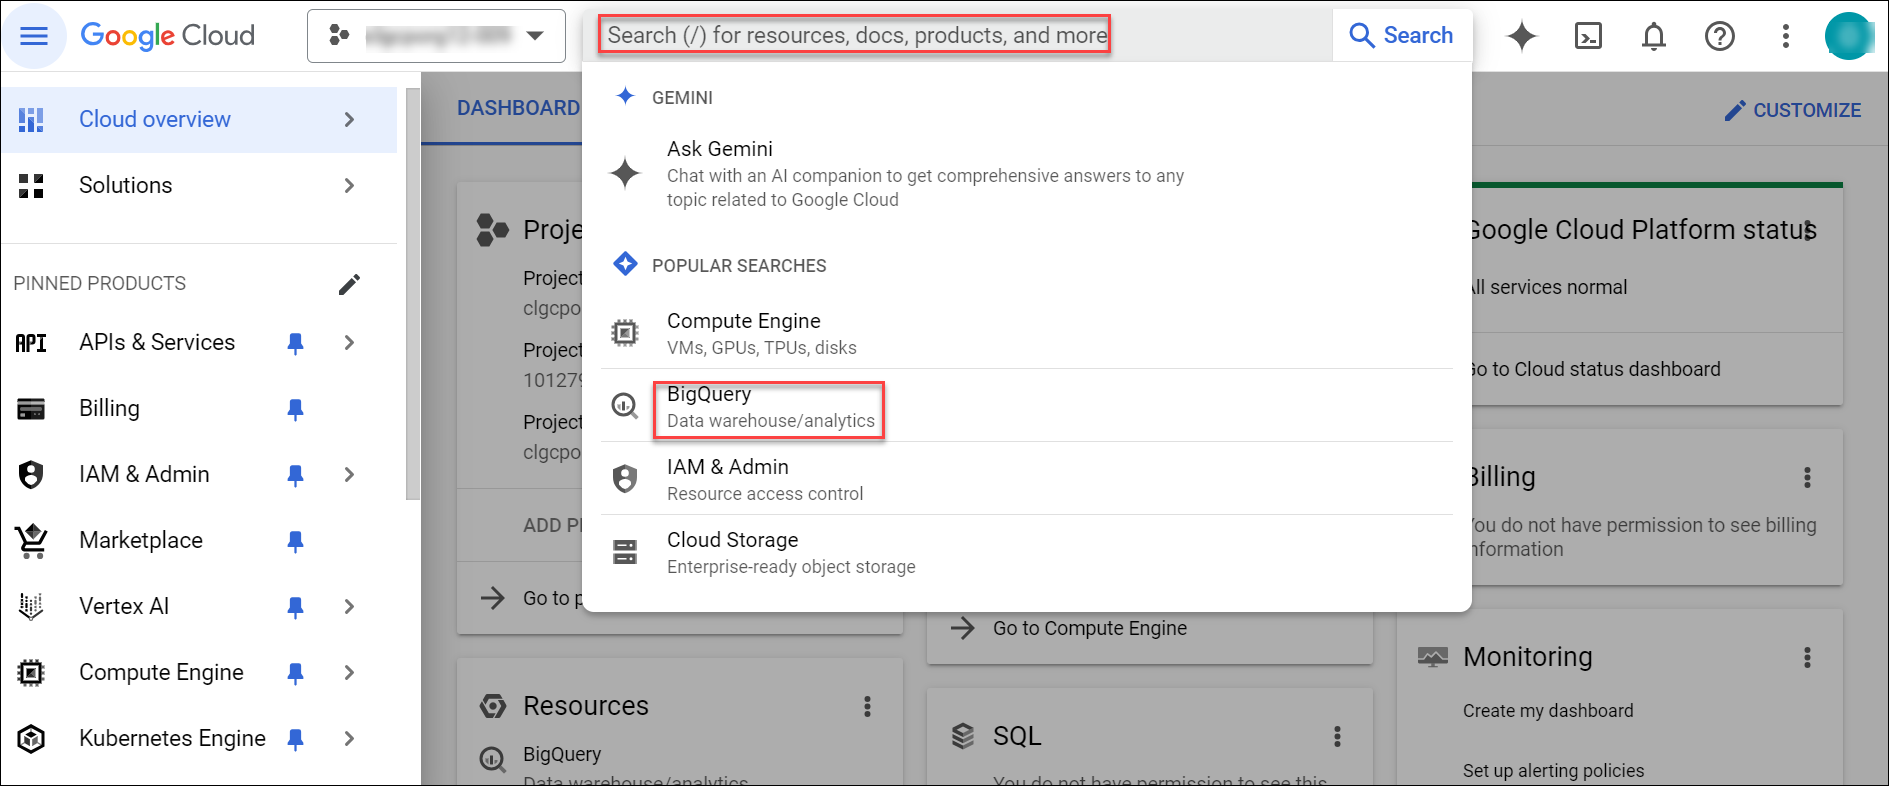
On the GCP Console, click on the search bar to find the Big Query Service.
On the BigQuery Console, we can examine the effectiveness of the BigQuery Custom Role we created in step 1.
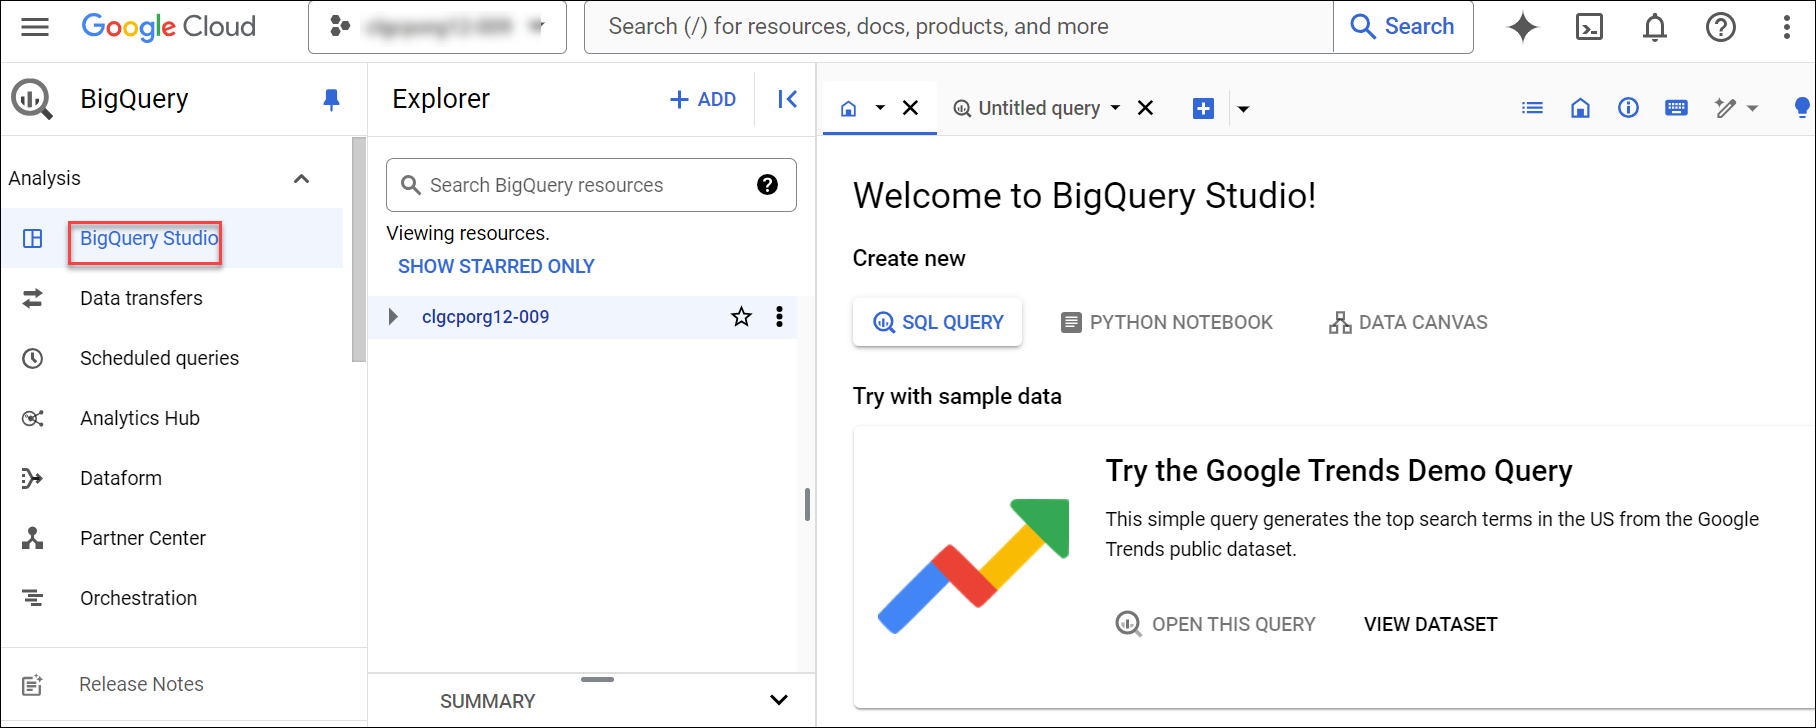
Note : As shown in the above picture, the BigQuery Role has been successfully applied to the user. Therefore, the user can perform actions that are mentioned inside the Role.
22. Inline Question Fixes - (15 August 2024)
Feature Requirement
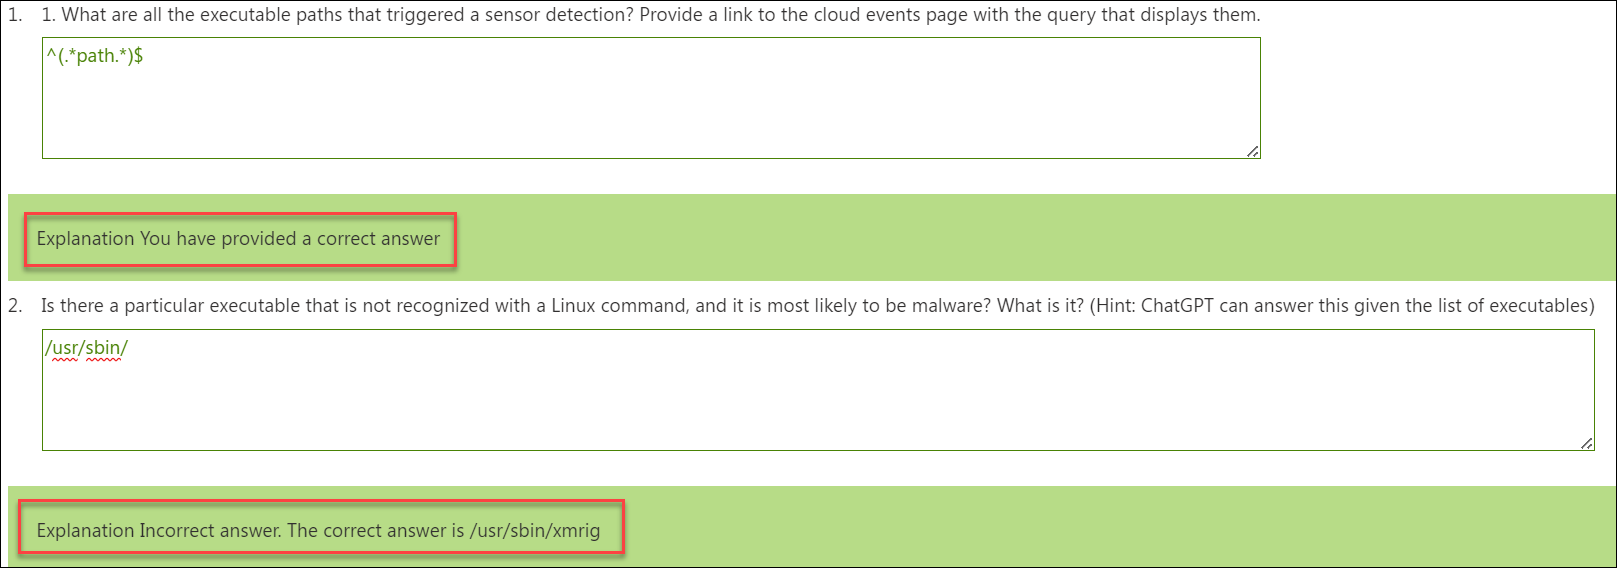
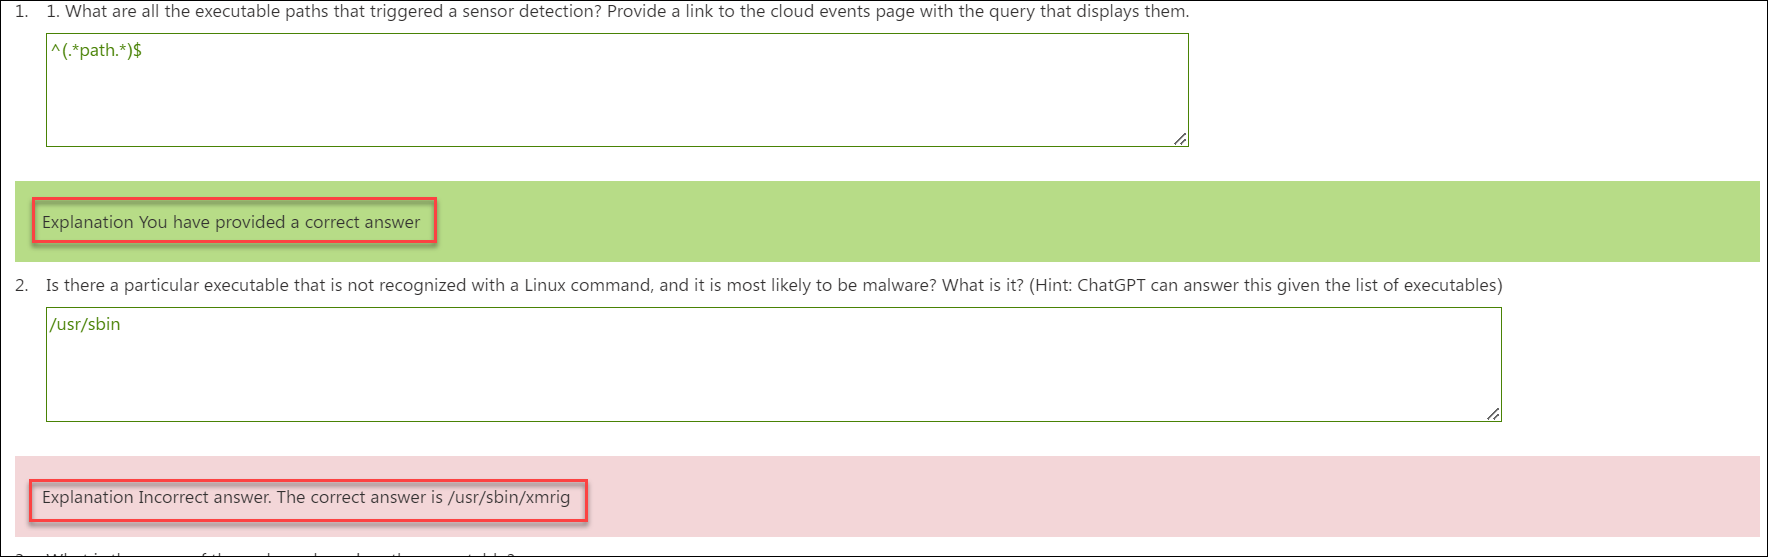
The feedback color for all the Grouped questions was influenced by the outcome of the first question and If the question is correct still the answer was highlighted in red.
Implementation
Issue resolved by assigning appropriate colors to the feedback: green for correct answers and red for incorrect answers.
Issues and their Resolutions
1. Issue 1
The feedback color for all questions was influenced by the outcome of the first question. If the first question was answered incorrectly, the feedback for subsequent questions was displayed in red, regardless of the correctness of their answers.
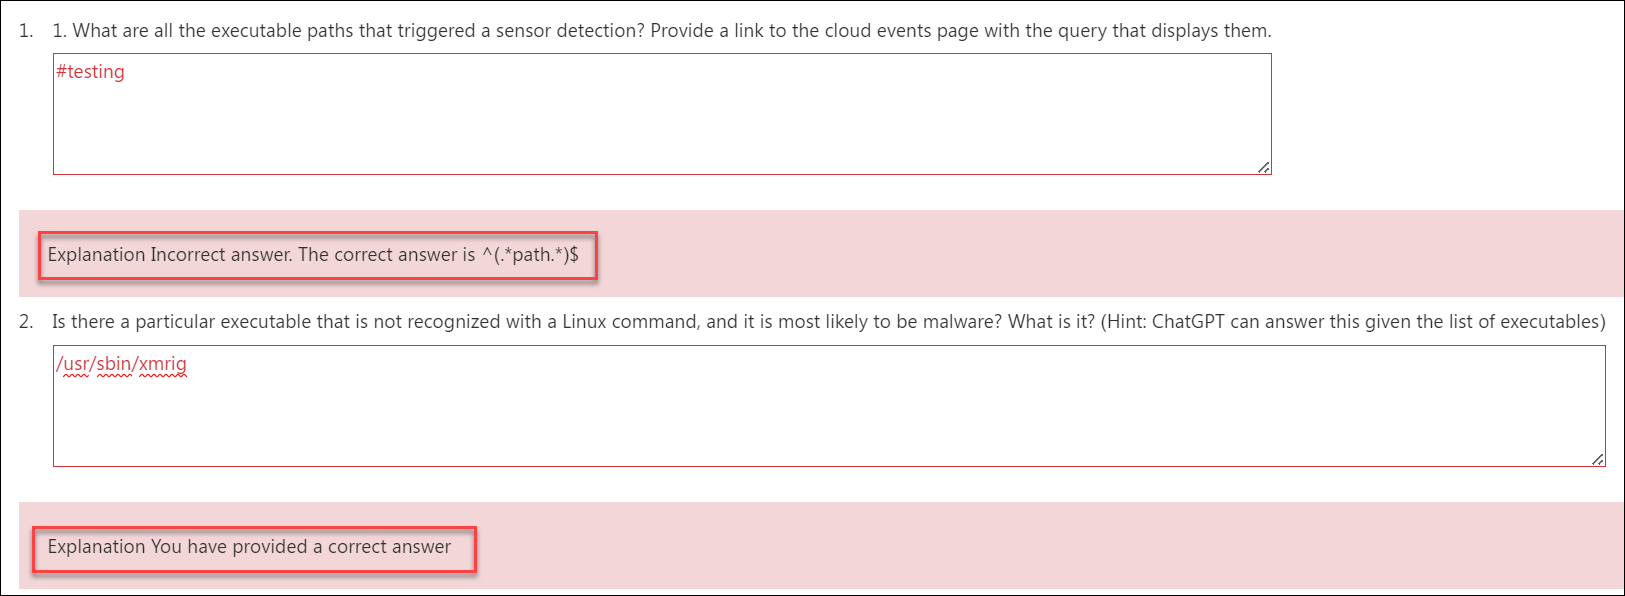
Fixes for Issue 1
If the answer to the first question is incorrect, the feedback will be in red; for subsequent questions, the feedback color will depend on the correctness of each answer.
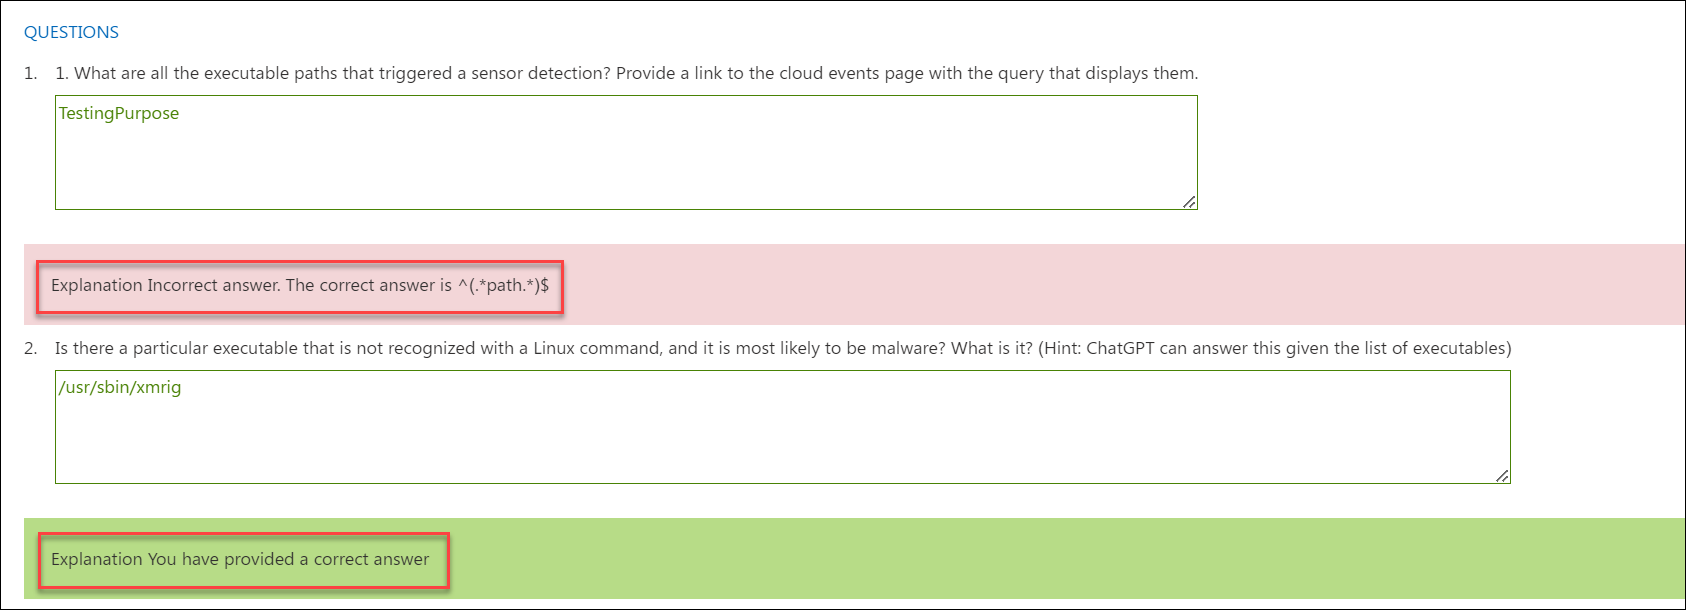
2. Issue 2
Even when the correct answer was provided, it was still highlighted in red.
Fixes for Issue 2
If the answer to the question is correct, the feedback will be in green.
23. Terraform Implementation - (15 August 2024)
Requirement
Enabling Terraform template support in CloudLabs.
Implementation
This feature allows a user to deploy the resources using a Terraform engine.
Steps to set up a Terraform template
- Note : Please ensure that the flag Enable Terraform: true at the system admin level should be enabled for the Terraform feature to work.
Login to the CL portal and navigate to the required tenant (WIZ). On the left-hand side of the page, you will see the Template section.
Click on Edit for the template where you want to upload the Terraform template.
Click on the Add button under the “Deployment Manager Template” section if the Cloud Platform is GCP.
Note
If the Cloud Platform is AWS, the section will be named as CloudFormation Template.
If the Cloud Platform is Azure, the section will be named as ARM Template

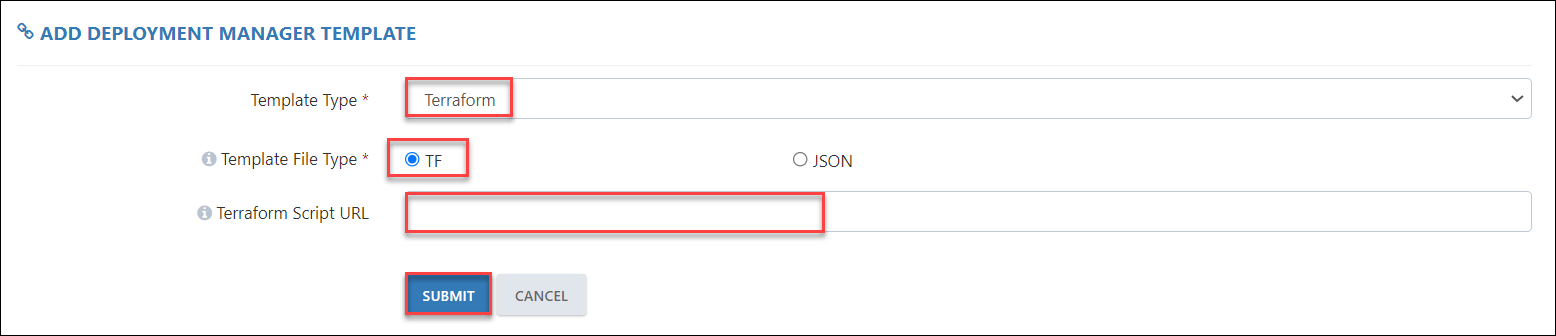
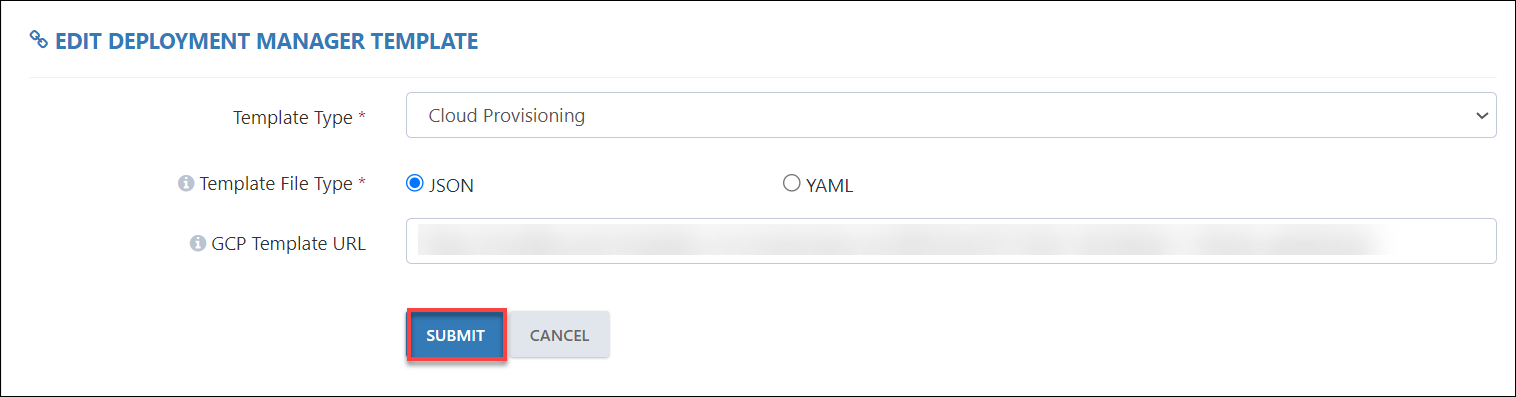
- Choose the configurations as specified below, then click Submit:
Template Type: Terraform
Template File Type: TF or JSON
Custom Role URL: Paste the URL of the terraform file either in tf or json format.
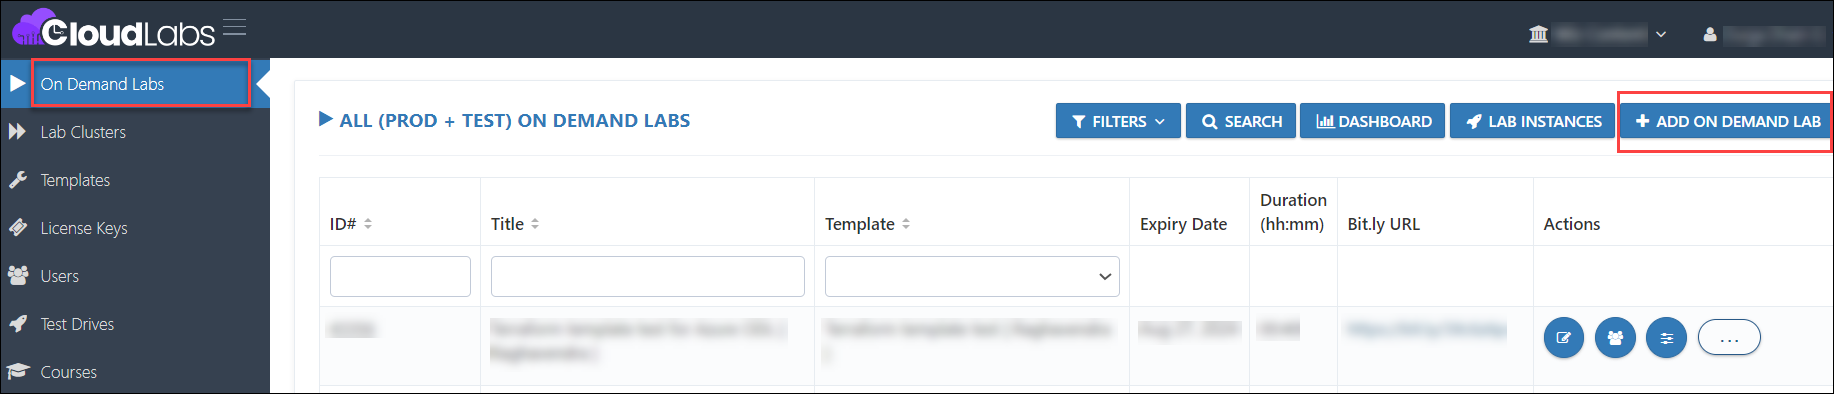
- Now, navigate to On Demand Labs section. Create an ODL using this template and click on users for this newly created ODL.
Note : To learn how to create an ODL, click here
Click on Add User, fill out the user details, and launch the environment.
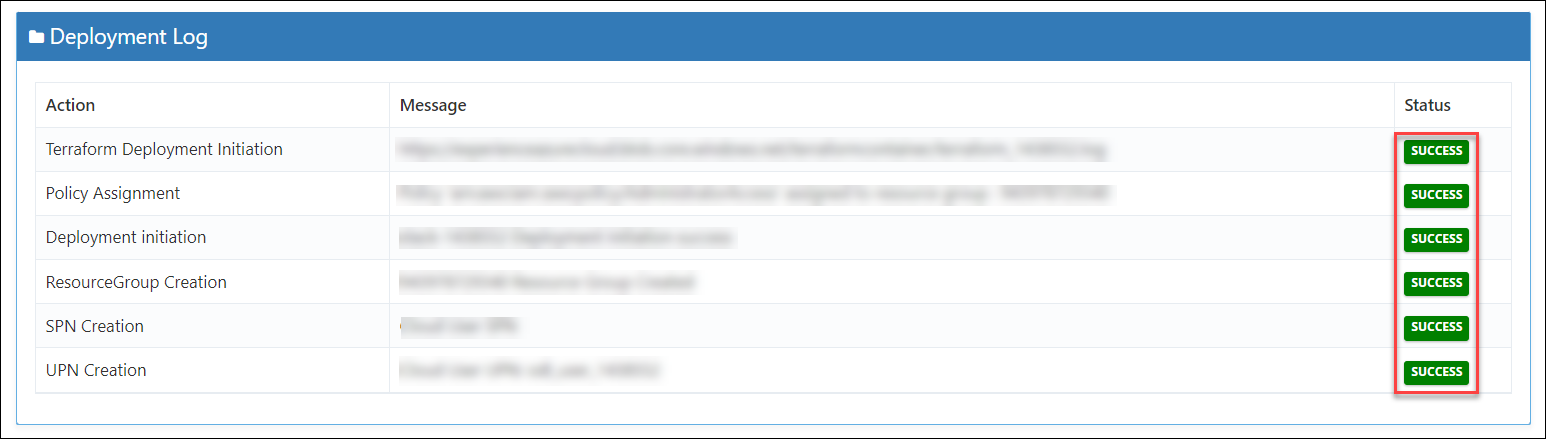
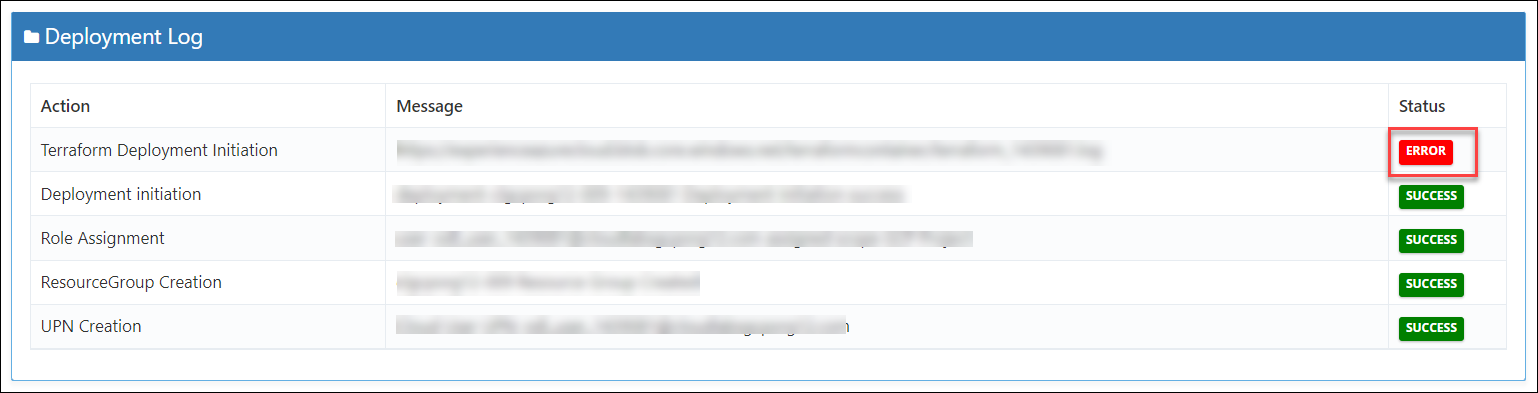
Once the deployment is complete, status can be seen under the Deployment Activity Log in the lab status section.

Success Scenario:
Failure Scenario:
Limitations
- Terraform template can’t be added to a shared subscription (Reason: Terraform can create additional RGs which will be left during cleanup).
- RDP over HTTPS feature is not supported at this moment (Added to the next iteration).
References
Sample TF files:
Sample JSON files:
24. Auto Extension Approval - (15 August 2024)
Feature Requirement
This feature was needed to streamline the process of extending duration and credit under managerial oversight.
Implementation
The solution involves configuring settings at the ODL level to enable duration and credit extensions with manager approval.
Steps for Enabling Manager-Approved Duration and Credit Extension Feature
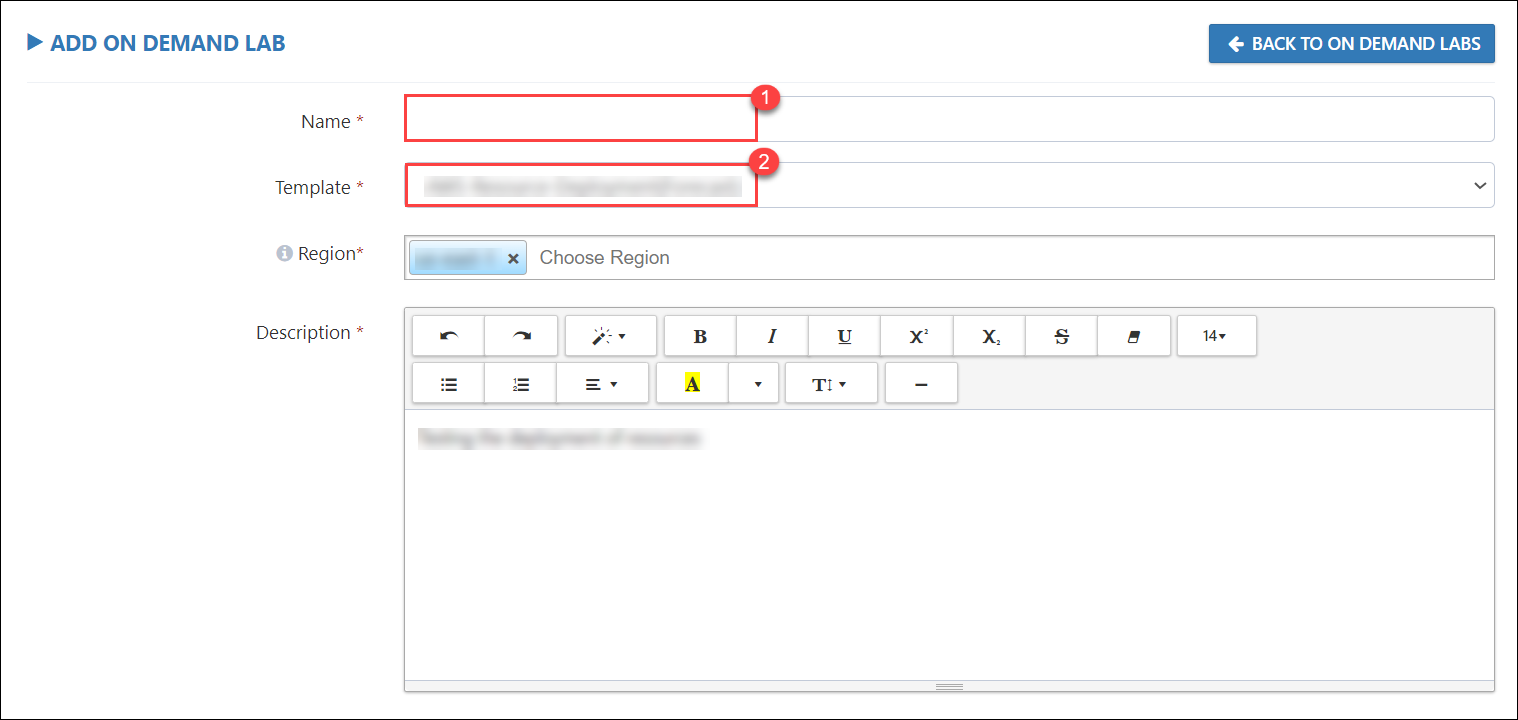
Log in to the CL portal and click on + ADD ON DEMAND LAB in the On Demand Labs section.
Name the ODL, choose a template to associate with it, and complete all the required details.
Note : To learn how to create an ODL, click here

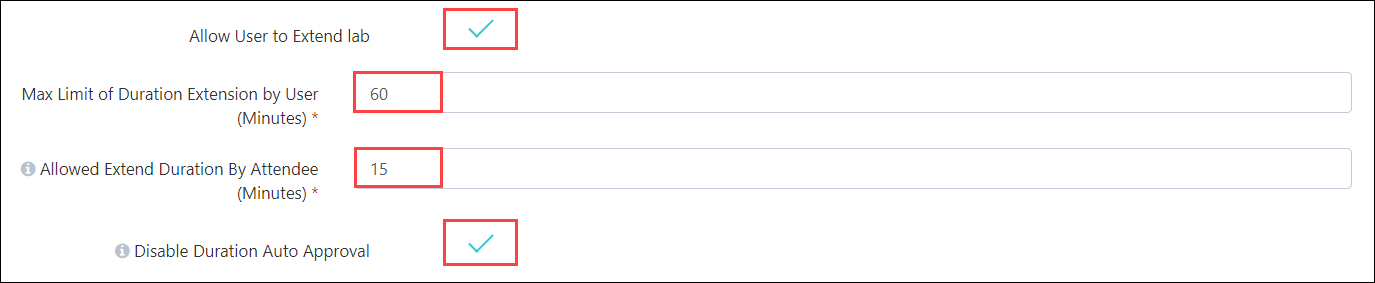
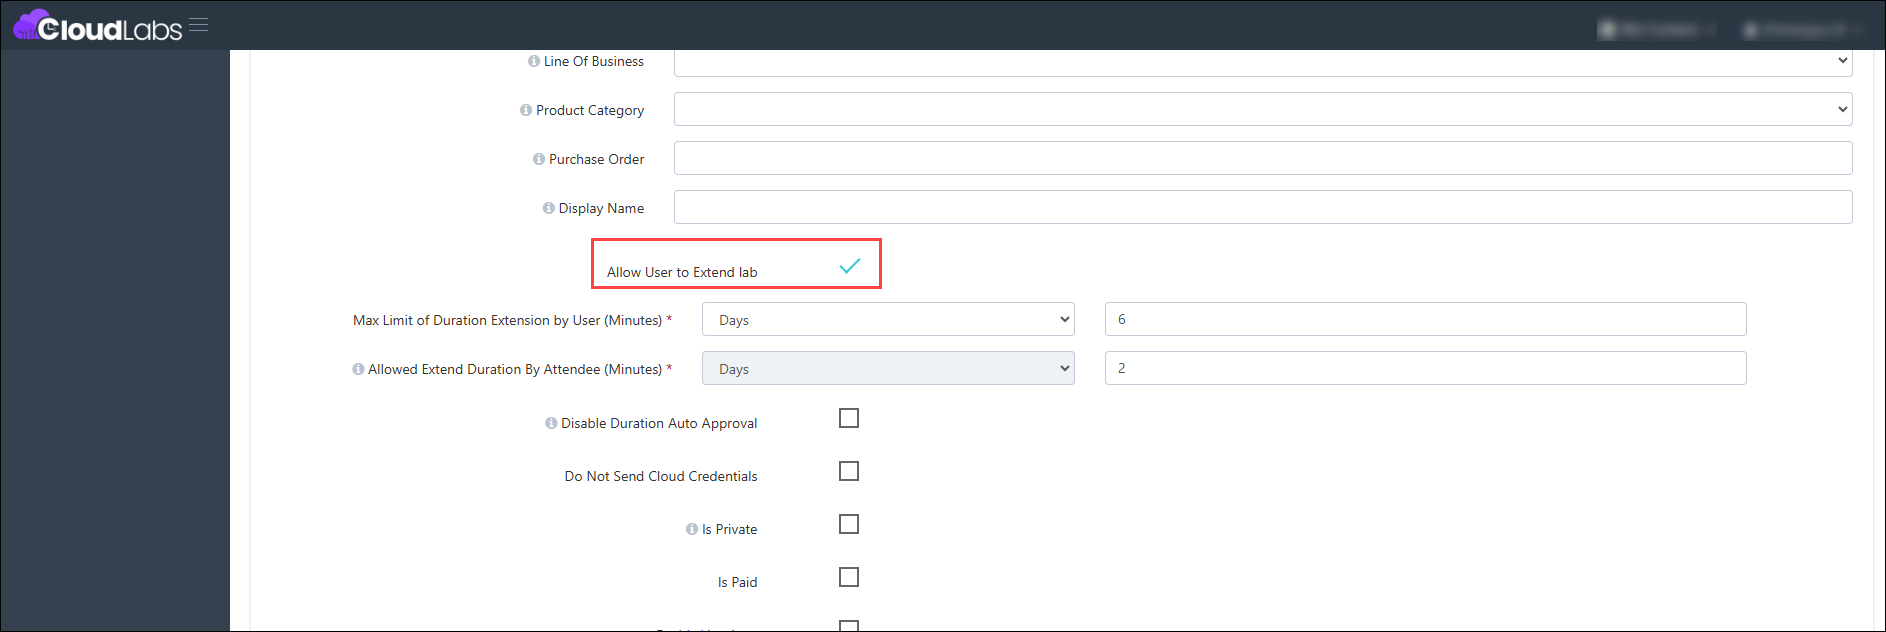
- To add the Duration Extension feature to your ODL, ensure that you click on the checkbox labeled "Allow user to Extend lab" and select the configurations as specified below."
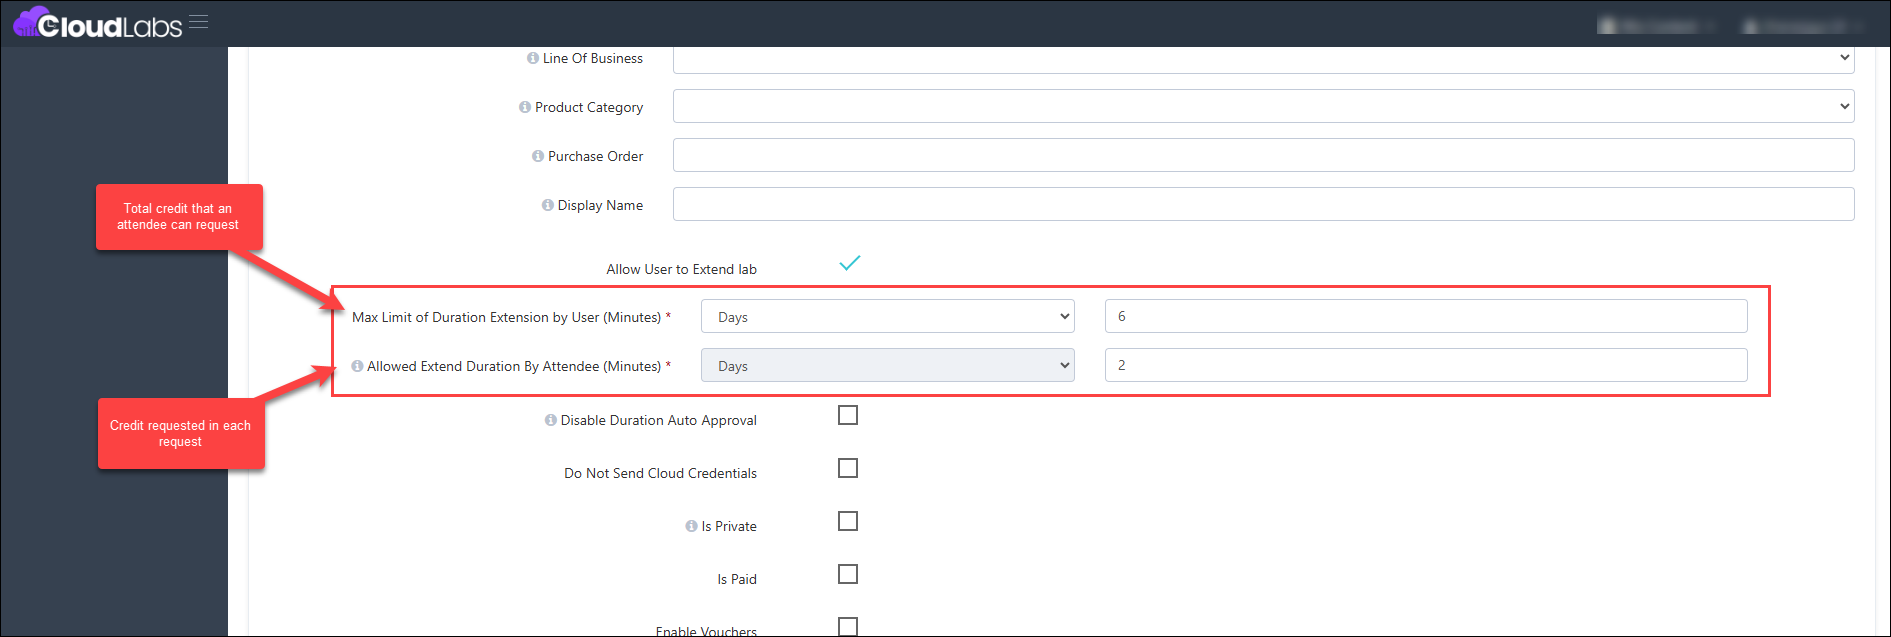
Max Limit of Duration Extension by User : Specifies the maximum time duration.
Allowed Extend Duration By Attendee : Specifies the time interval for extensions within the max limit.
Disable Duration Auto Approval : Ensure to click on this checkbox for manager approval.
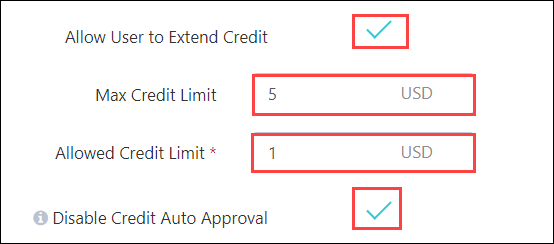
- To add the Credit Extension feature to your ODL, ensure that you click on the checkbox labeled "Allow user to Extend Credit" and select the configurations as specified below."
Max Credit Limit : Specifies the maximum Credit extension limit.
Allowed Credit Limit : Specifies the credit interval for extensions within the max limit.
Disable credit Auto Approval : Ensure to click on this checkbox for manager approval.
Click on the Submit Button after enabling the Duration and Credit Extension Feature.
Steps for Testing Manager-Approved Duration and Credit Extension Feature
Navigate to the On Demand Labs section and click on Users for the ODL where the Duration Extension and Credit Extension features have been enabled.
Click on Add User, fill out the user details, and launch the environment.
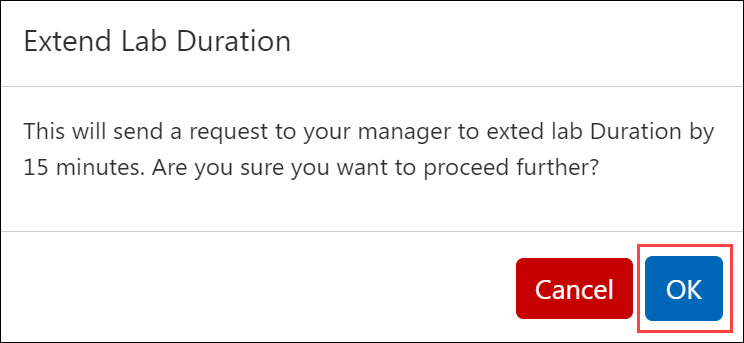
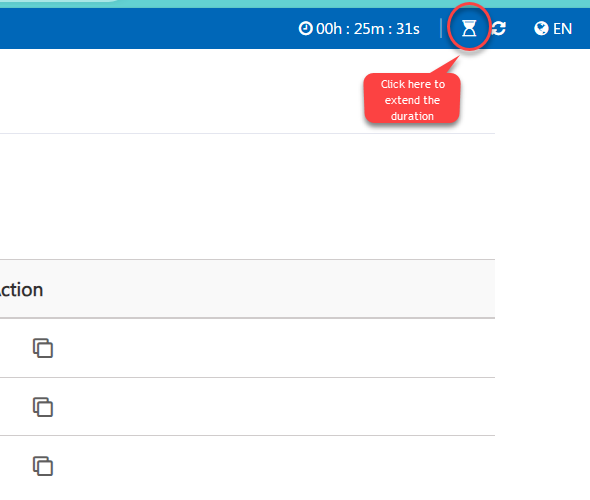
On the top right corner of the page, click on the duration extension icon as shown below.
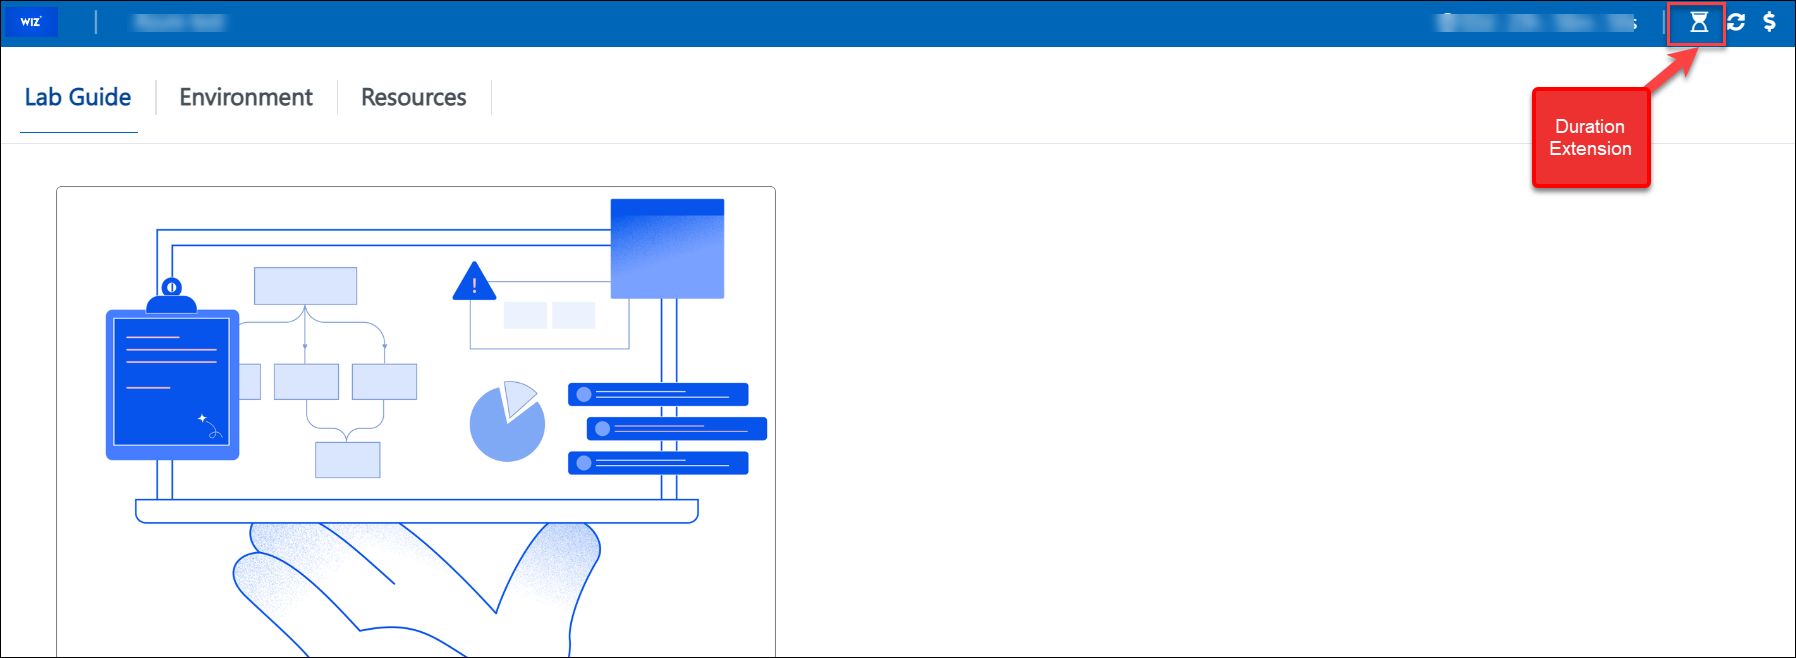
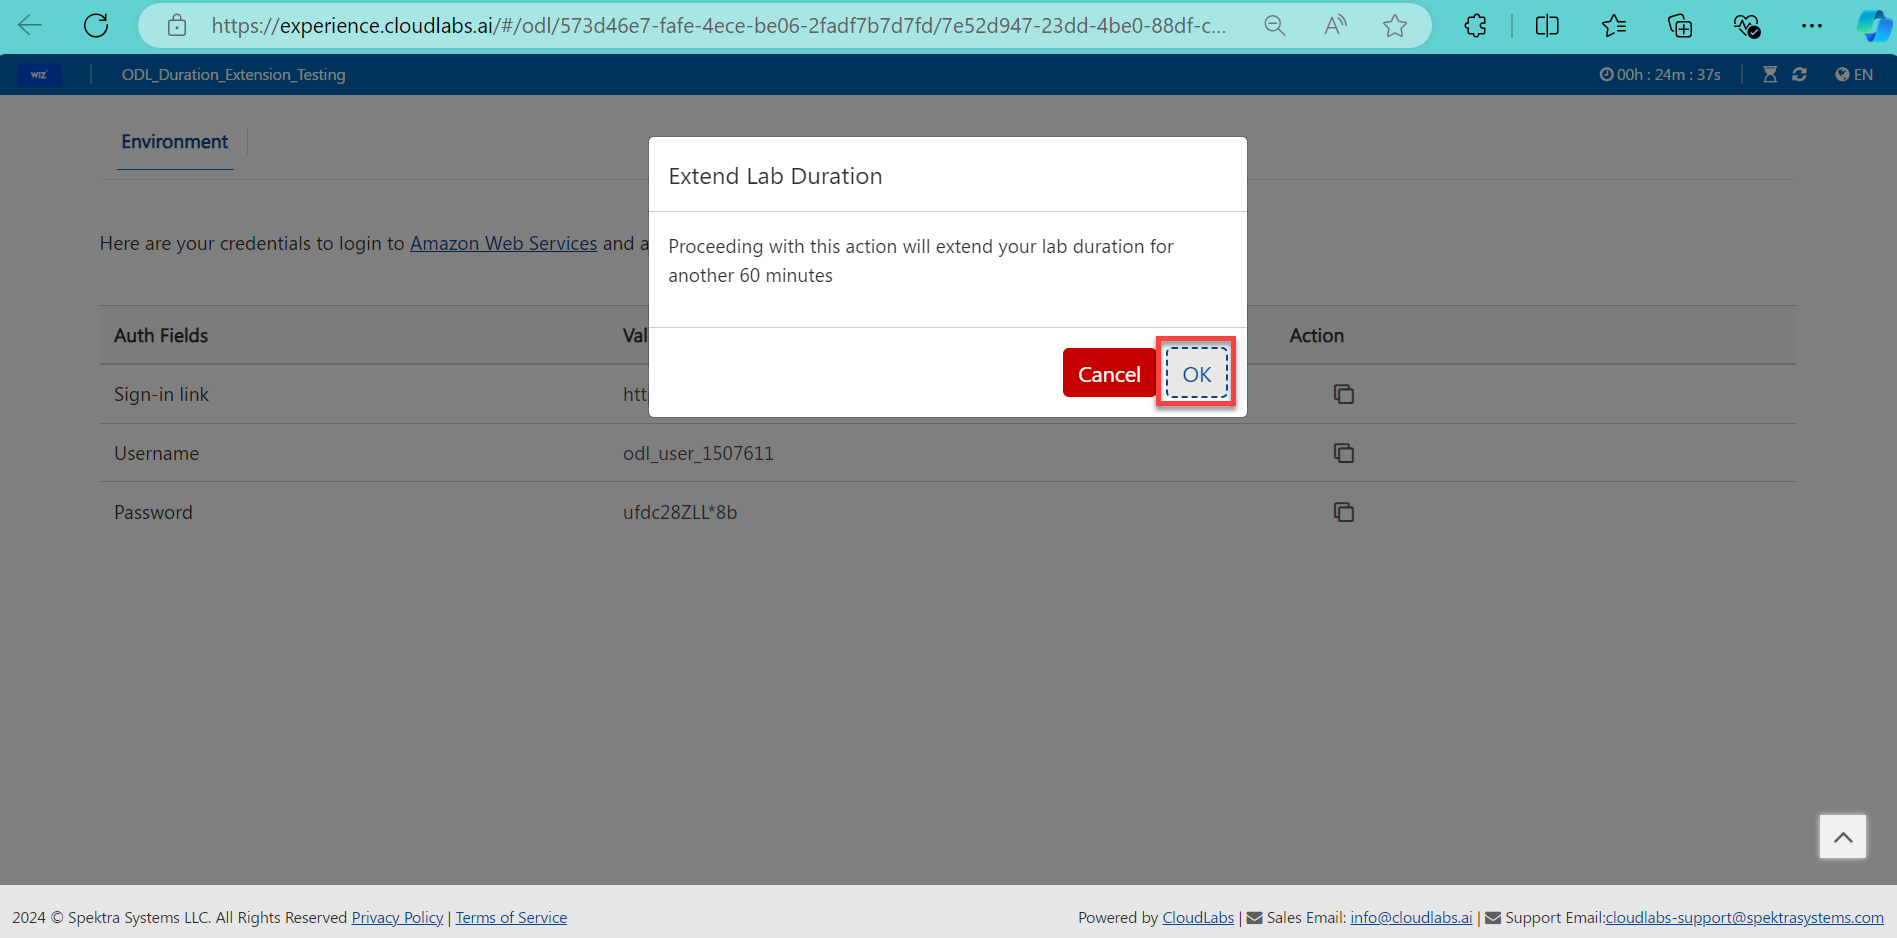
Click on Okay to extend the duration of the lab.
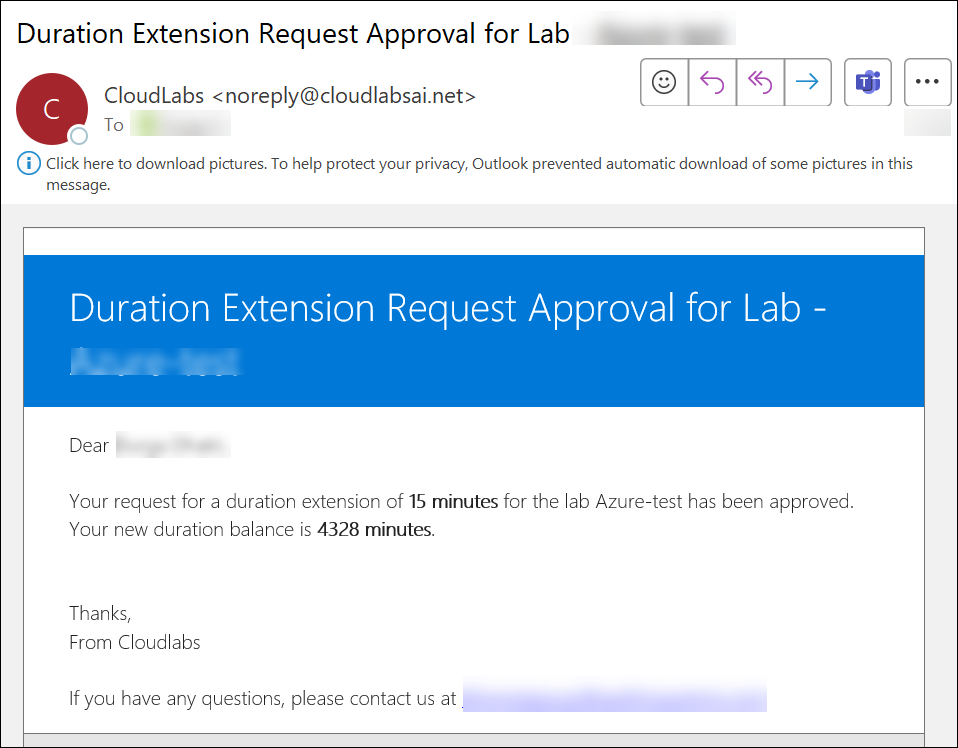
The requester will receive an email confirming the duration Extension.
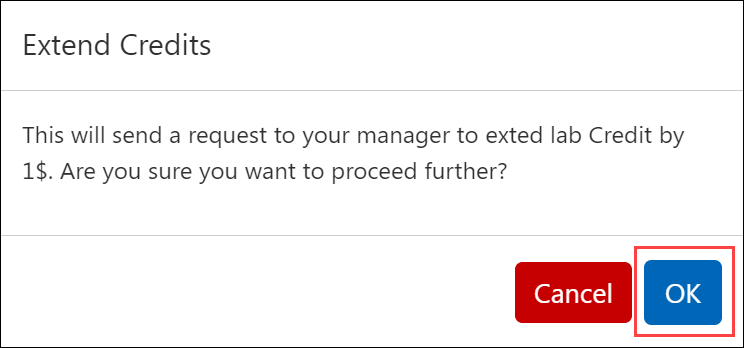
On the top right corner of the page, click on the Credit extension icon as shown below.

Click on Okay to extend or increase the credit.
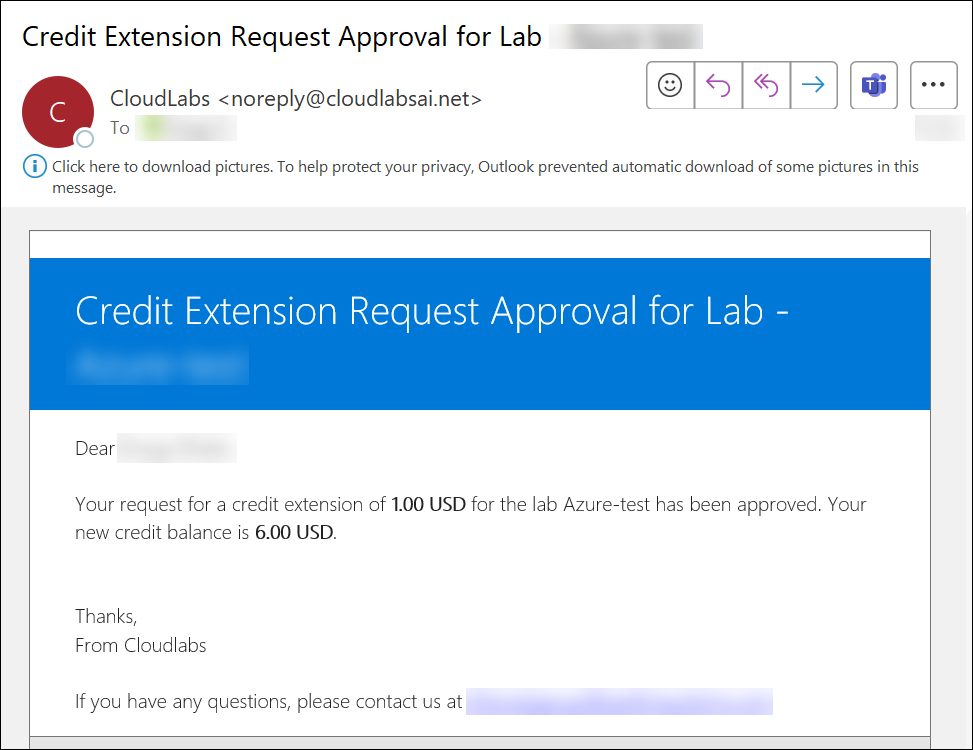
The requester will receive an email confirming the Credit Extension.
Manager's Approval Process for Duration or Credit Extensions
The manager will receive an email as soon as a duration or credit extension is requested by the requester.

Note : The above image represents the email for credit extension.
Once the manager approves the request, the duration or credit extension will automatically take effect in the ongoing lab.
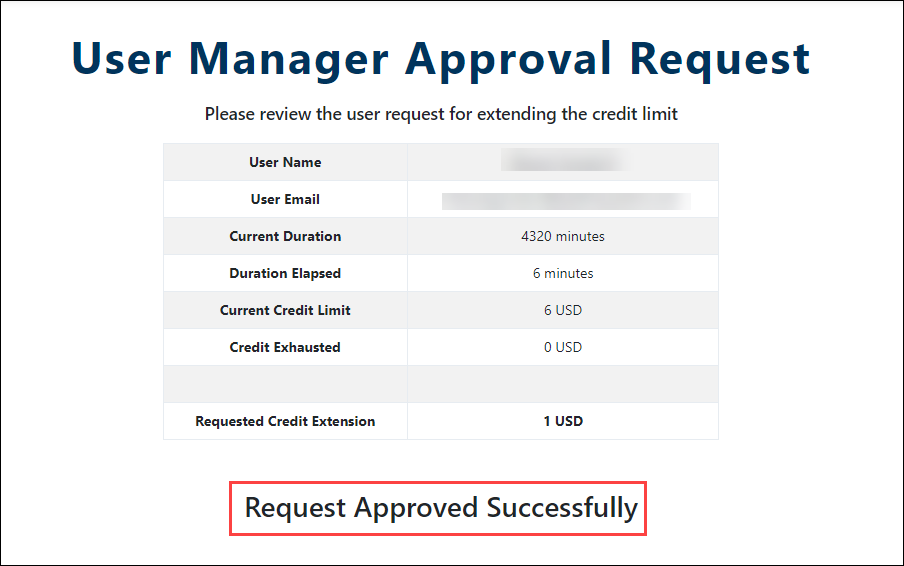
Note : The above image represents credit extension approval.
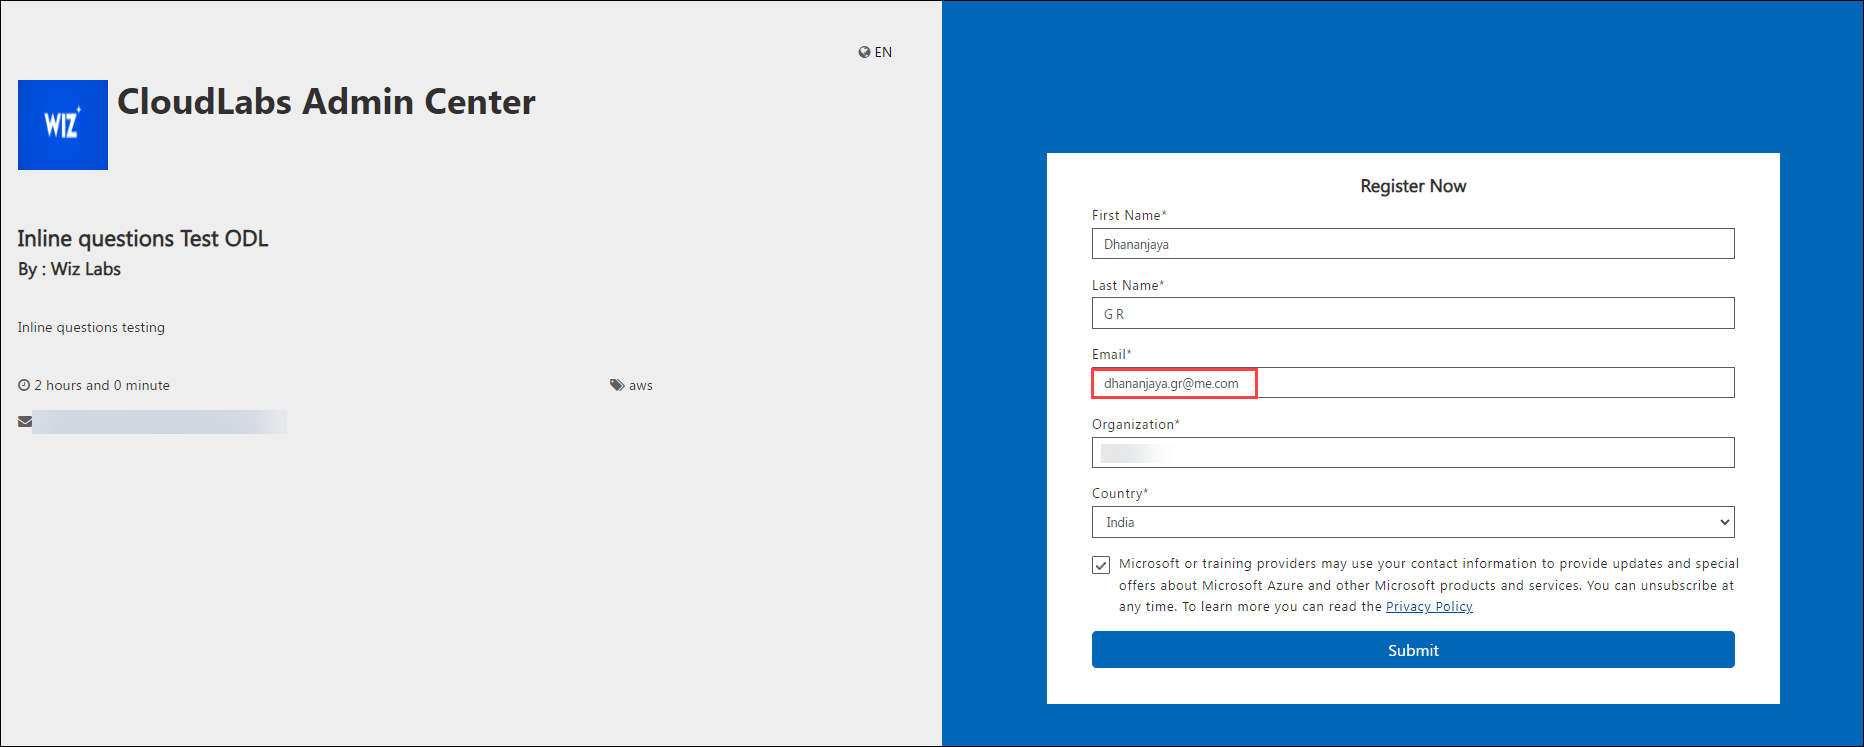
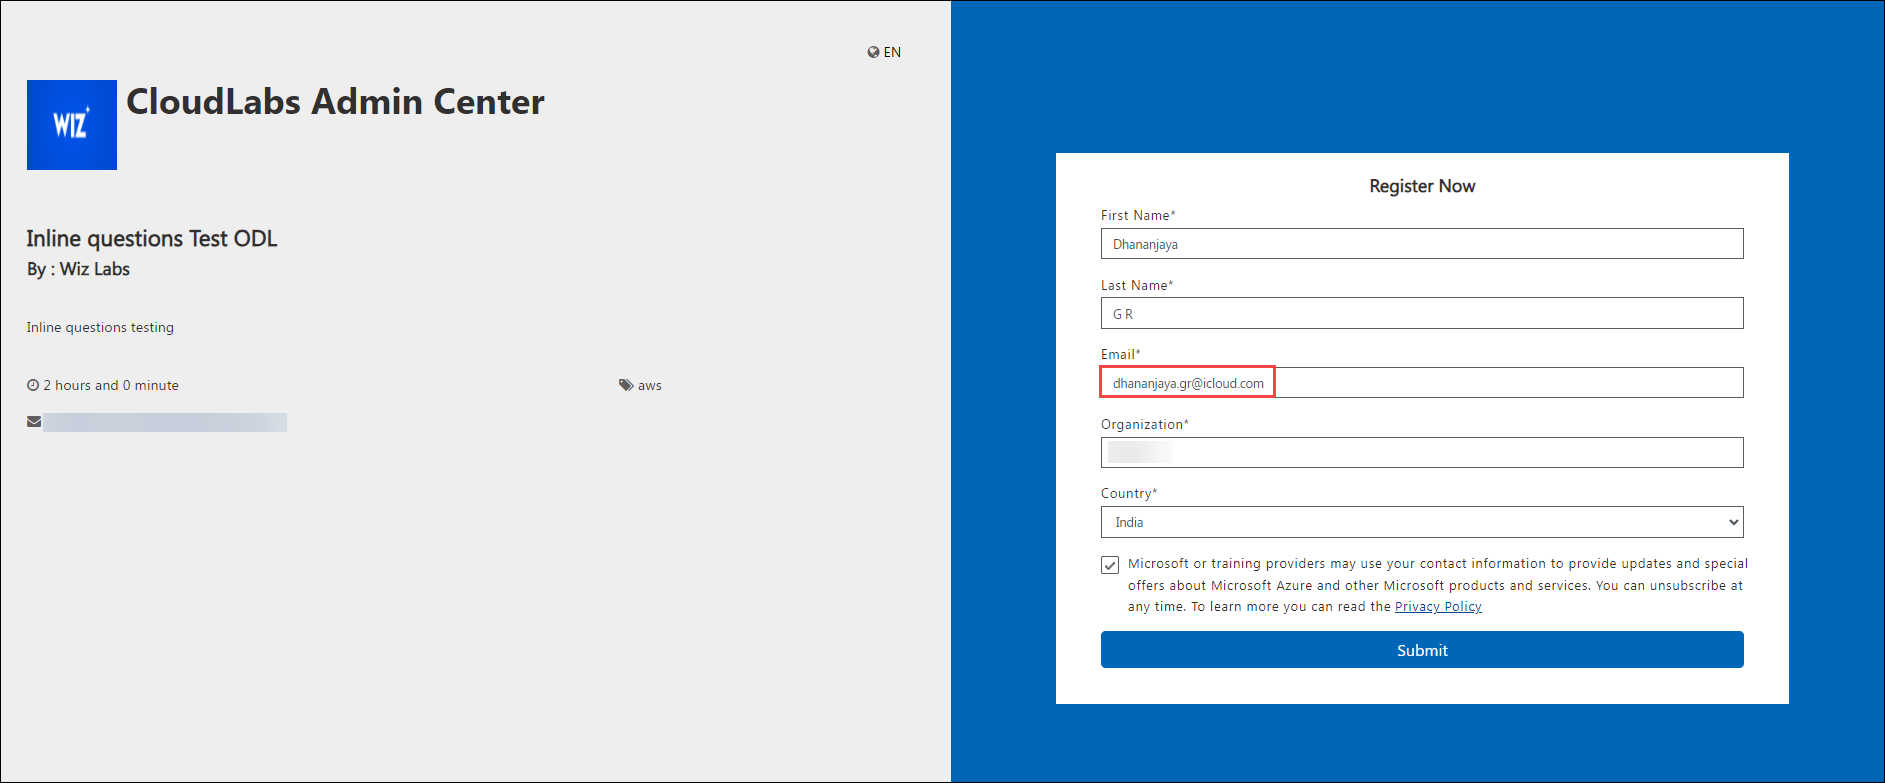
25. Personal Email Consideration in Tenant Level - (30 September 2024)
Feature Requirement
Need to add the me.com and icloud.com for the Personal Email address.
Implementation
me.com and icloud.com are considered as the Personal Email address.
Allowing Personal email consideration
If we are allowing the personal Email address at the ODL level then Users can able to register with me.com and icloud.com.
Steps for enabling, Disabling and Checking the functionalities of allowing personal email address.
Log in to the Cloud Labs portal and navigate to the required tenant (WIZ). On the left-hand side of the page, you will see the ODL section.
Navigate to the necessary ODL and select the edit (1) button.
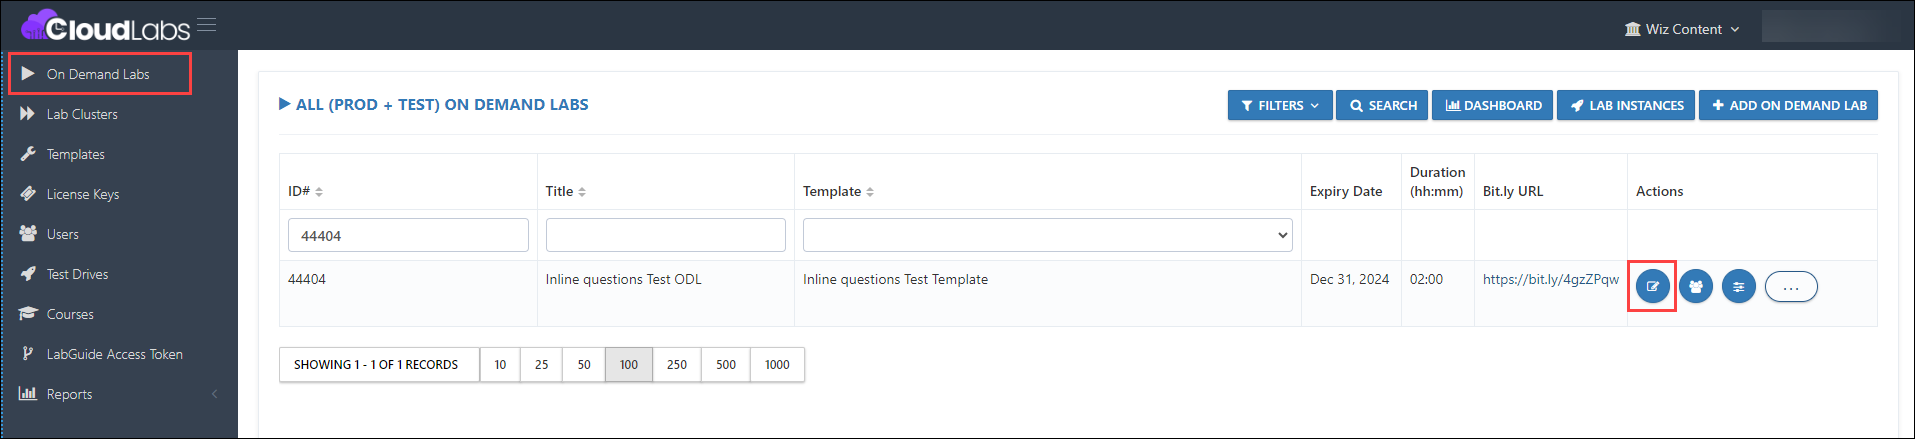
Then navigate down and select the checkbox labeled Allow personal email addresses.
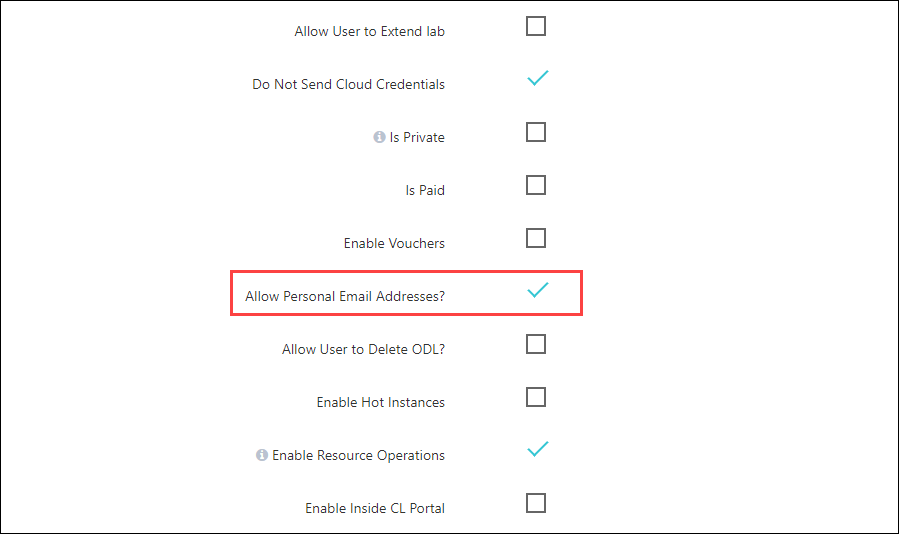
Click on the Submit button.
Testing scenario:
Allow personal email addresses enabled:
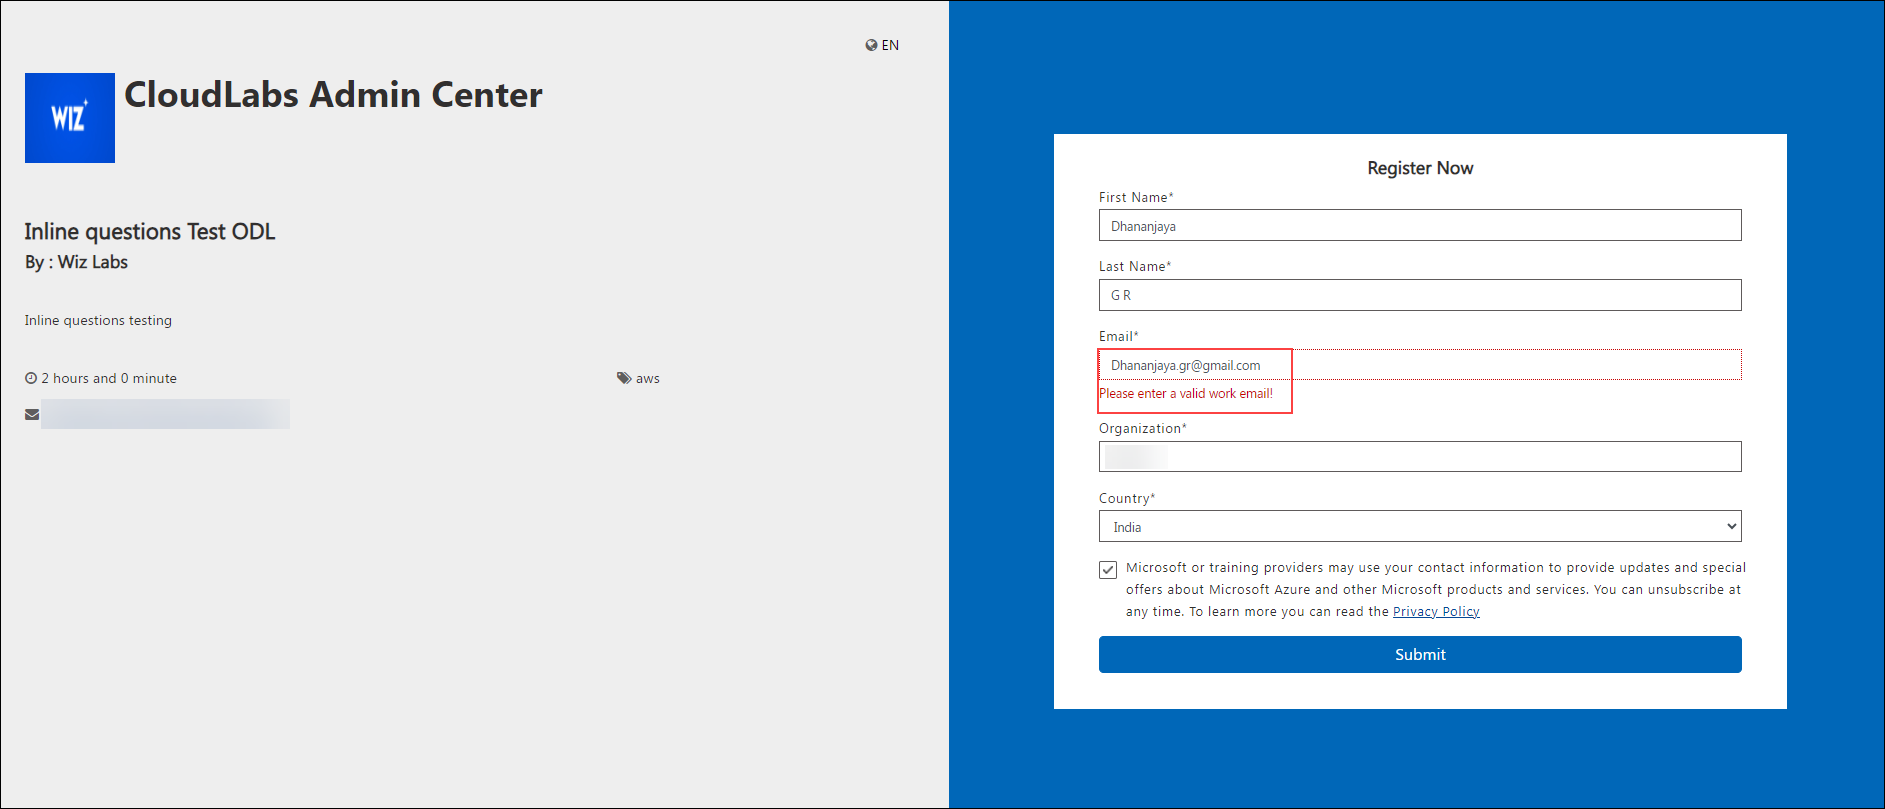
Allow personal email addresses disabled:
26. Retake Count Should Not Consider for Failed Deployments - (30 September 2024)
Feature requirement
Prevent retake count from decrementing when a deployment fails due to an error.
Implementation
When an instance or environment is deployed and fails, the retake count for failed deployments will not decrease. For each successful deployment, the retake count decreases by 1. For example, if the retake count is initially set to 5 and the deployment fails due to a template error, the count remains at 5.
Validating the retake count functionality
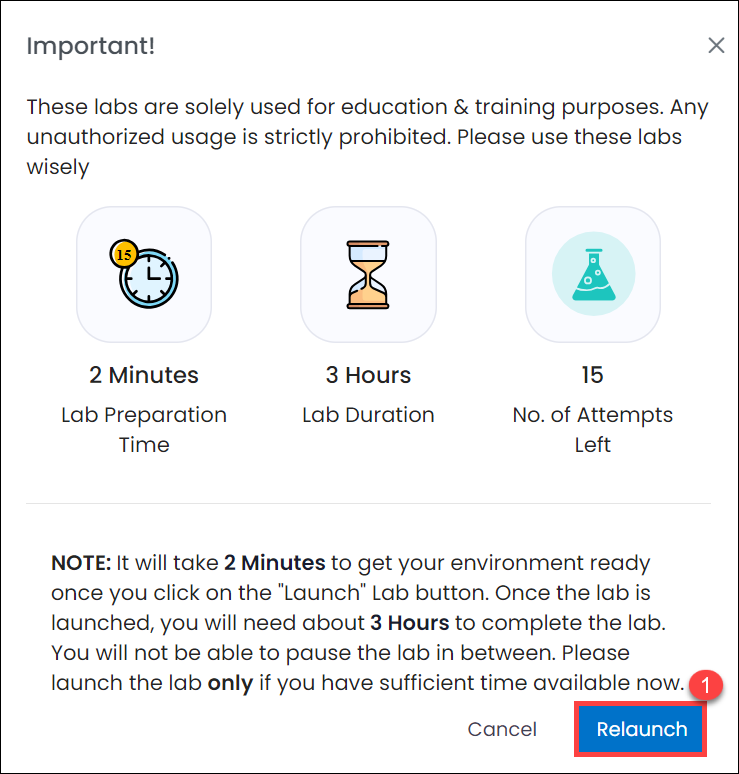
Phase 1: Testing the retake count for successful deployments.
Initially, the retake Count is set to 15 (1) before launching the environment, as shown below.
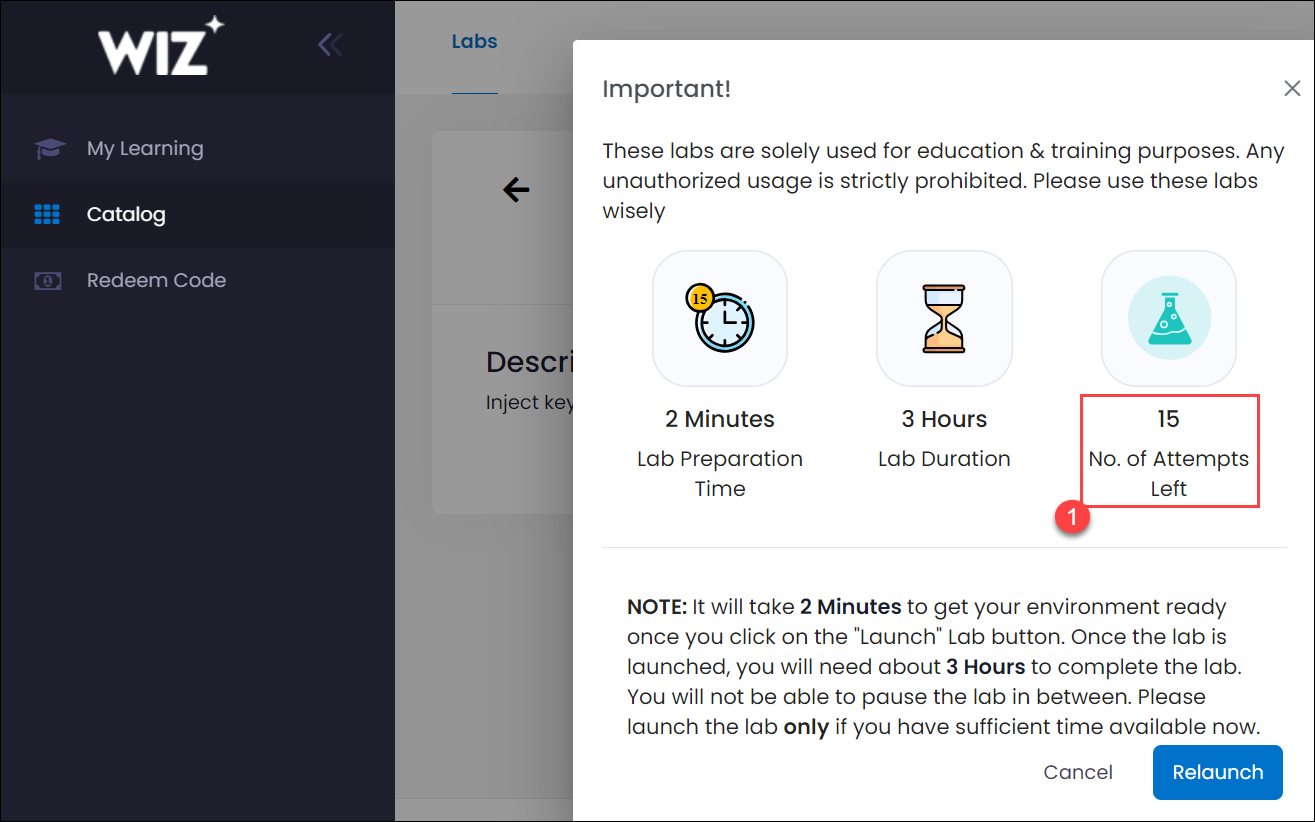
The Instance is launched by clicking the “Relaunch (1)” button as shown below.
The deployment of the environment will succeed.

The retake count gets reduced by 1 as a successful deployment has taken place. The No. of attempts or the retake count getting reduced is expected for successful deployments.
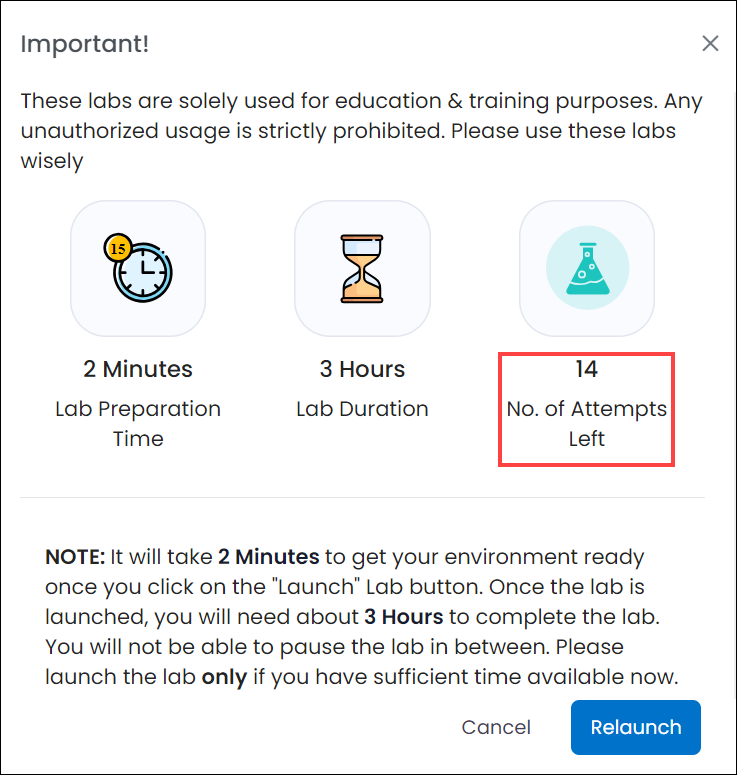
Phase 2: Testing the retake count for failed deployments.
Let the initial retake Count be 14 before launching the environment, as shown in the image below.
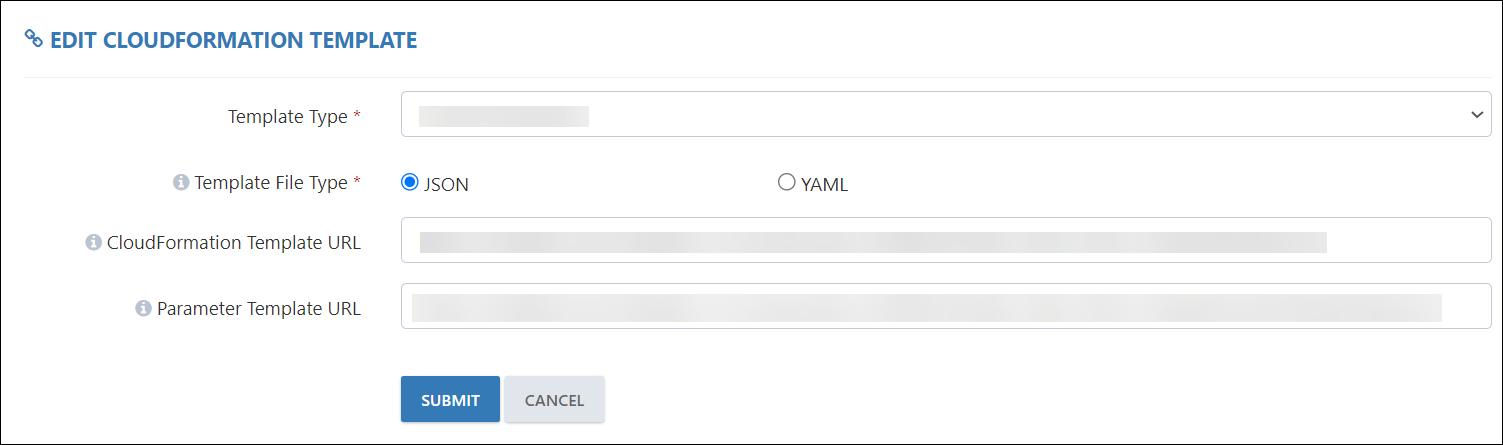
To test the retake count, the CloudLabs template is modified to obtain failed deployments.
The Instance is relaunched by clicking the “Relaunch (1)” button as shown in the picture.
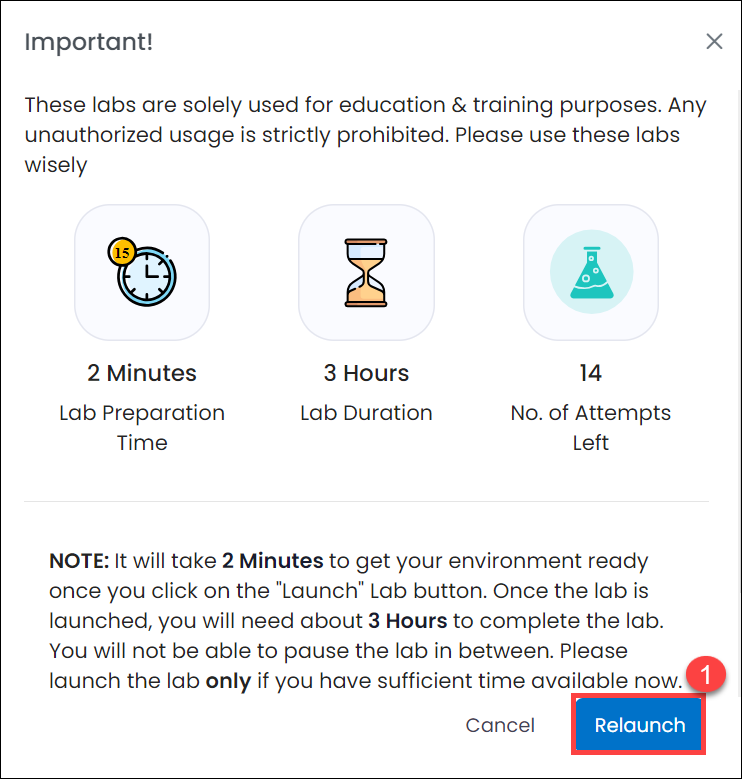
The deployment of the environment will fail.

The retake count remains the same as it was before deployment. The number of attempts, or the retake count, is expected to stay unchanged for failed deployments according to the requirements and implementation.
27. AWS Forecasted Costs in CloudLabs - (30 September 2024)
Feature Requirement
This feature allows users to view AWS forecasted costs directly within the CloudLabs platform, providing real-time insights into their budget and usage.
Implementation
Integrate AWS forecasting into CloudLabs, allowing users to view forecasted costs directly in the control panel.
Steps for checking AWS forecasted cost
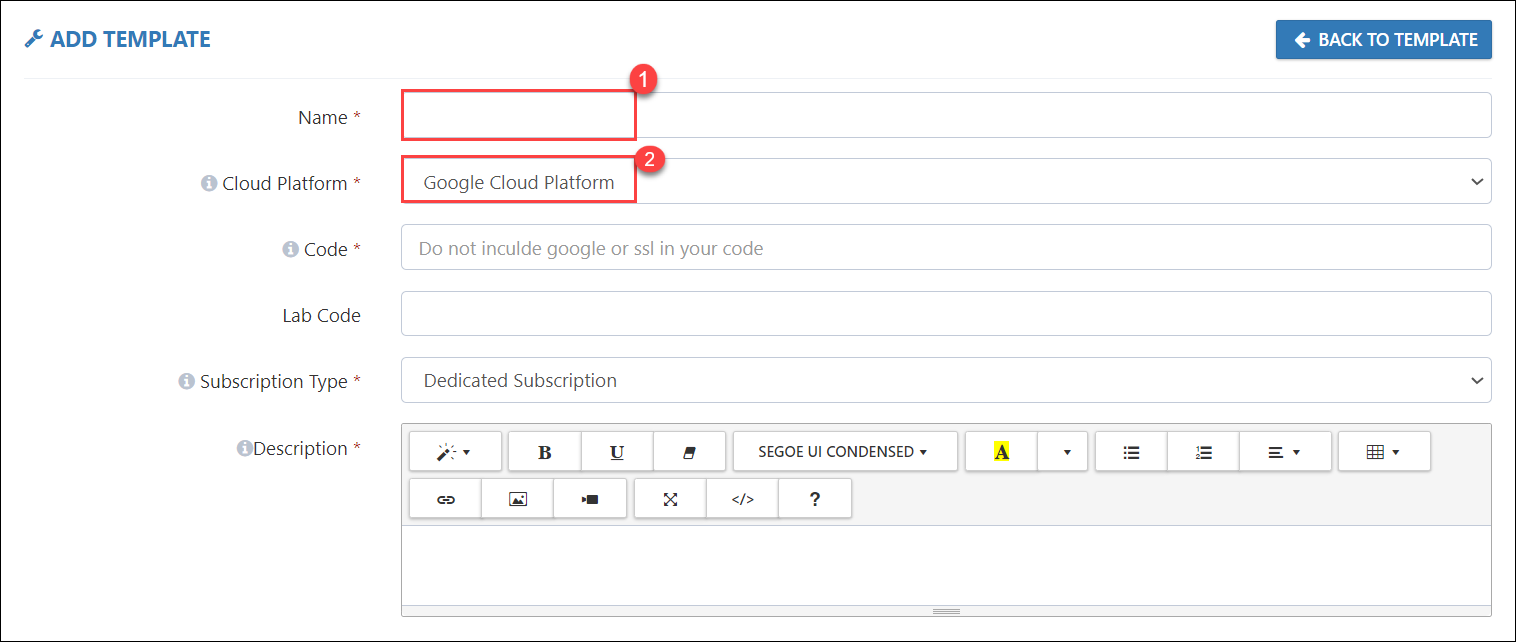
Log in to the CL portal, navigate to the Templates (1) section, and click on "+ ADD (2)" to create a new template.
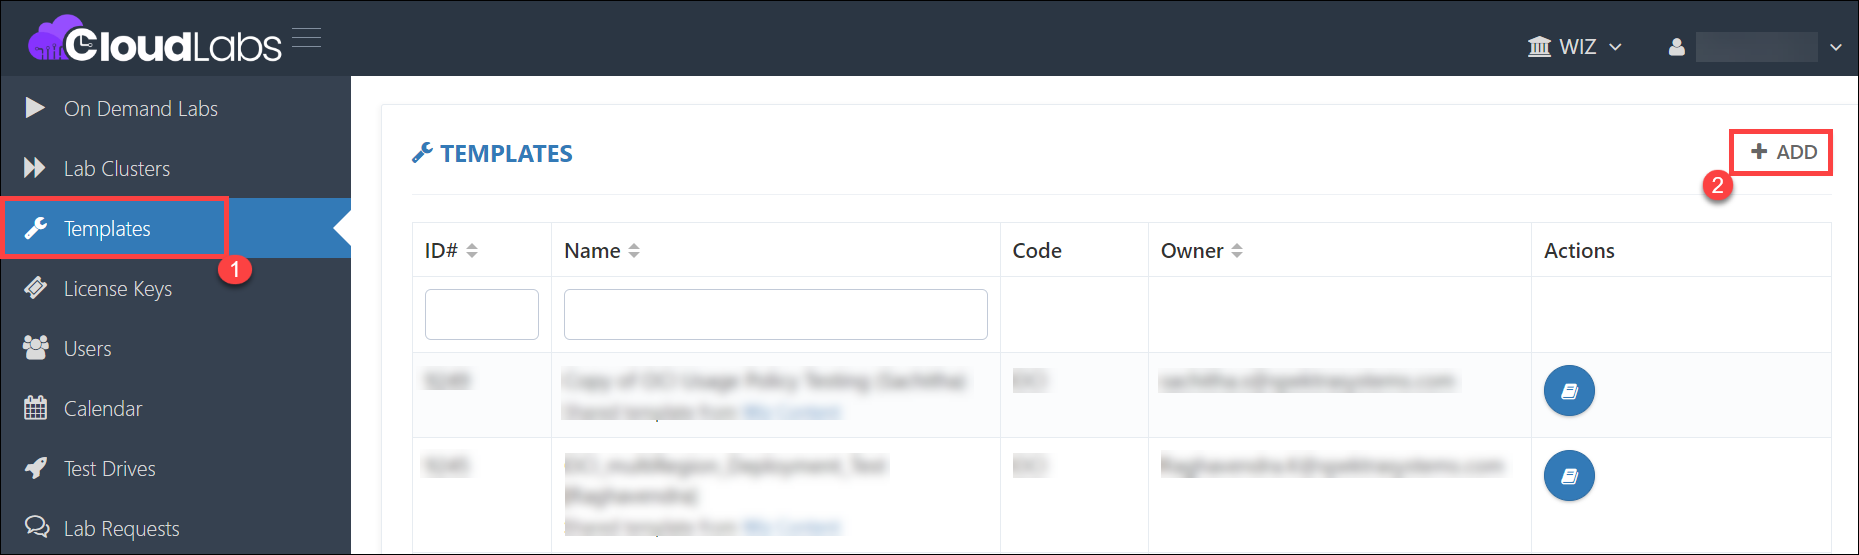
Name the template (1), select AWS as the Cloud Platform (2), and fill in all the required details. Note : To learn how to create a template, click here
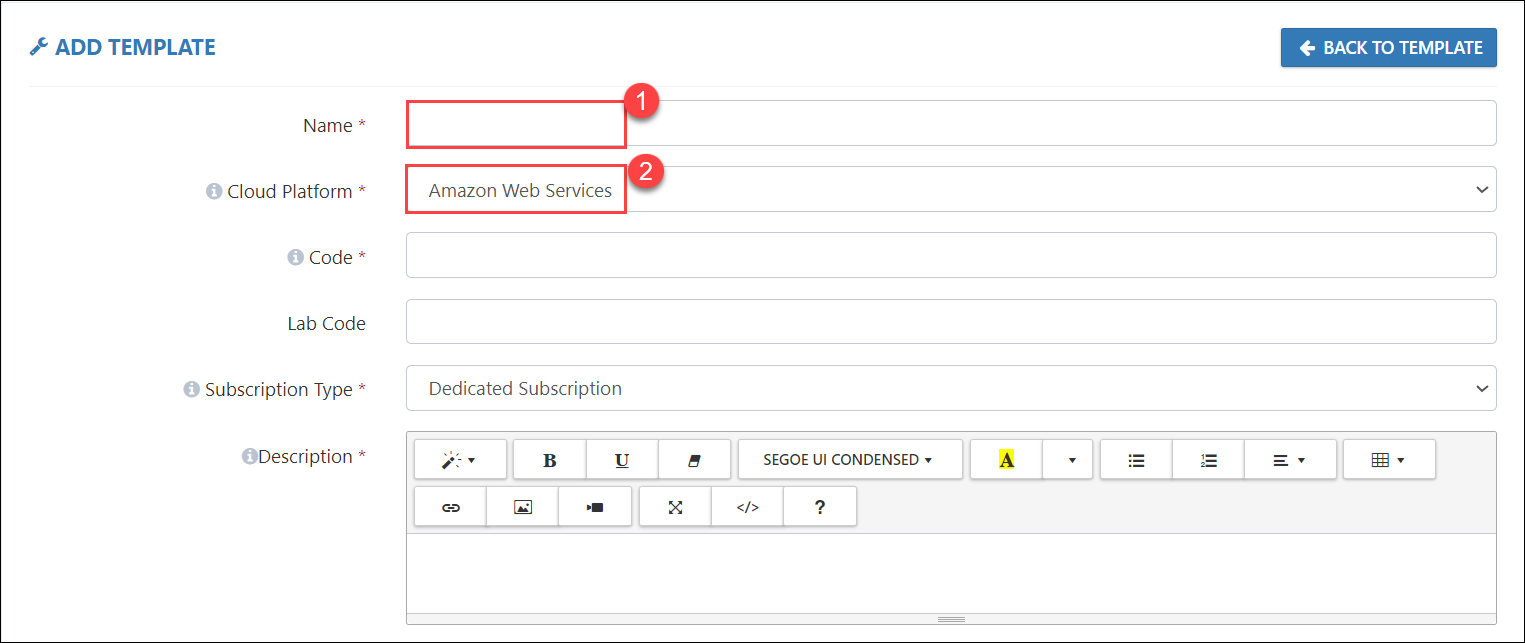
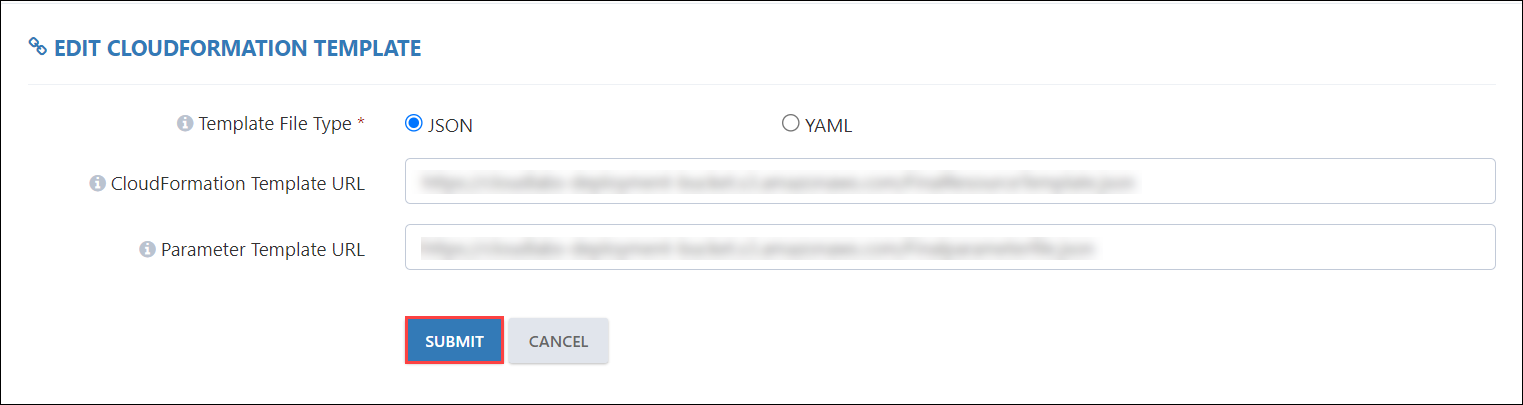
To deploy resources for cost forecasting, the user can either specify CloudFormation templates and parameter files or create the resources directly in the AWS console. To create resources using a CFT, provide the URL of the CFT and the parameter file as shown below in the template section and click on Submit.
To create resources on the AWS console or to list or describe them, provide the necessary template permissions based on the requirements and click on Submit.
Navigate to the On Demand Labs (1) section and click + ADD ON-DEMAND LAB (2) in the top-right corner to create a new ODL.
Name the ODL(1), choose the newly created template(2) to associate with it, and fill in all the required details.
Note : To learn how to create an ODL, click here
Additionally, click on "Enable Credit-Based Allocation" while creating the ODL to retrieve the forecasted costs, and then Submit.
In the On Demand Labs (1) section, click on Users (2) for the ODL associated with Cost Forecasting.
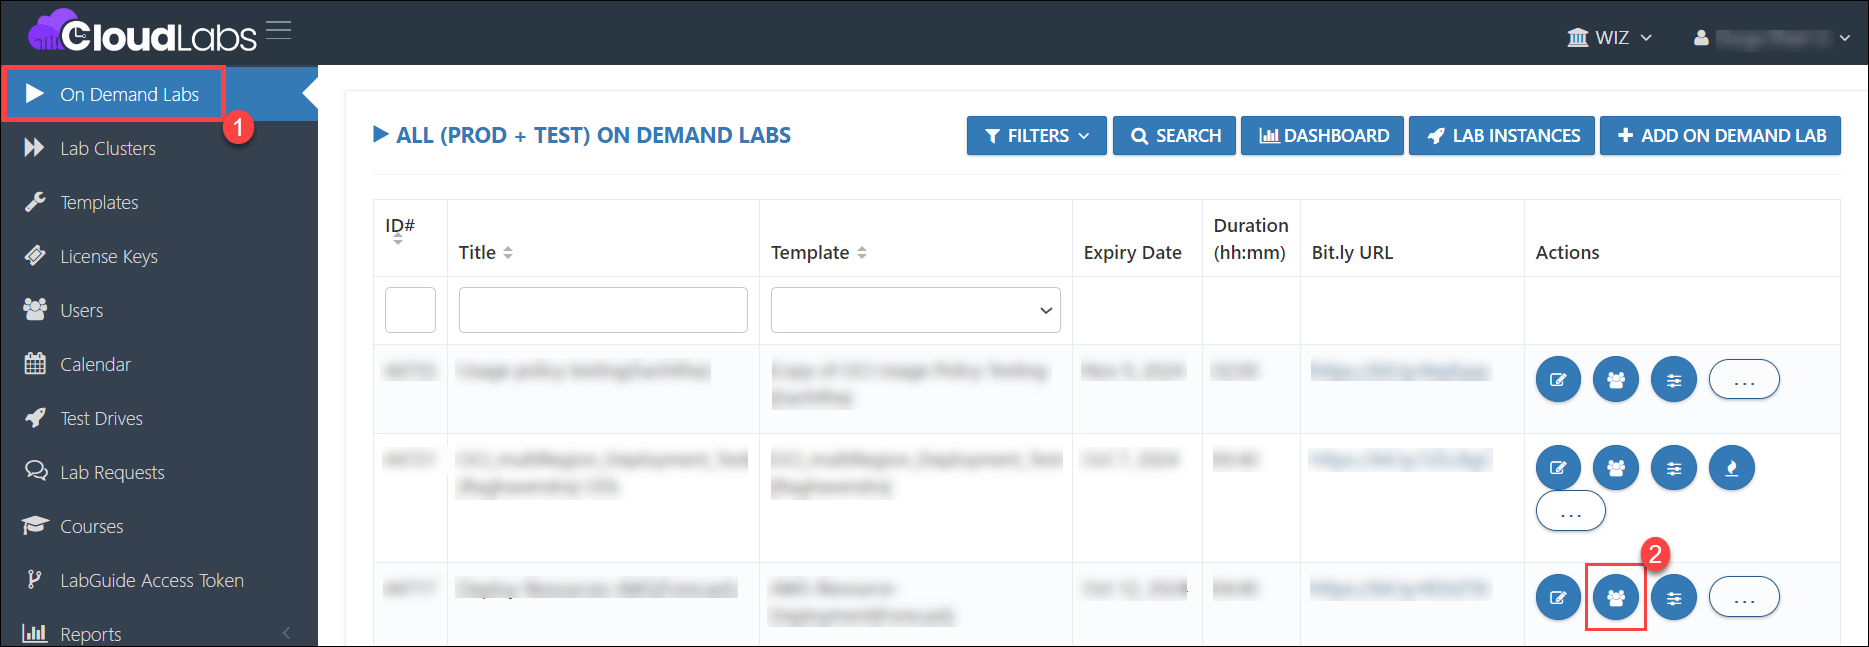
Click on Add User, fill out the user details, and launch the environment.

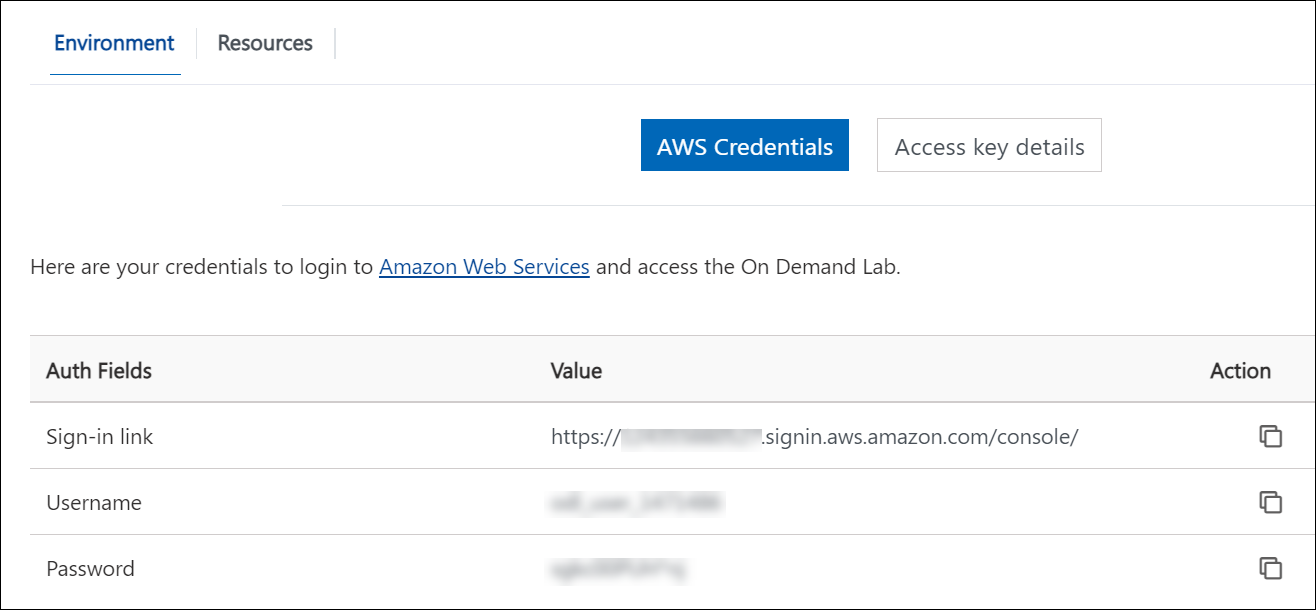
Log in to the AWS account using the provided credentials and deploy the resources. If the resources are deployed via the CFT, ensure that all the resources have been created successfully.
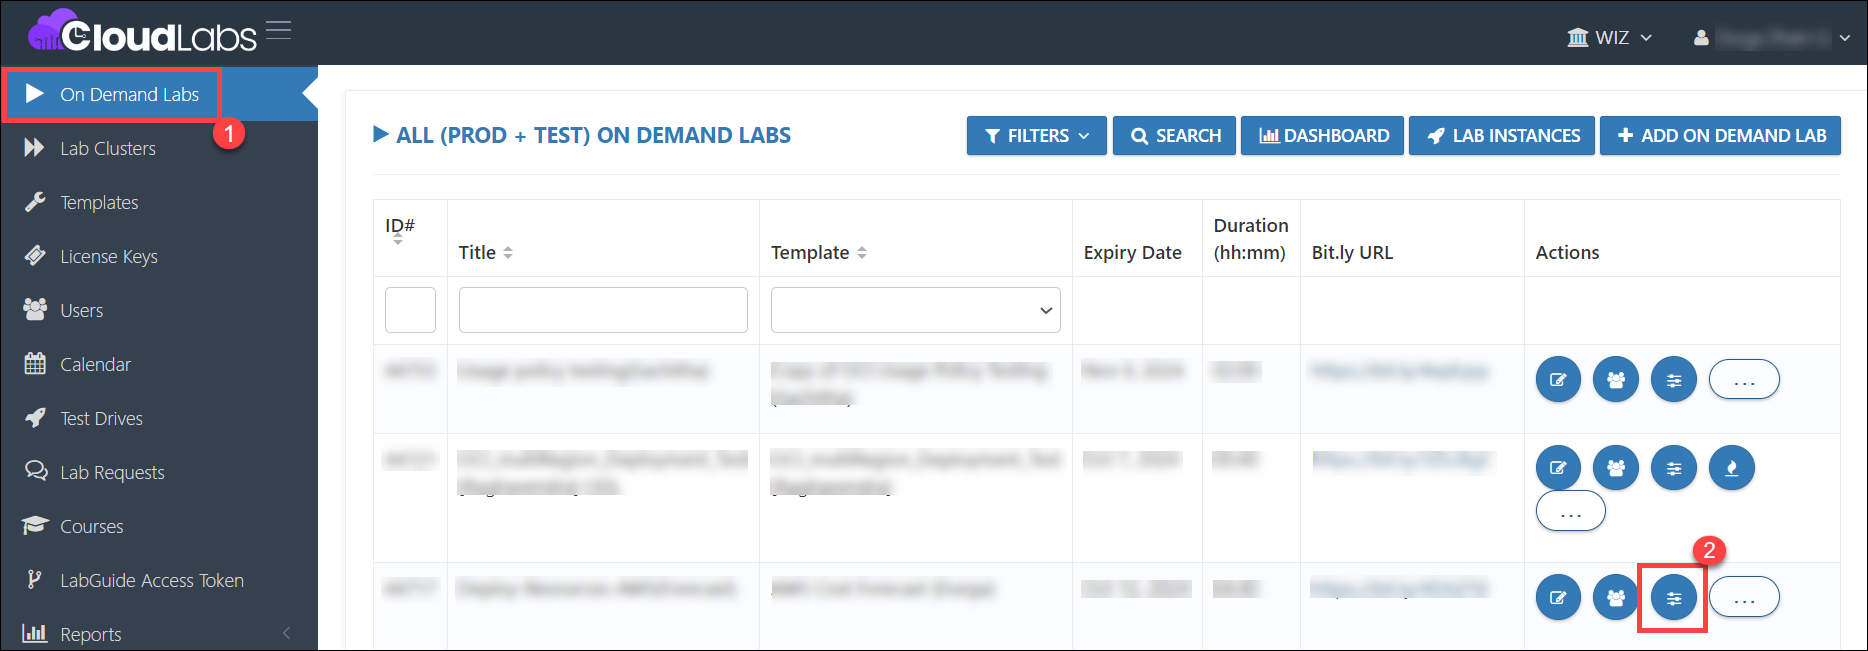
In the CloudLabs On Demand Labs (1) section, click on Control Panel (2) for the ODL associated with Cost Forecasting to monitor the forecasted costs.
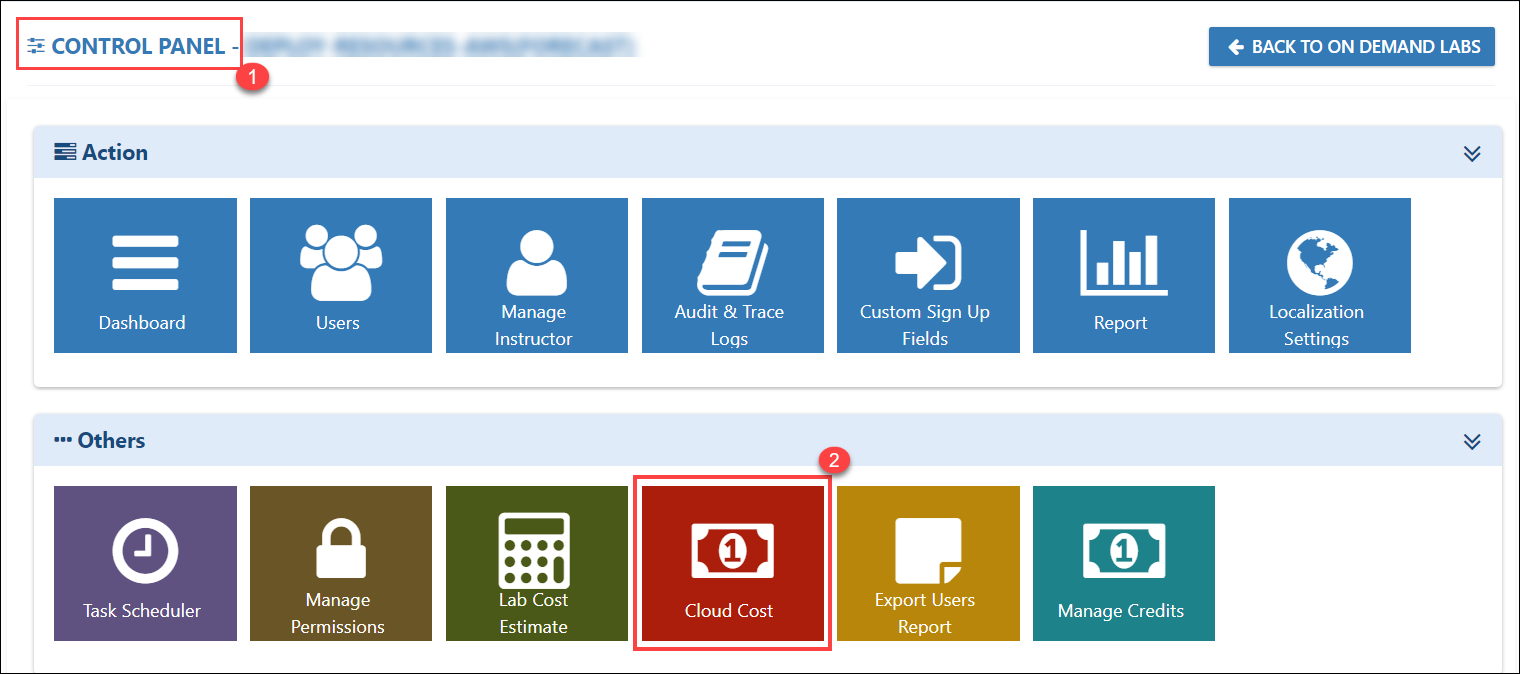
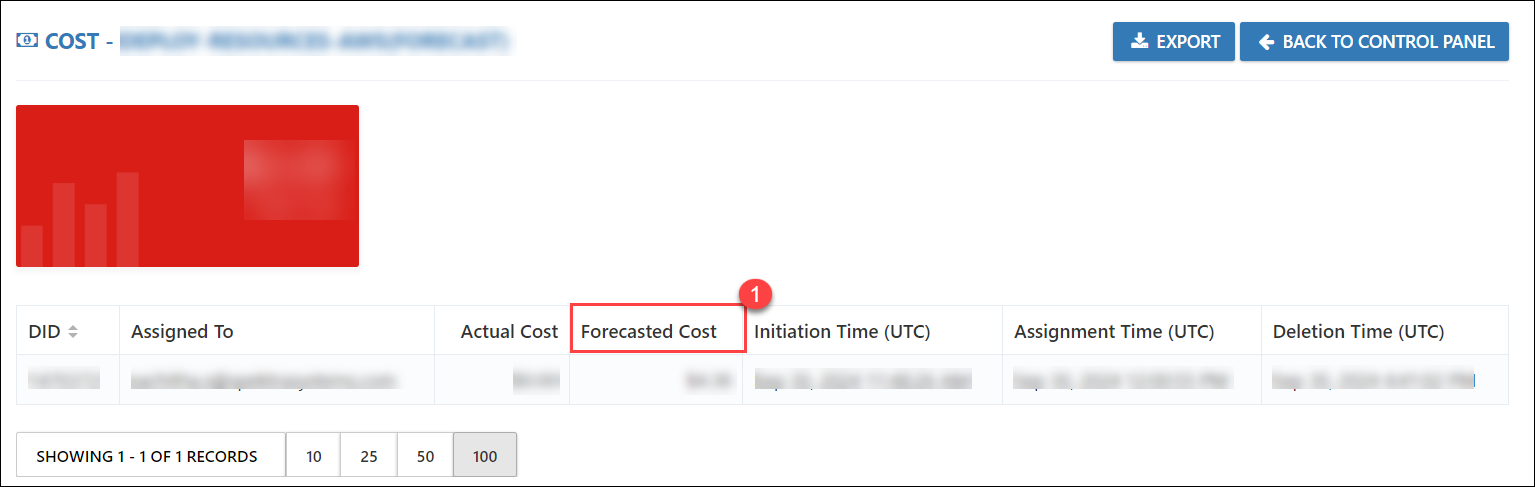
Under the Control Panel (1), click on "Cloud Cost (2)".
The forecasted cost for the current ongoing lab will be displayed under the "Forecasted Cost(1)" section. If any new deployments occur, the forecasted costs will be updated accordingly.
28. GCP Forecasted Costs in CloudLabs - (30 September 2024)
Feature Requirement
This feature allows users to view GCP forecasted costs directly within the CloudLabs platform, providing real-time insights into their budget and usage.
Implementation
Integrate GCP forecasting into CloudLabs, allowing users to view forecasted costs directly in the control panel.
Steps for checking GCP forecasted cost
Log in to the CL portal, navigate to the Templates (1) section, and click on "+ ADD (2)" to create a new template.
Name the template (1), select GCP as the Cloud Platform (2), and fill in all the required details.
Note : To learn how to create a template, click here
- To deploy resources for cost forecasting, the user can either specify the Deployment Manager template or create the resources directly in the GCP console.
To create resources using a Deployment Manager template, provide the URL of the template as shown below and click on Submit.
To create resources on the GCP console or to list them, provide the necessary permissions under IAM based on the requirements and click on Submit.
Navigate to the On Demand Labs (1) section and click + ADD ON-DEMAND LAB (2) in the top-right corner to create a new ODL.
Name the ODL (1), choose the newly created template(2) to associate with it, and fill in all the required details.
Note : To learn how to create an ODL, click here
Additionally, click on "Enable Credit-Based Allocation" while creating the ODL to retrieve the forecasted costs, and then Submit.
In the On Demand Labs (1) section, click on Users (2) for the ODL associated with Cost Forecasting.
Click on Add User, fill out the user details, and launch the environment.
Log in to the GCP console using the provided credentials and deploy the resources. If the resources are deployed via the Deployment Manager Template, ensure that all the resources have been created successfully.
In the CloudLabs On Demand Labs (1) section, click on Control Panel (2) for the ODL associated with Cost Forecasting to monitor the forecasted costs.
Under the Control Panel (1), click on "Cloud Cost (2)".
The forecasted cost for the current ongoing lab will be displayed under the "Forecasted Cost (1)" section. If any new deployments occur, the forecasted costs will be updated accordingly.
29. OCI Phase 2 - (30 September 2024)
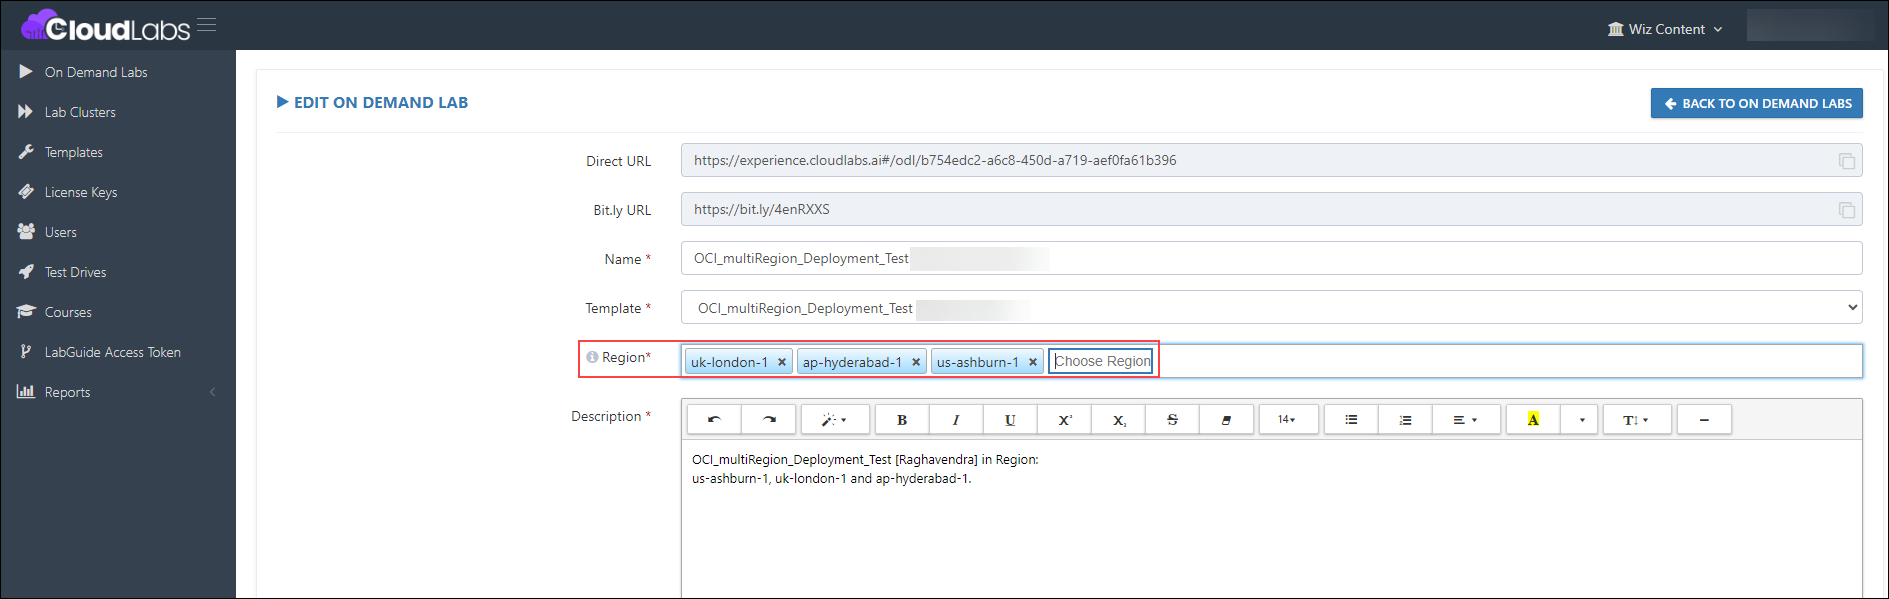
Multi-Region Deployment using OCI
Overview
Users can now deploy OCI resources in multiple regions. Currently, it is limited to us-ashburn-1, uk-london-1, and ap-hyderabad-1.
Prerequisites
Before adding multiple regions to the template, ensure you have the following prerequisites:
Admin access to CloudLabs Admin Portal (If access is unavailable, kindly reach out to your point of contact or CloudLabs Support).
Adding Multiple Region
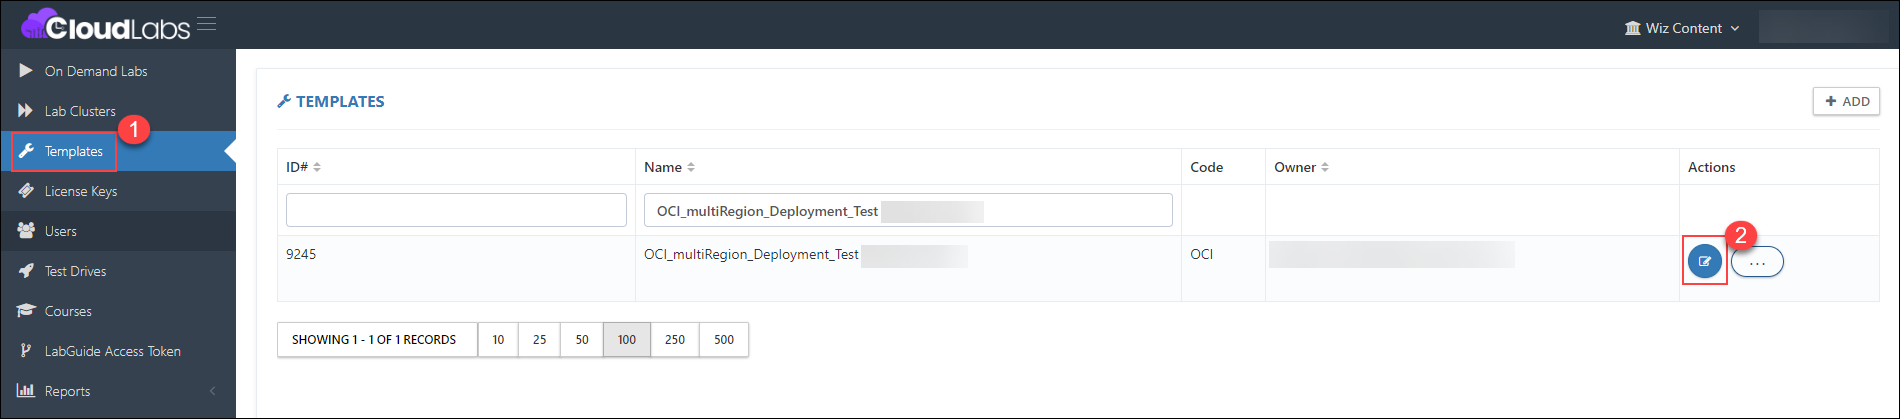
Log in to the CL portal and navigate to the required tenant (WIZ). On the left-hand side of the page, you will see the Template section.
Navigate to the Templates (1) section in the left menu and click on the edit (2) button.
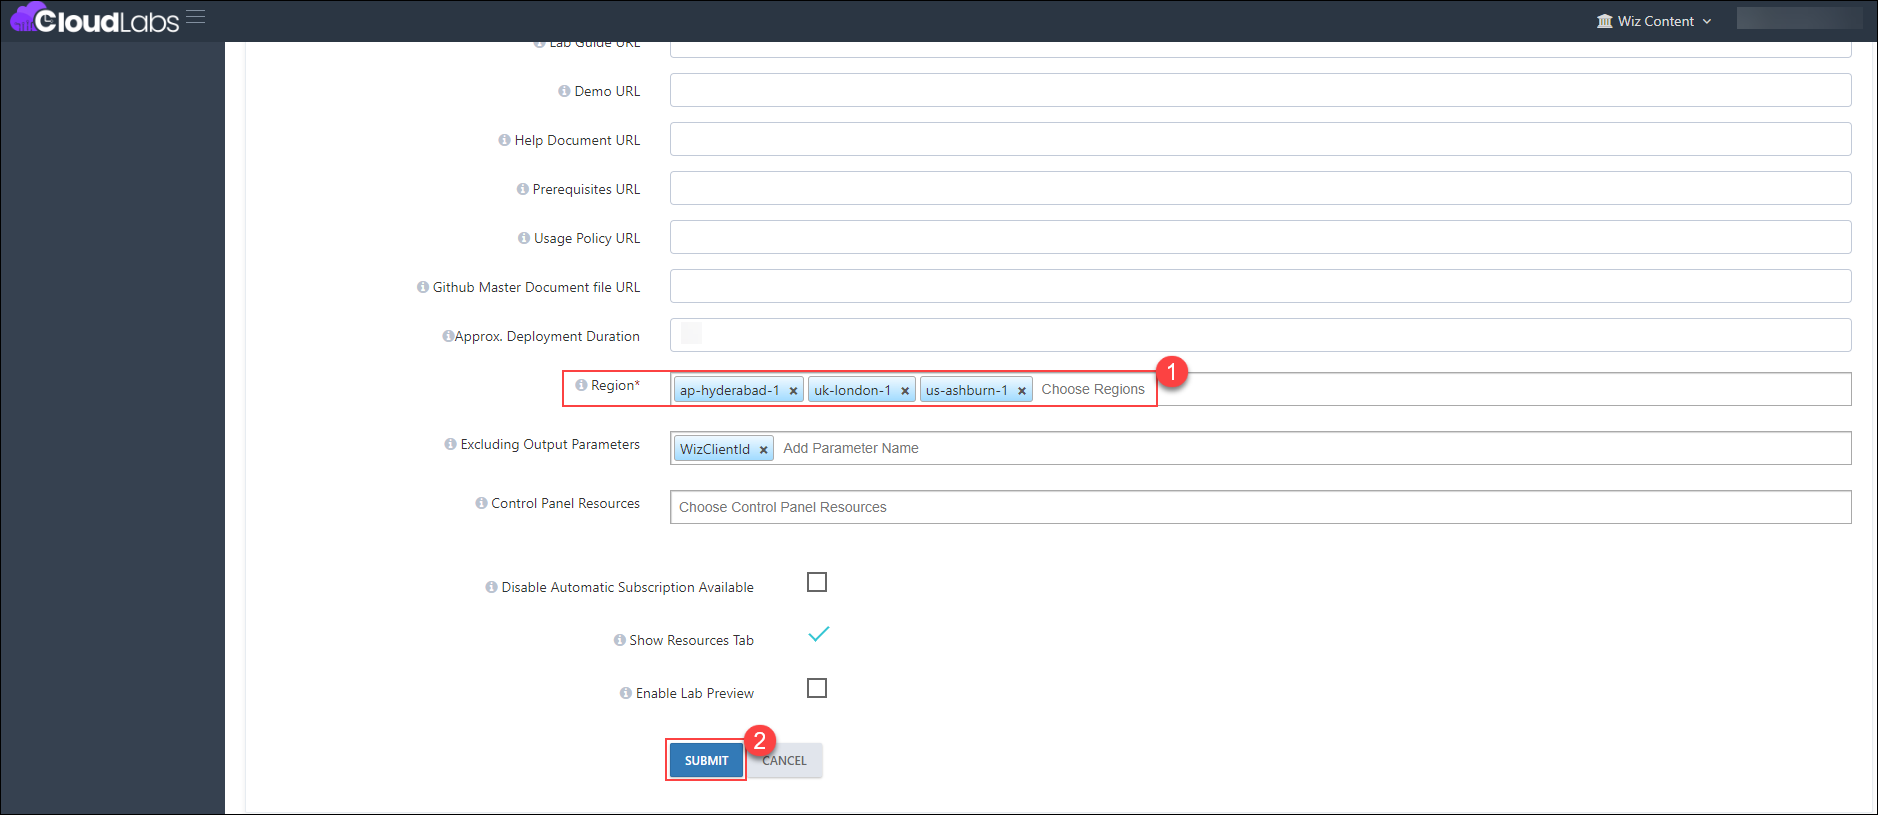
Scroll down to the Region (1) section and choose the regions. Then click on the Submit (2) button.
Navigate to the ODL (1) section in the left menu and click on the edit (2) button.
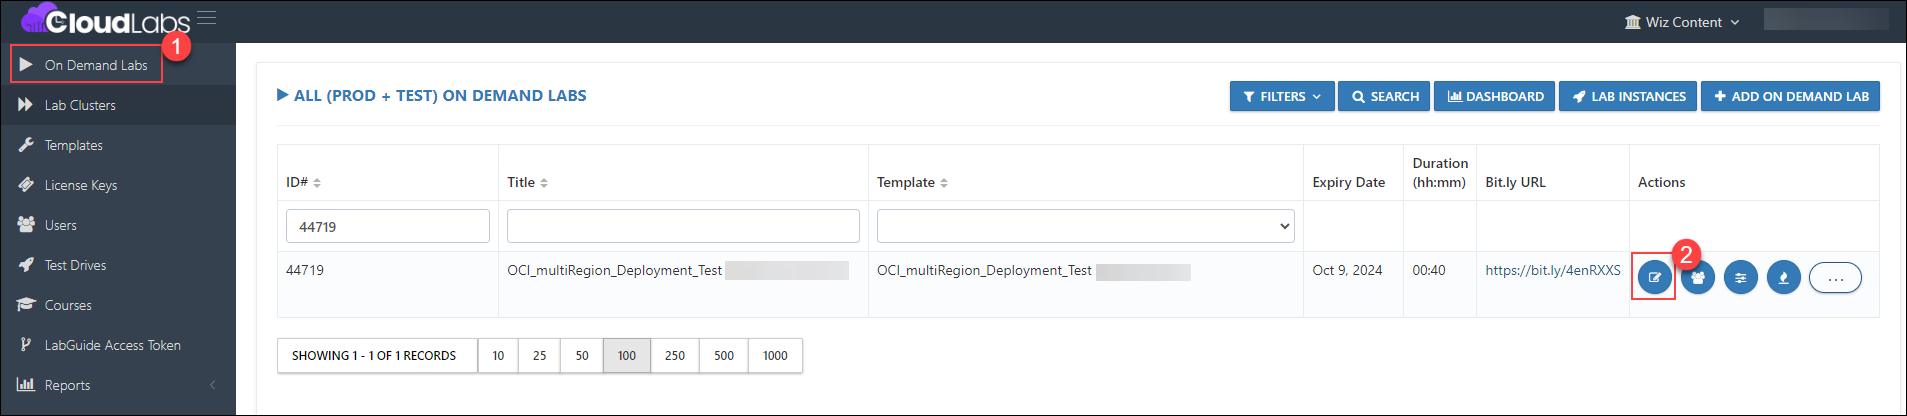
After clicking on the edit button, choose the same regions that were updated at the template level.
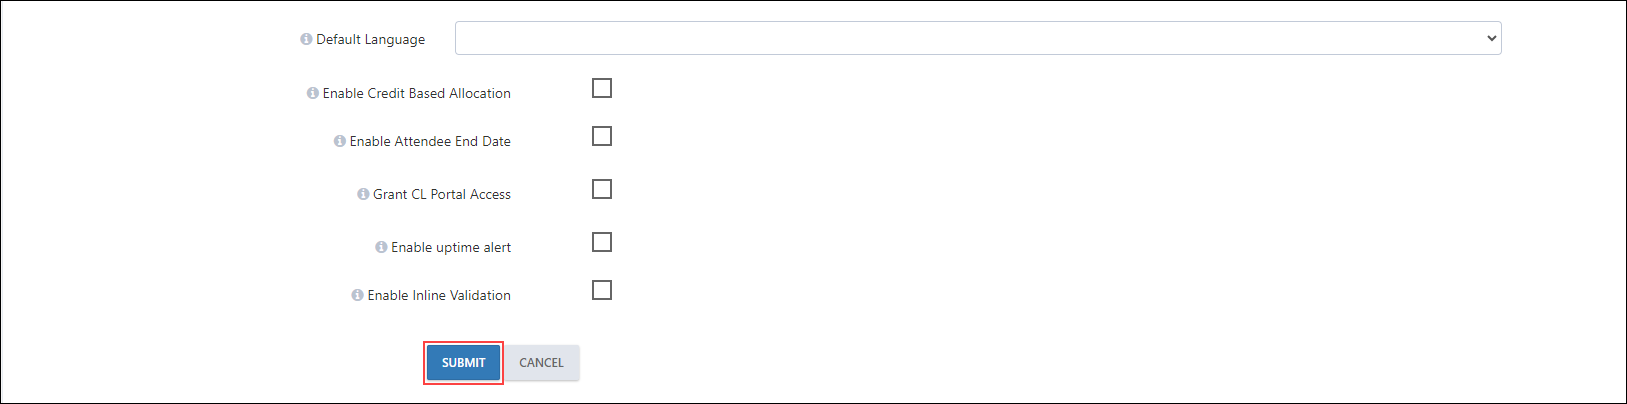
Then scroll down and click on the Submit button.
Testing scenario:
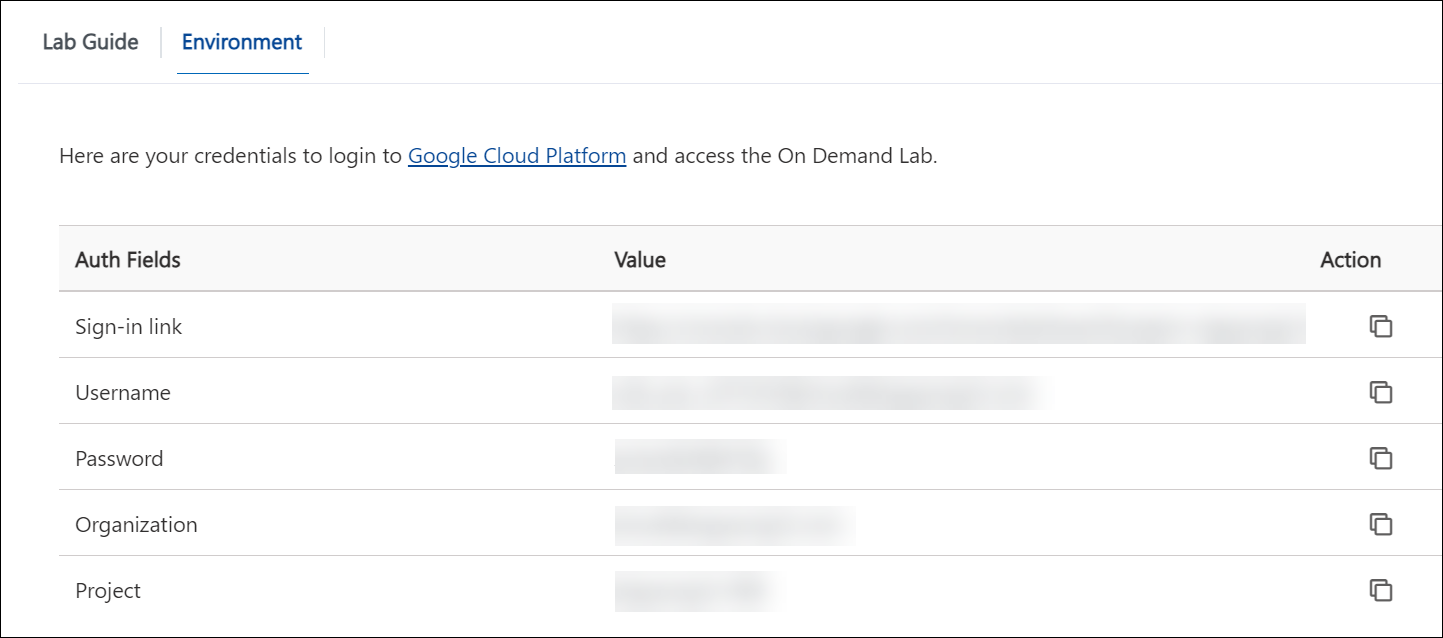
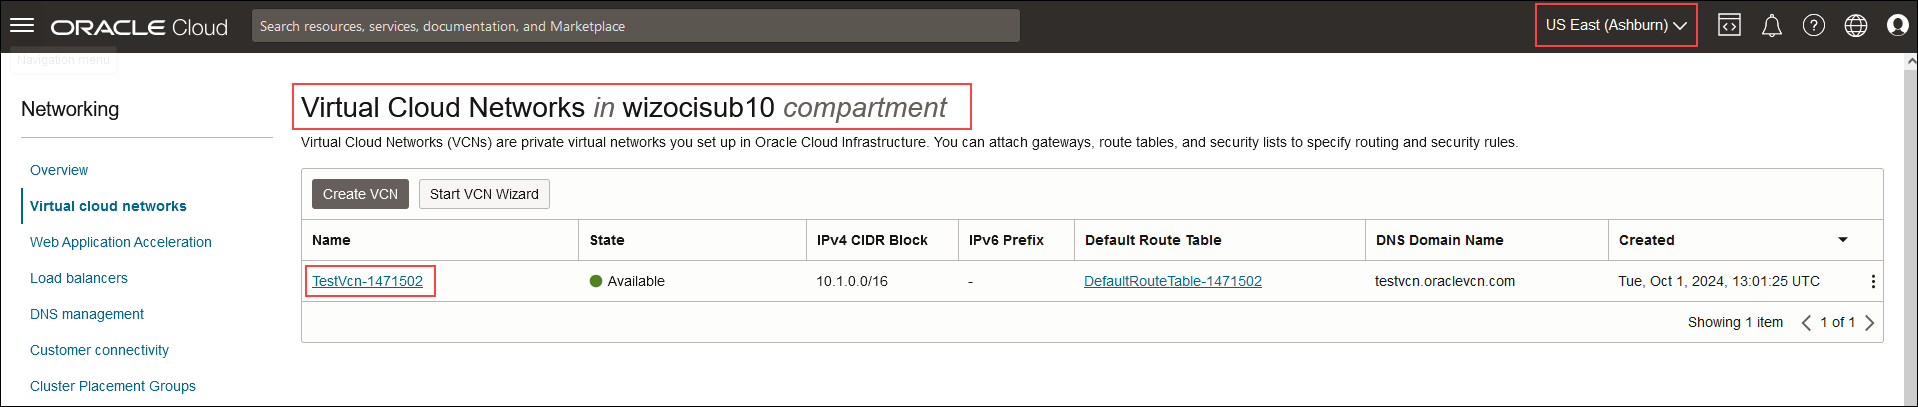
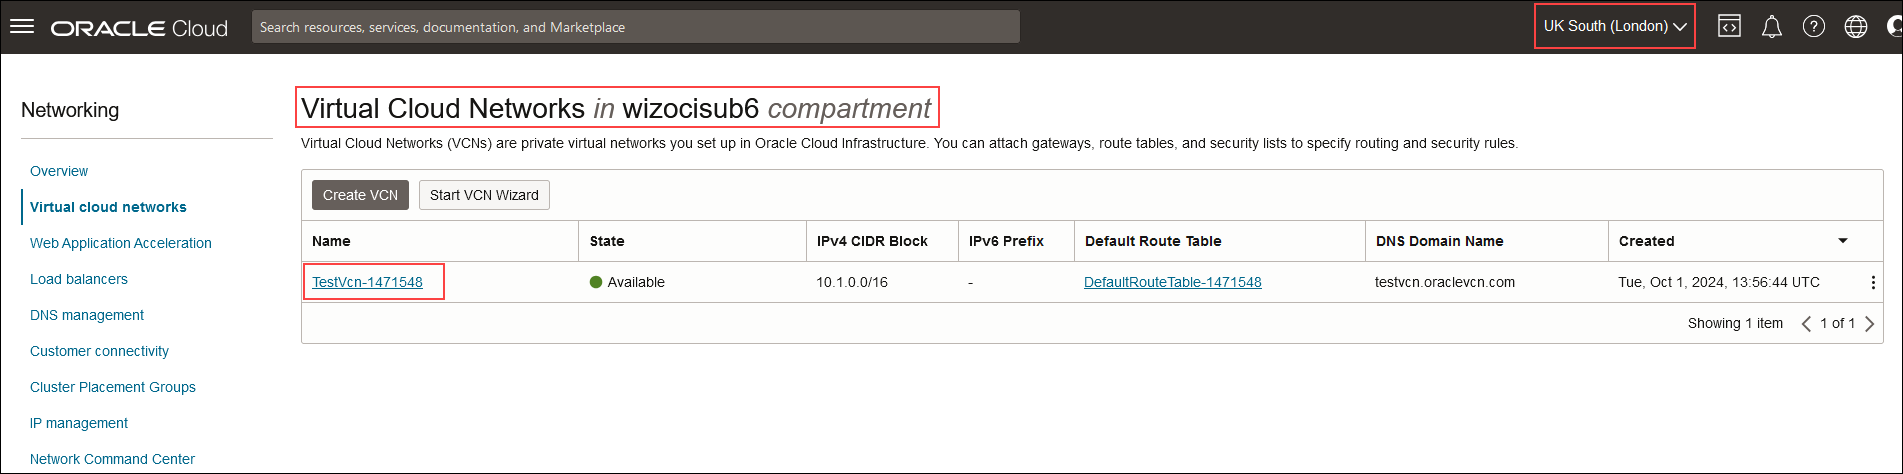
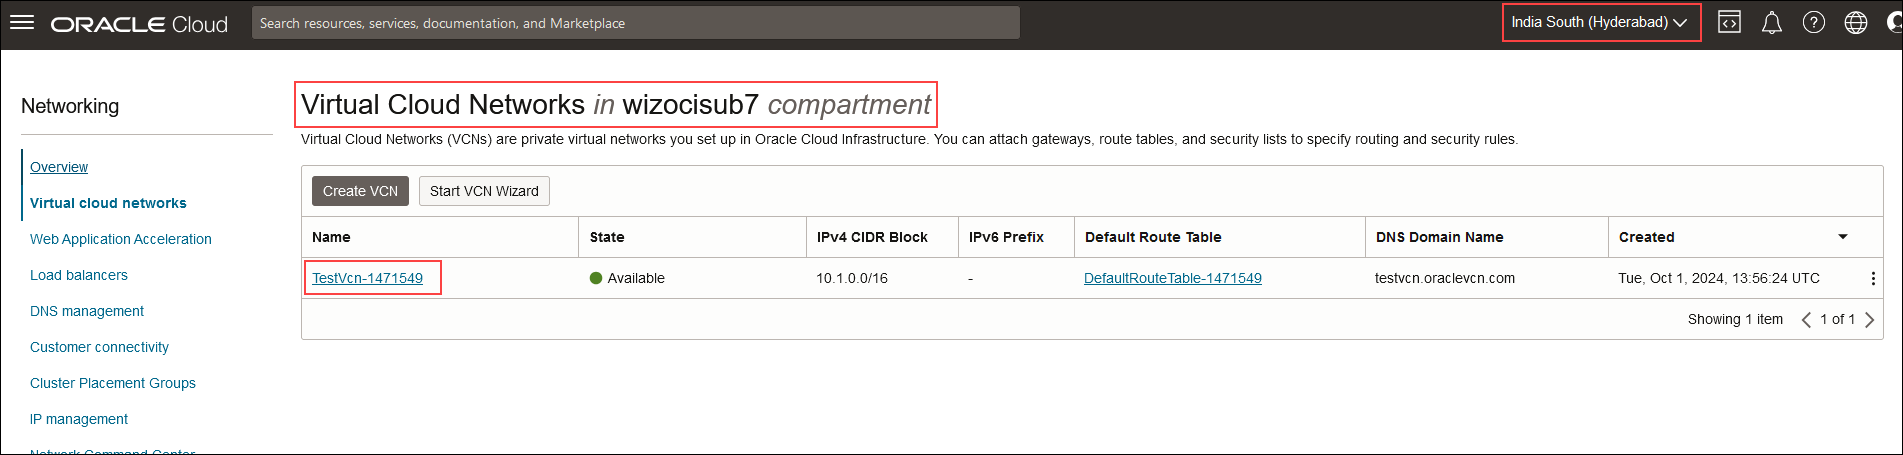
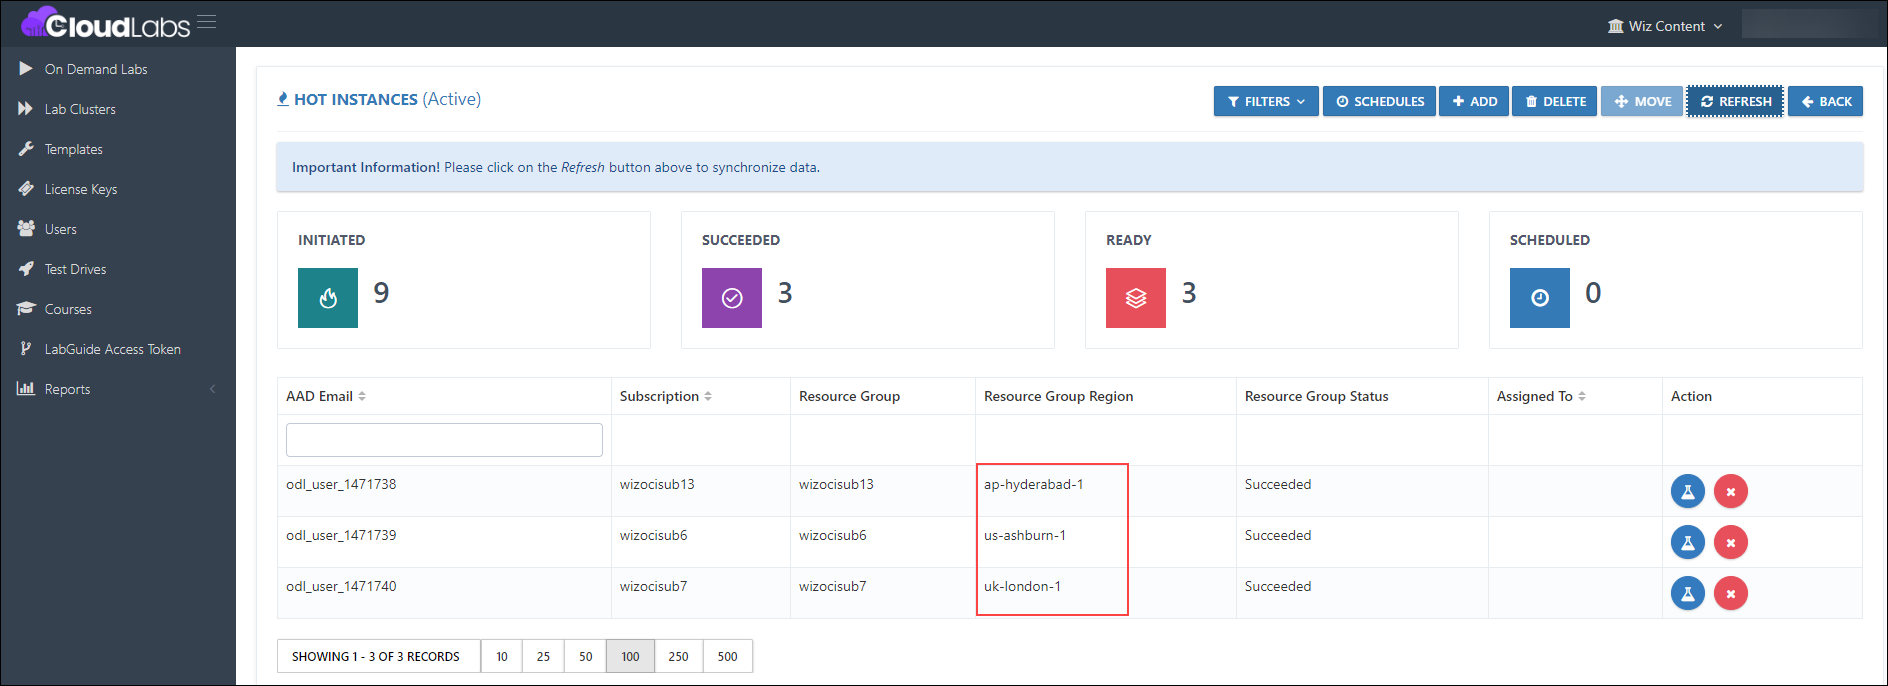
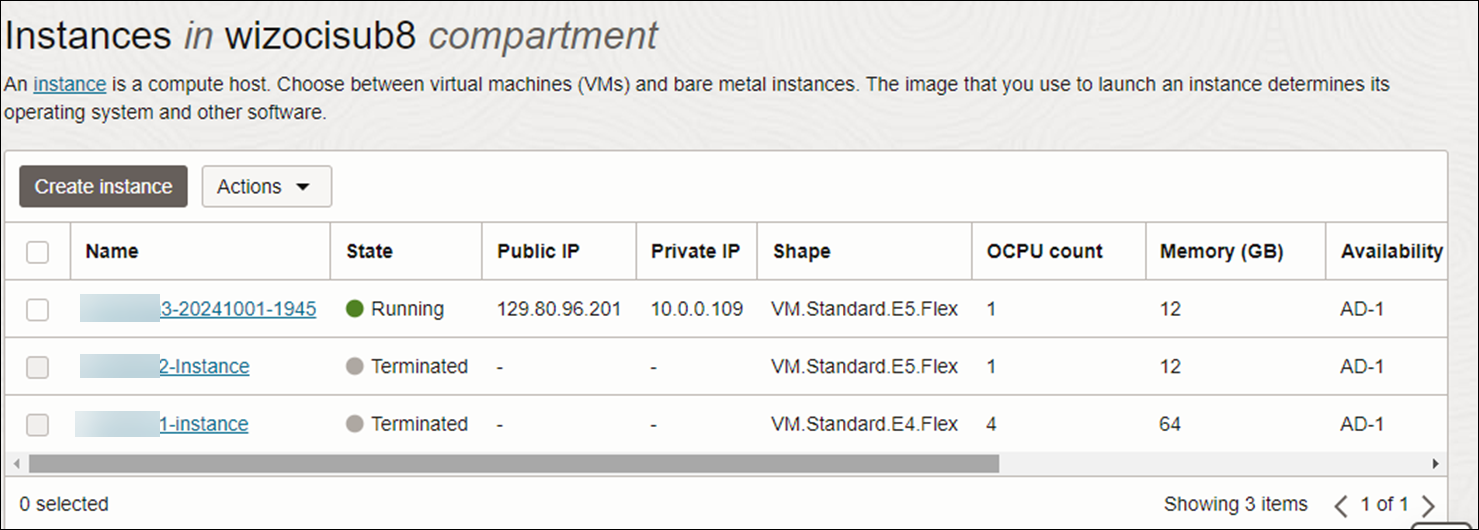
Once the users are deployed, below are the outputs for all the regions with resources deployed in each region.
us-ashburn-1
uk-london-1
ap-hyderabad-1
Hot Instance in OCI
Overview
Hot instances can now be added using OCI as the cloud platform.
Prerequisites
Before adding hot Instances to the ODL, ensure you have the following prerequisite:
Admin access to CloudLabs Admin Portal (If access is unavailable, kindly reach out to your point of contact or CloudLabs Support).
Adding Hot Instances
Log in to the CL portal and navigate to the required tenant (WIZ). On the left-hand side of the page, you will see the Template section.
Navigate to the ODL (1) section in the left menu and click on the edit (2) button.

Scroll down to the Enable Hot Instances section and enable the checkbox.
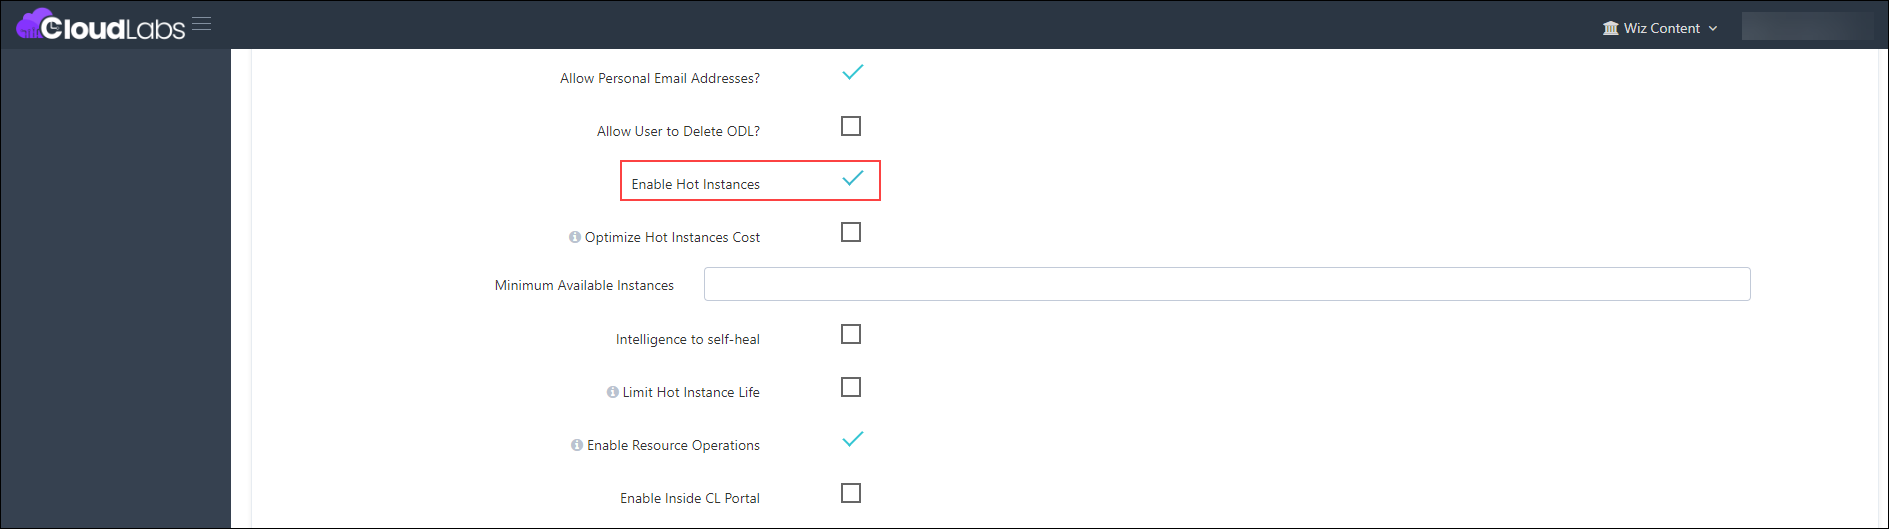
Then click on the Submit button.

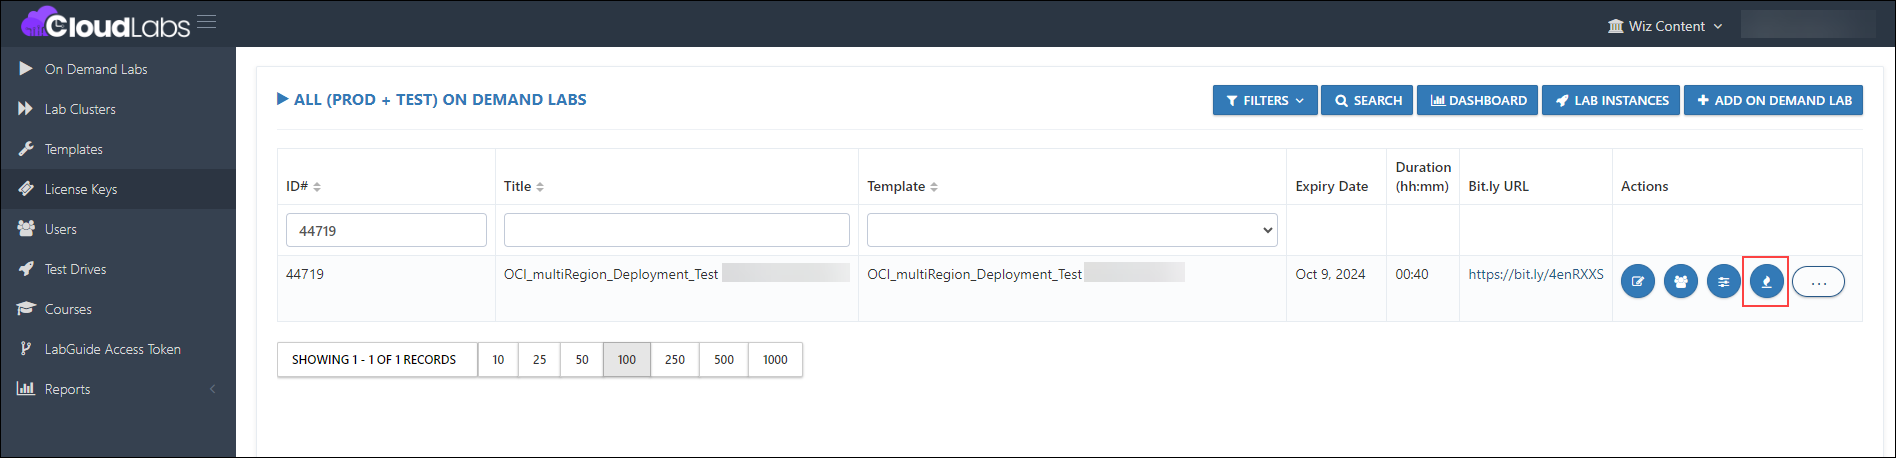
Once the ODL is submitted, click on the Hot Instance button.
Next, click on the + ADD button (1) and provide the Number of Hot Instances (2) needed. Then click on the Add (3) button.
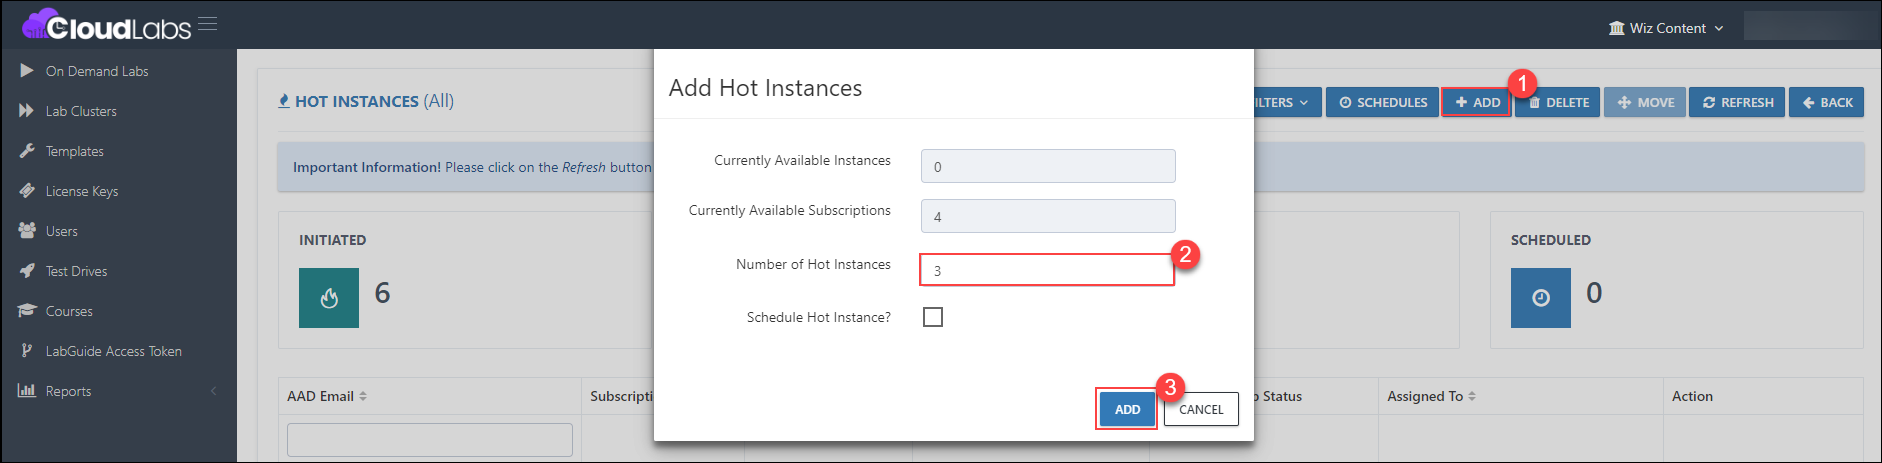
Once the hot instances are added, below is the output for all the regions.
OCI Resource Usage Policy
Overview
OCI Resource Usage Policy is used to monitor the cores and clusters of OCI resources that are predefined for a user.
Prerequisites
Before adding the OCI Resource Usage Policy in the Template, ensure you have the following prerequisites:
- Admin access to CloudLabs Admin Portal (If access is unavailable, kindly reach out to your point of contact or CloudLabs Support).
Adding OCI Resource Usage Policy
Log in to the CL portal and navigate to the required tenant (WIZ). On the left-hand side of the page, you will see the Template section.
Navigate to the Templates (1) section in the left menu and click on the edit (2) button.
Scroll down to the Usage Policy section and provide the Usage Policy URL for the respective OCI resource.

Then, click the Submit button.
Usage Policy and Alerts Outputs
Below are the Resource Usage Policy and Alerts outputs for the respective resources.
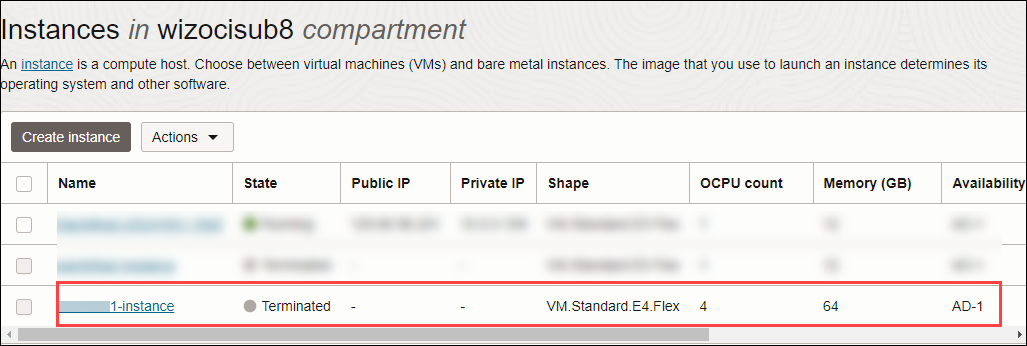
Instance :
i. The metric used is count of instances.
Policy:
[
  {
    "ResourceType": "OCI.Instance",

    "Parameter": [
      {
        "Name": "max-ocpu-cores",

        "Value": "1"
      },

      {
        "Name": "max-memory-gb",

        "Value": "32"
      },

      {
        "Name": "max-instance-count",

        "Value": "1"
      }
    ]
  }
]
Output:
In the OCI Console:
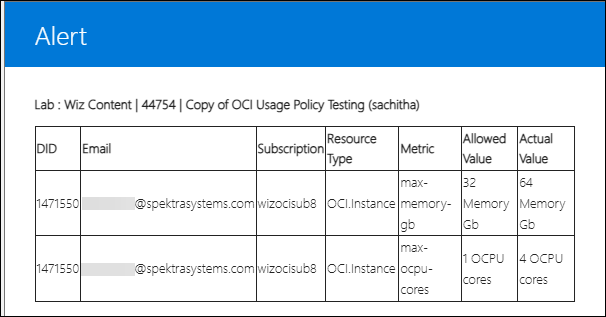
Alert:

ii. The metrics used include OCPU Cores and Memory (GB).
Output:
In the OCI Console:
Alerts:
Bucket : The metric used is Storage (GB).
Policy:
[
  {
  "ResourceType": "OCI.Bucket",
  "Parameter": [
      {
      "Name": "max-storage-gb",
      "Value": "1"
      }
    ]
  }
]
Output:
In the OCI Console:

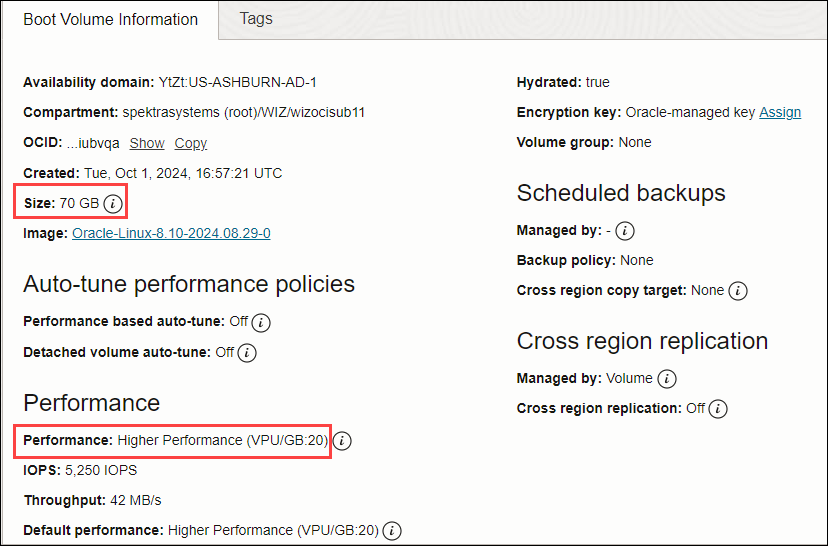
Boot Volume : The metrics used include VPUs (per GB) and Volume (GB).
Policy:
[
{
"ResourceType": "OCI.BootVolume",
"Parameter": [
{
"Name": "max-volume-gb",
"Value": "50"
},
{
"Name": "max-vpus",
"Value": "10"
}
]
}
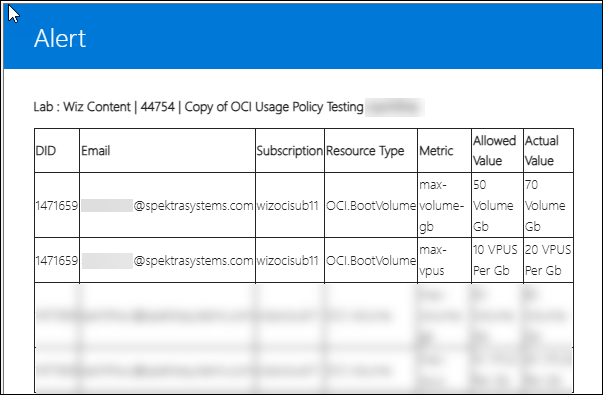
]Output:
In the OCI Console:
Alert:
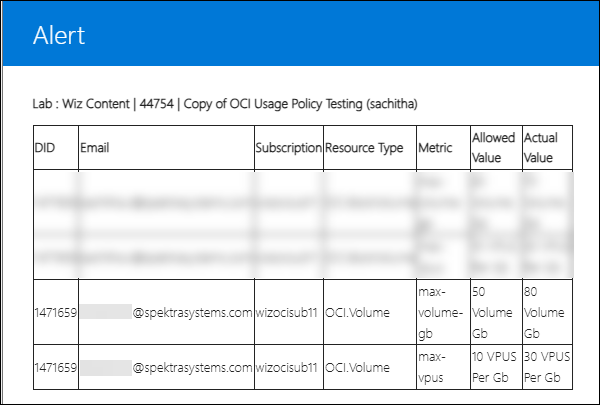
Block Volume : The metrics used include VPUs (per GB) and Volume (GB).
Policy:
[
  {
    "ResourceType": "OCI.Volume",

    "Parameter": [
      {
        "Name": "max-volume-gb",

        "Value": "50"
      },

      {
        "Name": "max-vpus",

        "Value": "10"
      }
    ]
  }
]
Output:
In the OCI Console:

Alert:
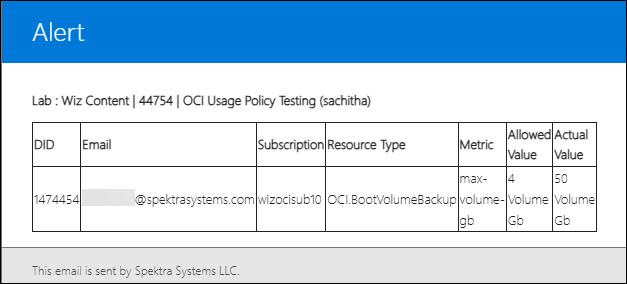
Boot Volume Backup : The metric used is Volume (GB).
Policy:
[
  {
    "ResourceType": "OCI.BootVolumeBackup",
    "Parameter": [
      {
        "Name": "max-volume-gb",
        "Value": "4"
      }
    ]
  }
]
Output:
In the OCI Console:
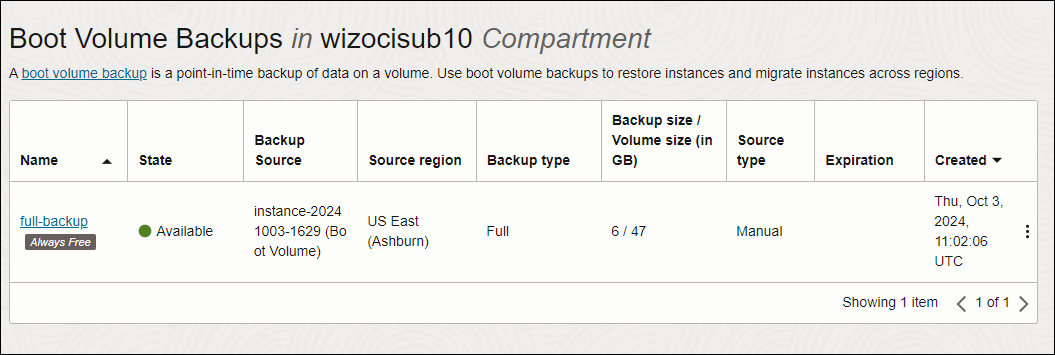
Alert:
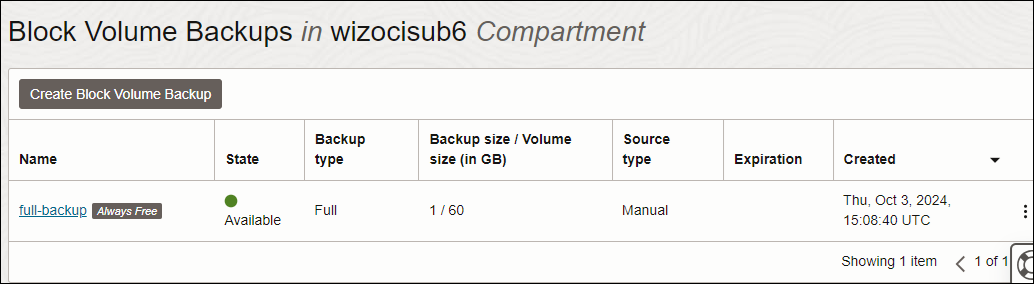
Block Volume Backup : The metric used is Volume (GB).
Policy:
[
  {
    "ResourceType": "OCI.VolumeBackup",

    "Parameter": [
      {
        "Name": "max-volume-gb",

        "Value": "6"
      }
    ]
  }
]
Output:
In the OCI Console:
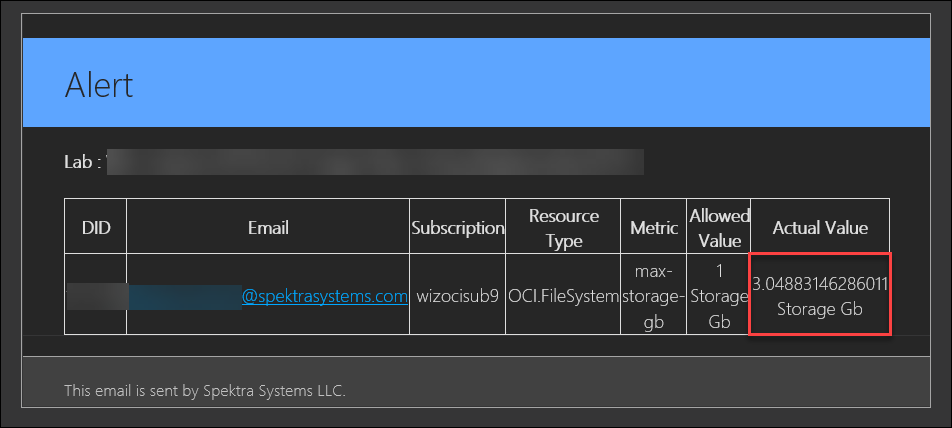
File System : The metric used is Storage (GB).
Policy
[
  {
     "ResourceType": "OCI.FileSystem",
     "Parameter": [
       {
         "Name": "max-storage-gb",
         "Value": "1"
        }
       ]
    }
 ]
Output In the OCI Console:

Alert:
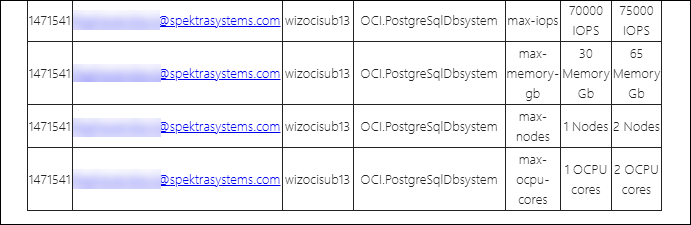
PostgreSQL DB System : The metrics used include max-ocpu-cores, max-memory-gb, max-nodes, and max-iops.
Policy
[
    {
      "ResourceType": "OCI.PostgreSqlDbsystem",
       "Parameter": [
         {
             "Name": "max-memory-gb",
             "Value": "30"
         },
         {
             "Name": "max-nodes",
             "Value": "1"
         },
        {
             "Name": "max-iops",
             "Value": "70000"
         }
       ]
    }
]
Output
Alert:
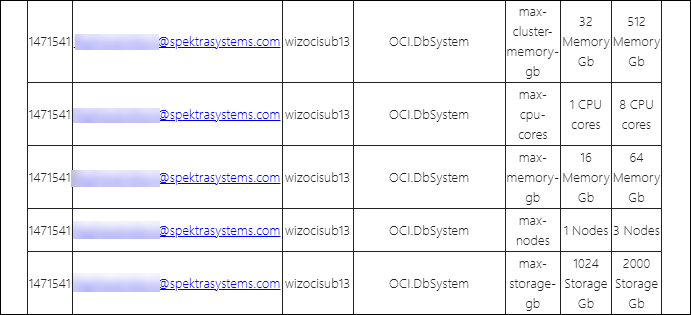
DB System : The metrics used include max-nodes, max-cluster-memory-gb, max-storage-gb, max-memory-gb, and max-cpu-cores.
i. The metric used is
Policy
[
    {
       "ResourceType": "OCI.DbSystem",
        "Parameter": [
           {
               "Name": "max-cpu-cores",
               "Value": "1"
           },
           {
               "Name": "max-memory-gb",
               "Value": "16"
           },
           {
               "Name": "max-storage-gb",
               "Value": "1024"
           },
           {
               "Name": "max-cluster-memory-gb",
               "Value": "32"
           },
           {
               "Name": "max-nodes",
               "Value": "1"
           }
        ]
    }
]
Output
Alert:
Below is the usage policy URL for all OCI resources, including Volume Backup, Boot Volume Backup, Boot Volume, Functions, DB System, Autonomous Database, PostgreSQL DB System, File System, Volume, Bucket, and Instance.
- Policy URL: https://cloudlabs-prod-templates-s3.s3.amazonaws.com/WIZ/test/OCI+Usage+Policy/usagepolicyOCI.json
30. Extension of Duration Based on Hours and Days - (19 November 2024)
Overview
Attendees will be able to extend the duration of their lab in increments of Minutes, Hours, and Days.
Prerequisites
Before enabling and configuring the duration extension feature in ODL, ensure you meet the following prerequisites:
- Admin access to the CloudLabs Admin Portal (If access is unavailable, please reach out to your point of contact or CloudLabs Support).
Enabling the Duration Extension Feature in ODL
Log in to the CL portal and navigate to the required tenant (WIZ). On the left-hand side of the page, go to the On Demand Labs section.
In the left menu, go to ODL (1) and click the edit (2) button.
Scroll down to the Allow User to Extend Lab section and enable the checkbox.
Select the required duration parameters from the dropdowns for Max Limit of Duration Extension by User. Once selected, the Allowed Extend Duration by Attendee option will be automatically chosen based on the above selection. Now, provide the appropriate duration based on your choice.
Note: The Max Limit should be an exact multiple of the Allowed Extend Duration to ensure that any extensions granted follow a consistent, repeatable pattern without remainder.
Example Calculation
Suppose we set the following:
- Max Limit of Duration Extension by User = 180 minutes
- Allowed Extend Duration By Attendee = 30 minutes
For the setting to be valid, the Max Limit (180 minutes) should be evenly divisible by the Allowed Extension (30 minutes). Here’s how we calculate it:

Since 6 is a whole number, 180 is a multiple of 30, so this configuration is valid.
Example of an Invalid Configuration
Now, let’s try with:
Max Limit of Duration Extension by User = 175 minutes
Allowed Extend Duration By Attendee = 30 minutes

Since 5.83 is not a whole number, 175 is not a multiple of 30, making this configuration invalid.
Finally, click on the Submit button.

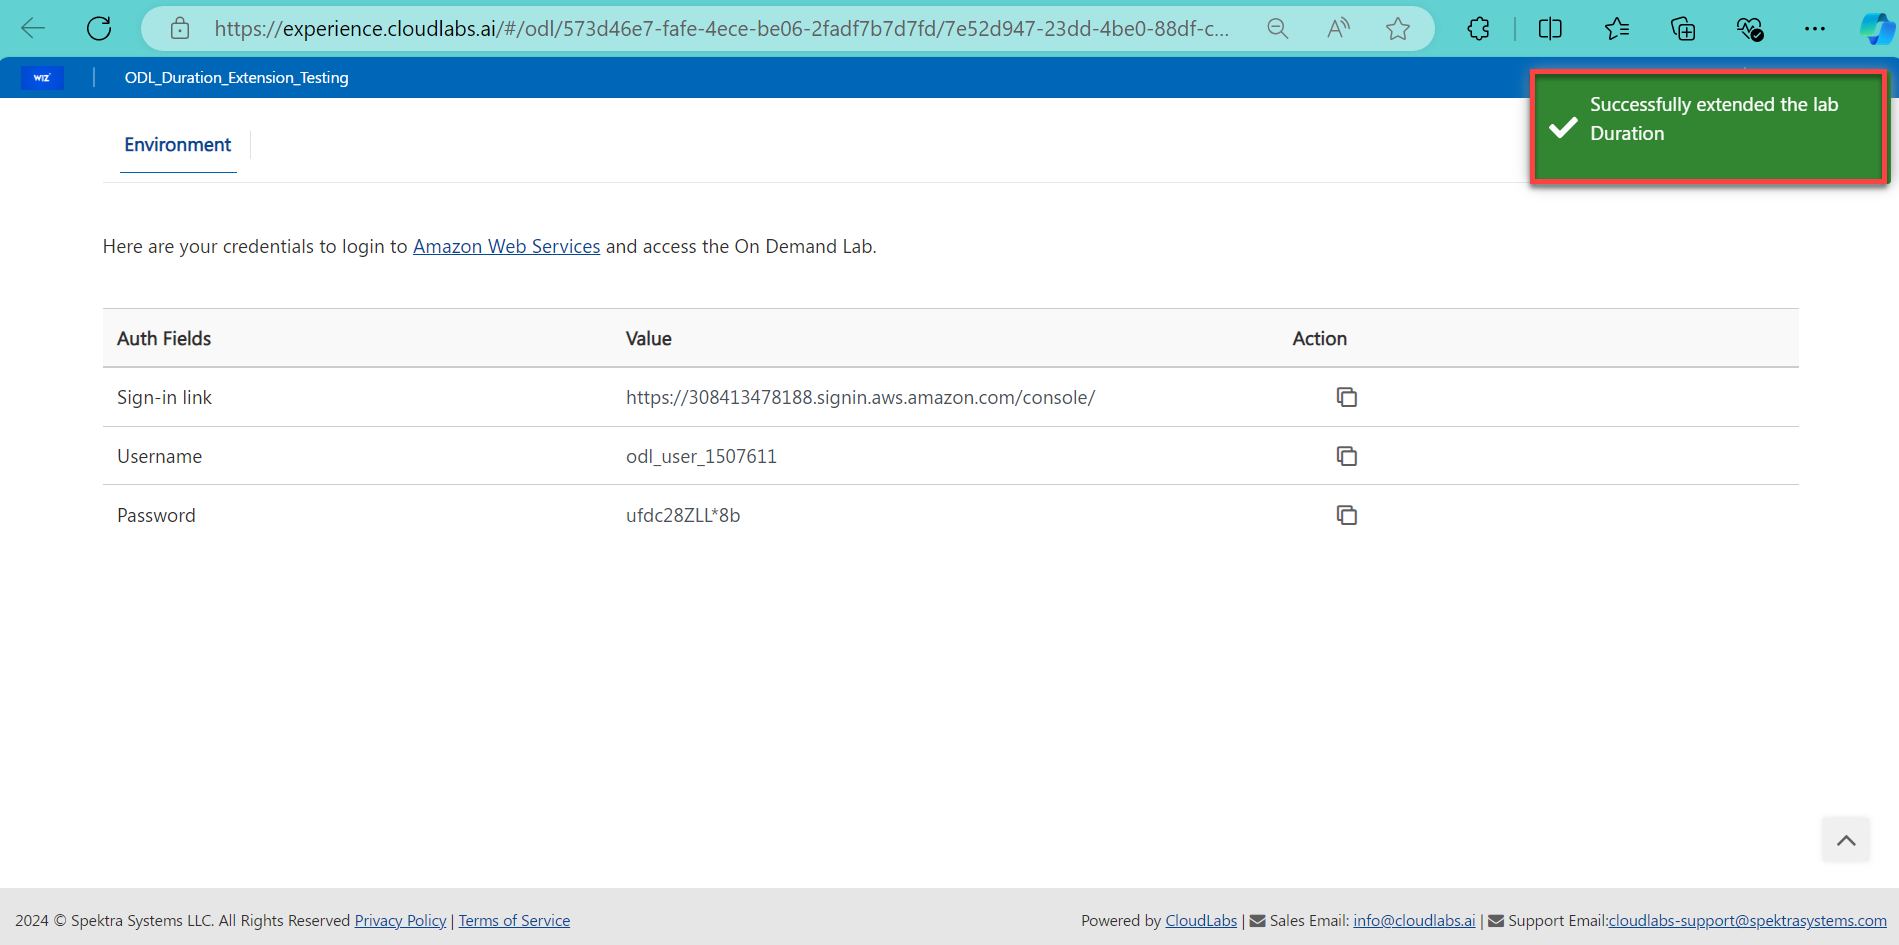
To extend the duration of the lab, click on the highlighted icon at the top right corner of the page.
After clicking on the icon, a confirmation pop-up will appear. Click OK to confirm the action.
Finally, a confirmation message will display on the page, and a notification will be sent to your instructor.
31. Clean up for GCP Roles - (19 November 2024)
Feature Requirement
Implement the attendee resource clean-up for the below list.
- GCP IAM Custom roles
Implementation:
Developed the API calls for the cleanup of the resources in the GCP projects.
32. Loading issue on the sign-up page - (19 November 2024)
Feature Requirement
The sign-up page was experiencing loading issues, causing it to get stuck when users attempted to sign up through the custom portal.
Implementation
The issue was resolved by identifying and addressing a backend error that was preventing the sign-up page from loading properly.
33. Issue with the Custom Portal Login Button - (19 November 2024)
Feature Requirement
The custom portal login button was not functioning as intended. When users clicked the button, the login button didn't work, preventing access to the portal.
Implementation
The issue was resolved by identifying a backend error that was causing the login button to behave unexpectedly.
34. Grammar Check - (19 November 2024)
Overview
The goal is to ensure that common mistakes like spelling errors, incorrect sentence structure, and punctuation issues are identified, providing a smoother and more professional user experience.
Prerequisites
Before checking the grammar in the custom portal, make sure the following prerequisites are in place:
- Admin access to CloudLabs Admin Portal (If access is unavailable, kindly reach out to your point of contact or CloudLabs Support).
Checking Grammar
Log in to the Wiz Custom portal and navigate to the Catalog section. Then, click on the required lab and press the Launch button.
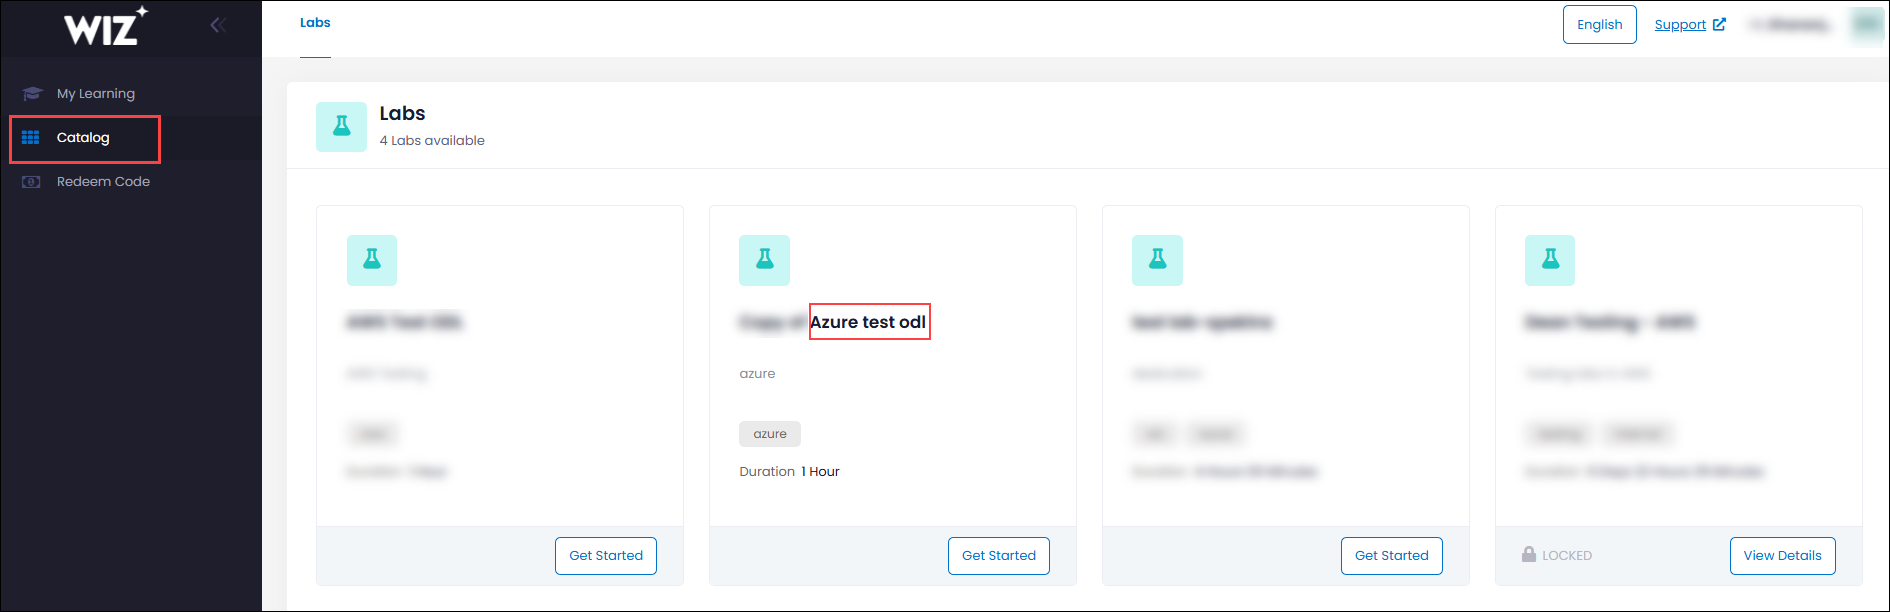
Once the deployment is complete, the following output will be displayed:

35. User Left Over Duration Alerts (05 December 2024)
Feature Requirement
Set up an alert email to notify when a user is nearing 70% or 80% of the total duration.
Implementation
Enable the Send Alert on Lab Duration Completion option and set Threshold limits for email alerts.
Steps for enabling the 'Send Alert on Lab Duration Completion' option and setting up the 'Threshold limits for email alerts.'
Log in to the CL portal and navigate to the required tenant (WIZ). On the left-hand side of the page, you will see the ODL section.
Navigate to the ODL (1) section in the left menu and click the edit (2) button.

Scroll down to the Send Alert On Lab Duration Completion (1) section and enable the checkbox.
Then, set the Threshold limits for email alerts (in minutes) (2) based on your requirements. If you want to add more threshold limits, click the + (3) button.
Click on the Submit (4) button.
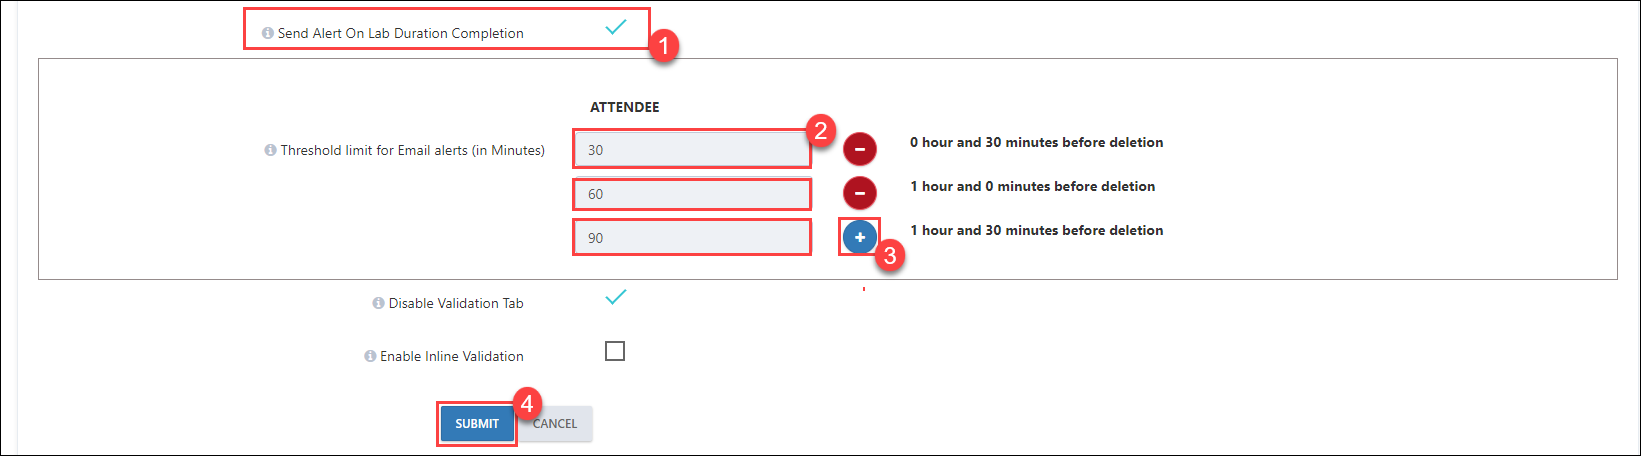
Once the user deployment is made and the user duration is coming to an end, based on the threshold limit set, the following alert will be sent to the respective user.
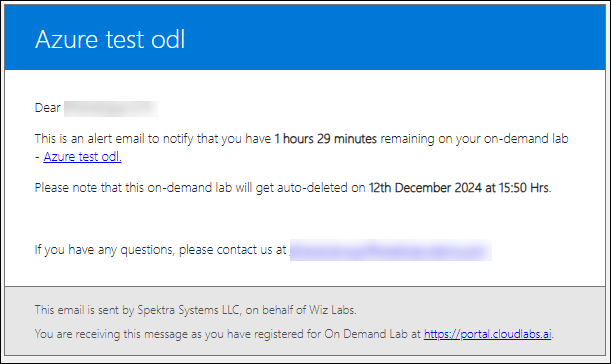
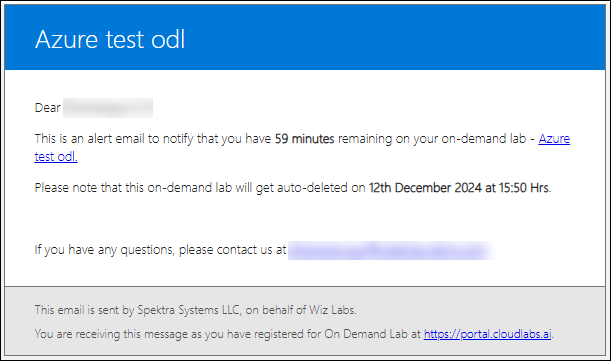
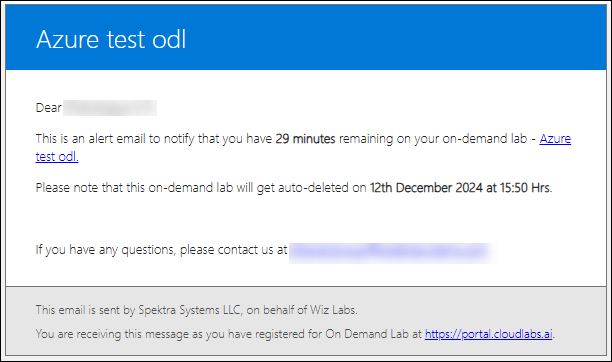
36. OCI User Details Using Inject Keys (17 December 2024)
Feature Requirement
This feature dynamically displays OCI account details, such as email, username, password, domain name, and more, on the Getting Started page by leveraging inject keys in the markdown file. These details are rendered automatically for each user, enhancing efficiency and consistency in lab setup.
Implementation
To implement this feature, follow the code snippets below. Replace placeholders with corresponding inject keys to ensure the values are dynamically populated.
Inject Key Code Snippets
Sign-In Link:
<inject key="ocisigninurl" enableCopy="true" />Cloud Account Name:
<inject key="tenantdomainname"></inject>Domain:
<inject key="aaddomain"></inject>Email/Username:
<inject key="AzureAdUserEmail"></inject>Password:
<inject key="AzureAdUserPassword"></inject>
Example Output
The above inject keys will render a Getting Started section with dynamically populated user-specific details. Below is an example image of the output:
(Refer to the attached sample image for how it will appear.)
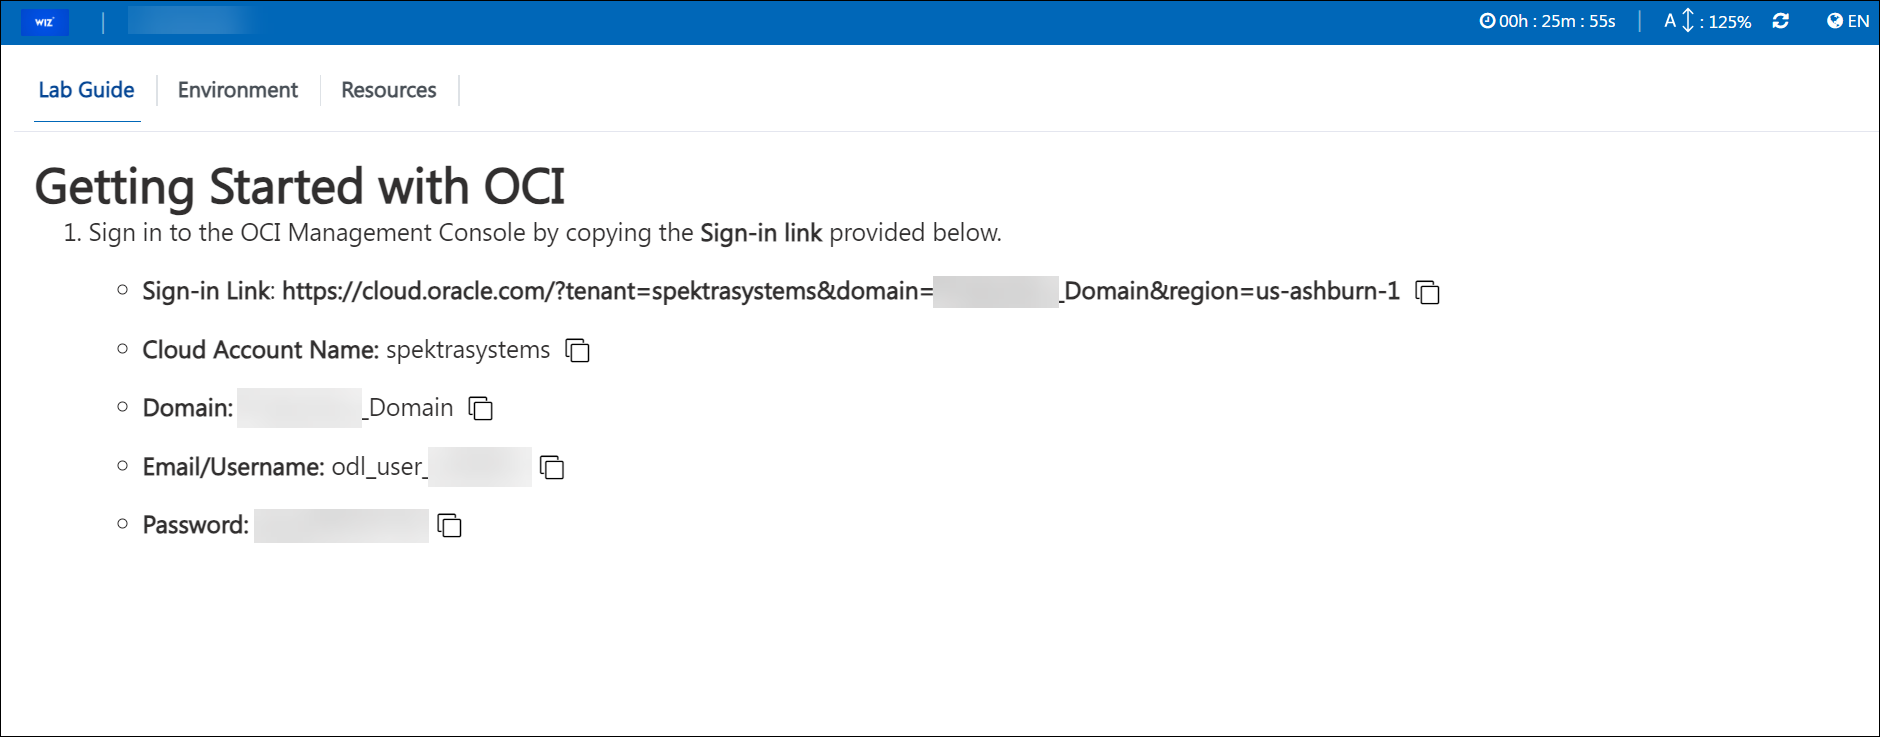
37. Environment Page Font Size Adjustment Feature (17 December 2024)
Feature Requirement
This feature allows users to easily increase or decrease the size of the font on the Environment Page using a dedicated button.
Steps to Use the Feature
Step 1: Navigate to the User Environment Page
Add a new user by clicking the Add User button (highlighted as the first option).
Click on the Environment icon (highlighted as the second option) to open the User Environment Page.
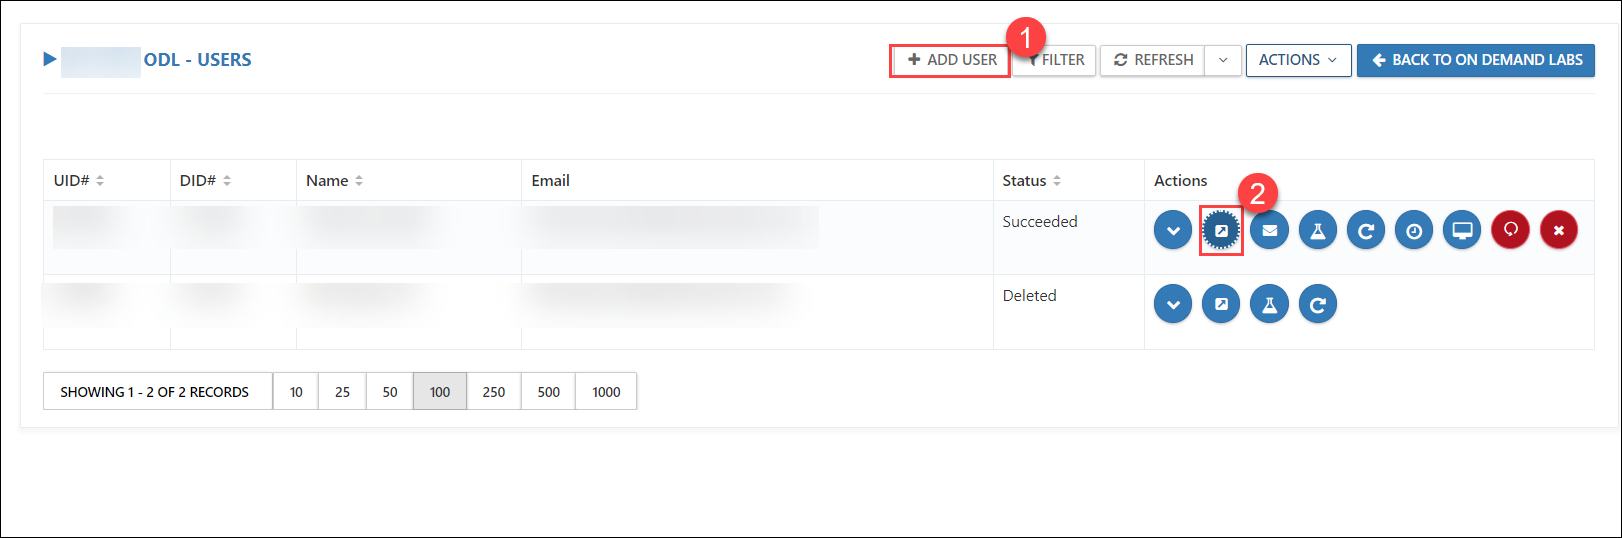
Step 2: Access the Size Adjustment Option
On the Environment Page, find the Font Size Adjustment button represented by the "A ↕ 100%" icon in the top navigation bar (see the below image).
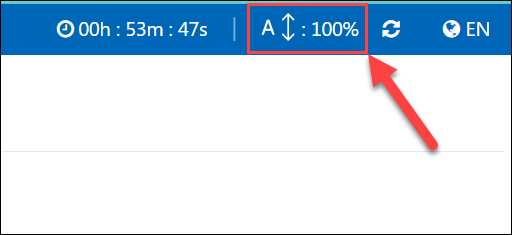
Step 3: Adjust the Font Size
Click on the Font Size Adjustment button to open a dropdown menu.
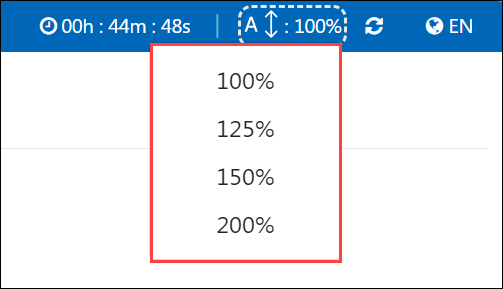
Choose your desired font size from the available options:
- 100% (default)
- 125%
- 150%
- 200%
The font size on the page will immediately change to match your selection.
Key Notes
- The font size changes dynamically, making it easier to read content on the page.
- To reset the font size to the default, select 100% from the dropdown.
- This feature does not affect the layout or other page elements; only the font size is modified.
38. Inject Keys: Set a Default Value if the Original Value is Unavailable (17 December 2024)
Feature Requirement:
Display a default value if the original value of the injected key is unavailable.
Implementation:
To implement this feature, provide the default value in the GitHub code. This will ensure it is visible in the lab guide preview.
Default Value Code Snippets
<inject key="ODLUser" default value="odluser123-azure-connector" enableCopy="true" />
Example Output:
Log in to the CL portal and navigate to the required tenant (WIZ). On the left-hand side of the page, you will see the ODL section.
Navigate to the ODL (1) section in the left menu and click on the ellipsis (...) (2) button.
Then, click on the Lab Guide Preview (3) option.
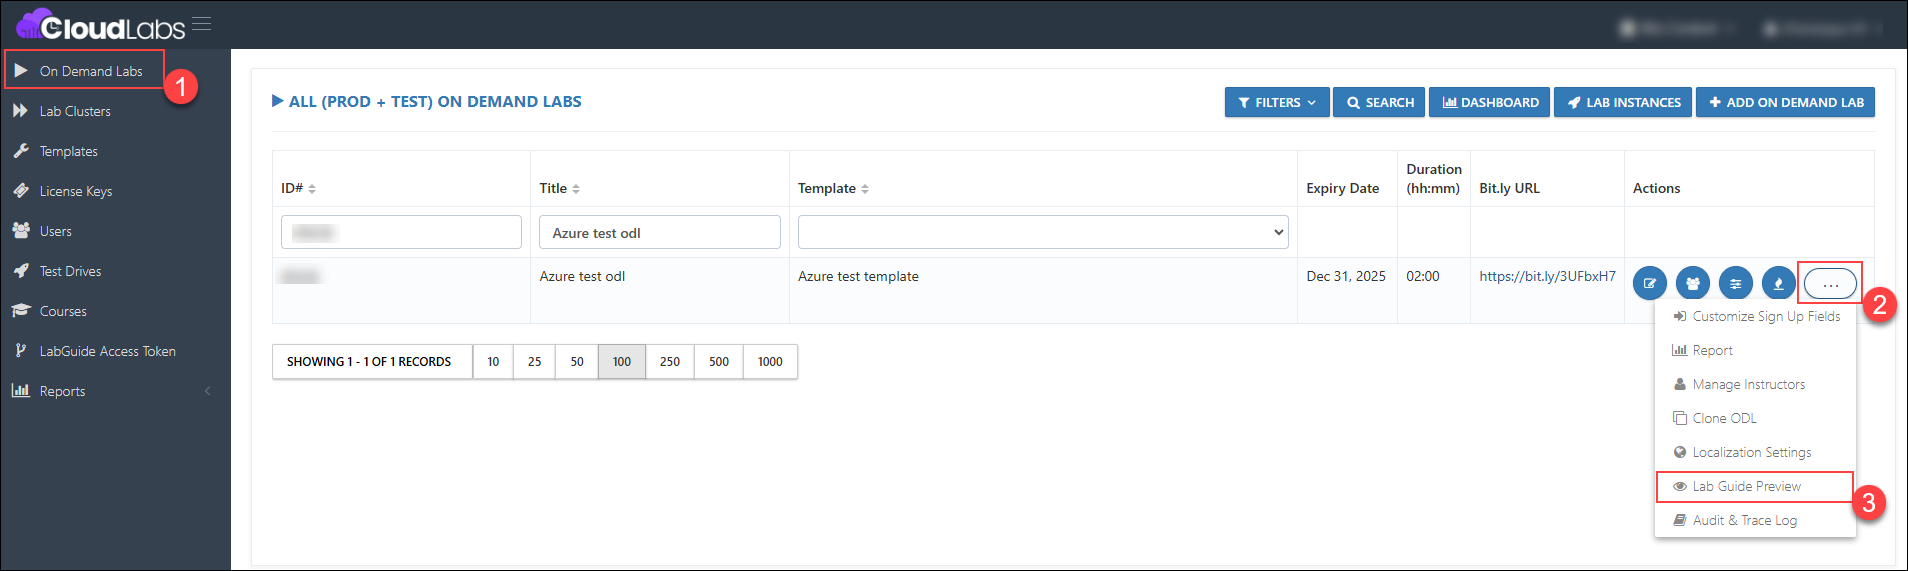
The default value mentioned above will appear in the lab guide preview, and in the user deployment lab guide, it will show the value from the inject key.
(Refer to the attached sample image for how it will appear.)

39. GCP Folder Approach (17 February 2025)
Feature Requirement
Set up the folder approach with four projects under each folder.
Implementation
Each CloudLabs user deployment will be granted folder access, along with access to four projects and associated resources based on the permissions set.
Steps for Testing the GCP Folder Approach:
Log in to the CL portal and navigate to the required tenant (WIZ). On the left-hand side of the page, you will see the Template section.
Navigate to the Template (1) section in the left menu and click on the edit (2) button.
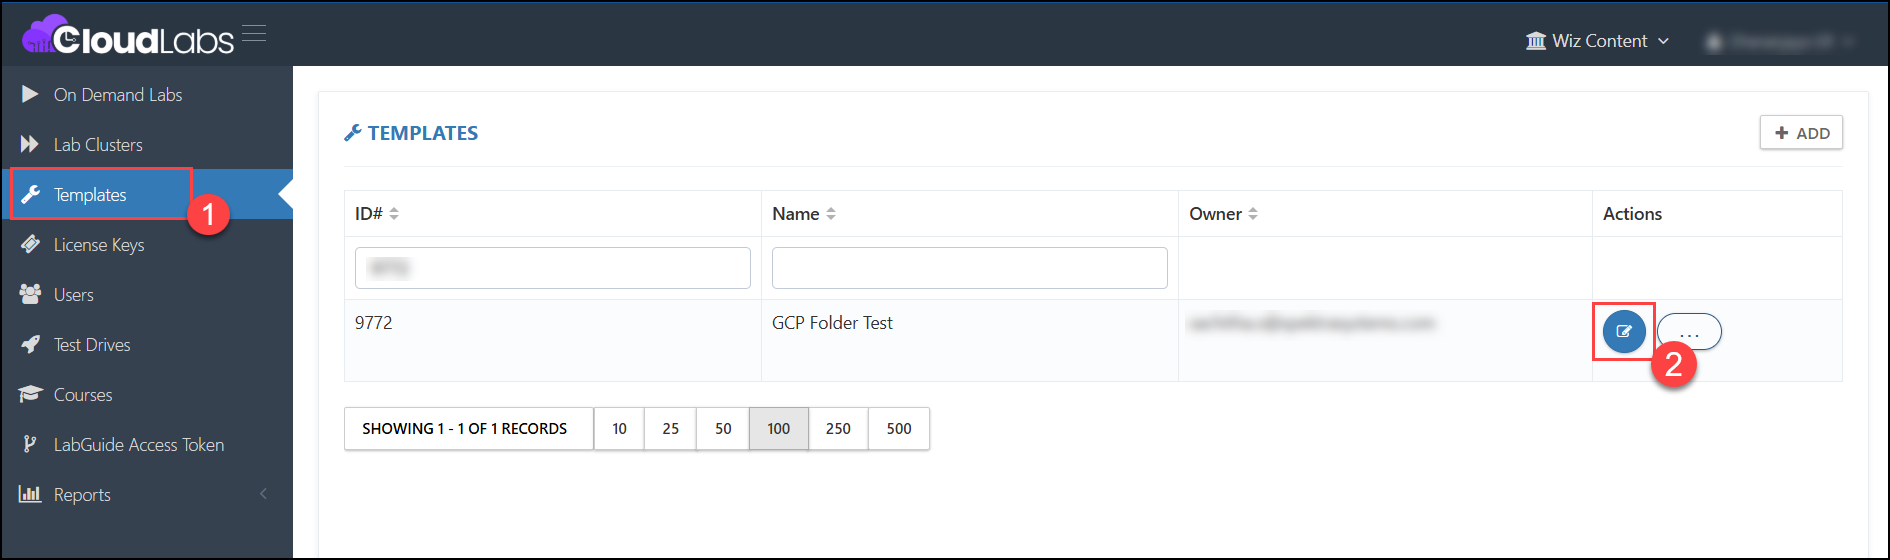
Then, scroll down to the Cloud Platform Configuration section and click on the Edit button.
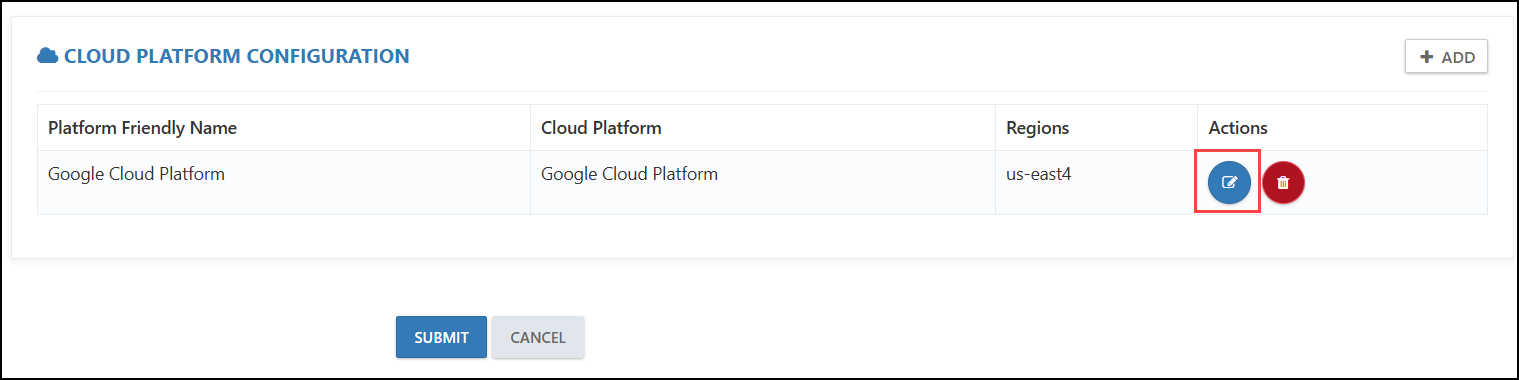
Under the Cloud Platform Configuration section, select the Dedicated Tenant option and click the Submit button.
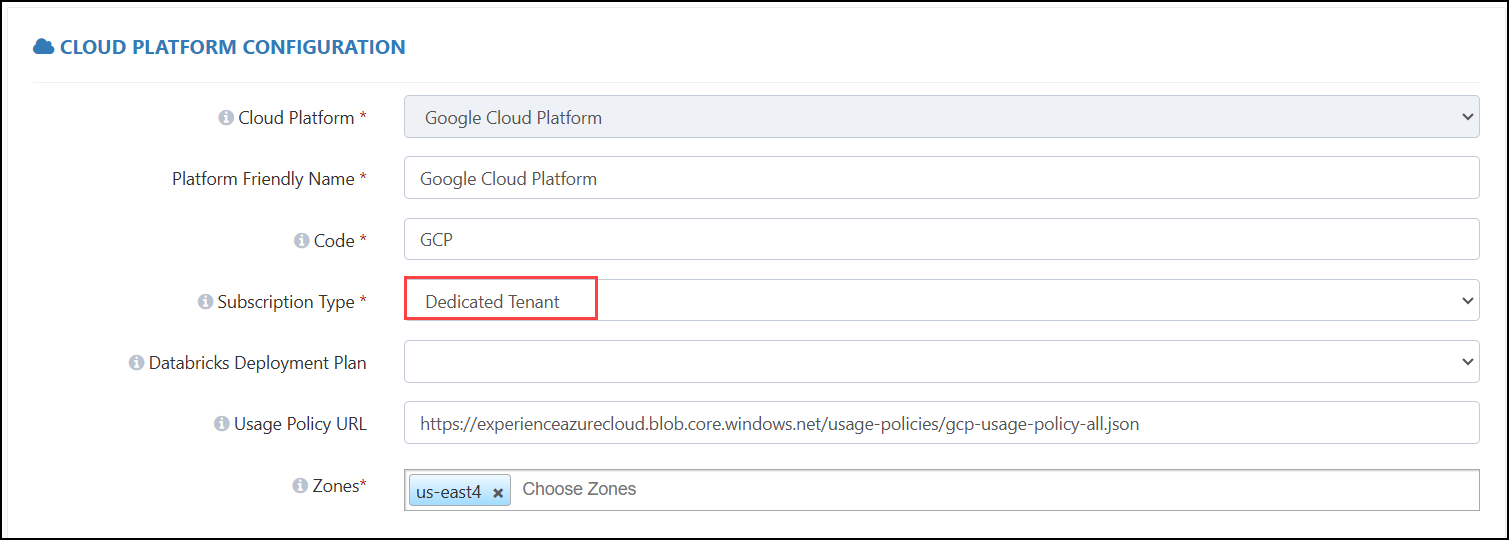
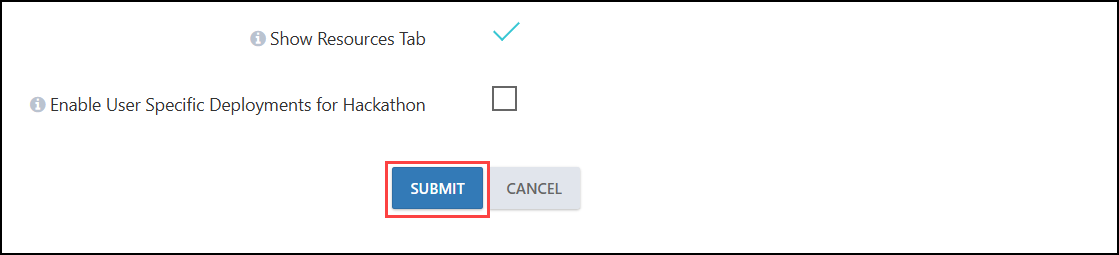
In the template, under the Cloud Template section, provide the necessary Cloud Template URL and Parameter URL if you want the resources to be ready for use when the deployment happens.
Note: All Cloud Template deployments will be deployed under the first project only.

Then, under the Edit Template Permissions, provide the below-mentioned details:
Platform Friendly Name: Google Cloud Platform (1)
Permission Type: Custom Role (2)
Profile Type: Attendee (3)
Scope: GCP Folder (4)
Custom Role URL: https://cloudlabs-prod-templates-s3.s3.us-east-1.amazonaws.com/WIZ/test/GCP+Folder+Test/TestCustomPolicy.json (5)
Then, click on the Submit (6) button.
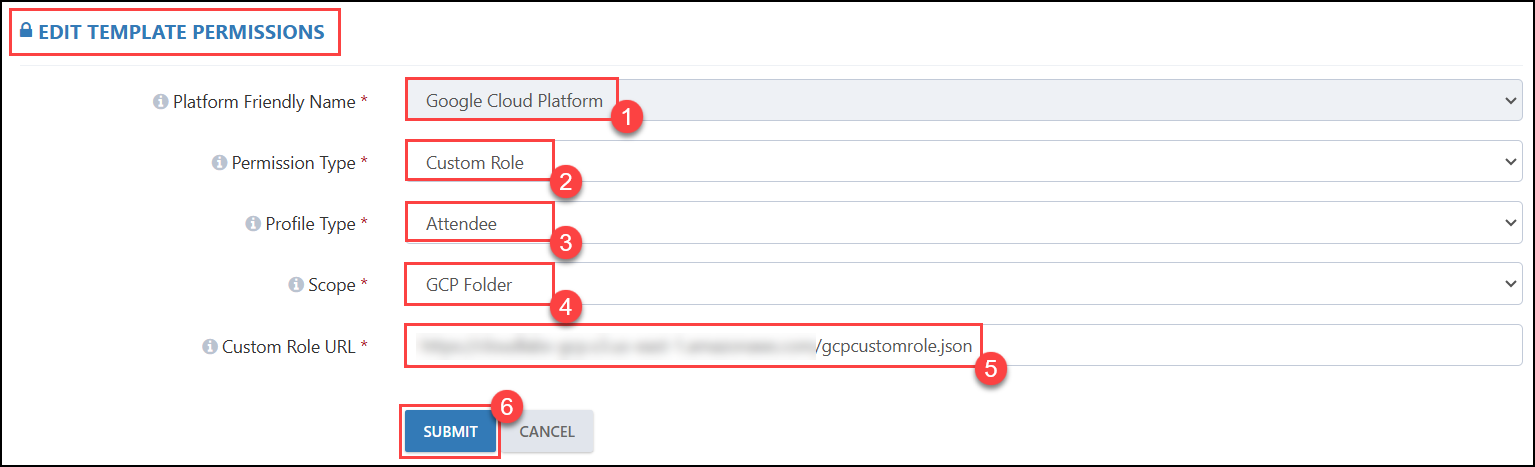
Note: For now, to access the folder, we need to provide folder-level permissions through a custom role.
Below is a sample that includes permissions for Folder management, Project management, IAM roles, Compute Engine, Networking, Storage, and more.
Link: Basic Custom Role
Now, provide the additional template permissions. Click on the Add button and provide the below-mentioned details:
Platform Friendly Name: Google Cloud Platform (1)
Permission Type: Basic Role (2)
Profile Type: Attendee (3)
Scope: GCP Folder (4)
Permission: Owner (5)
Then, click on the Submit (6) button.

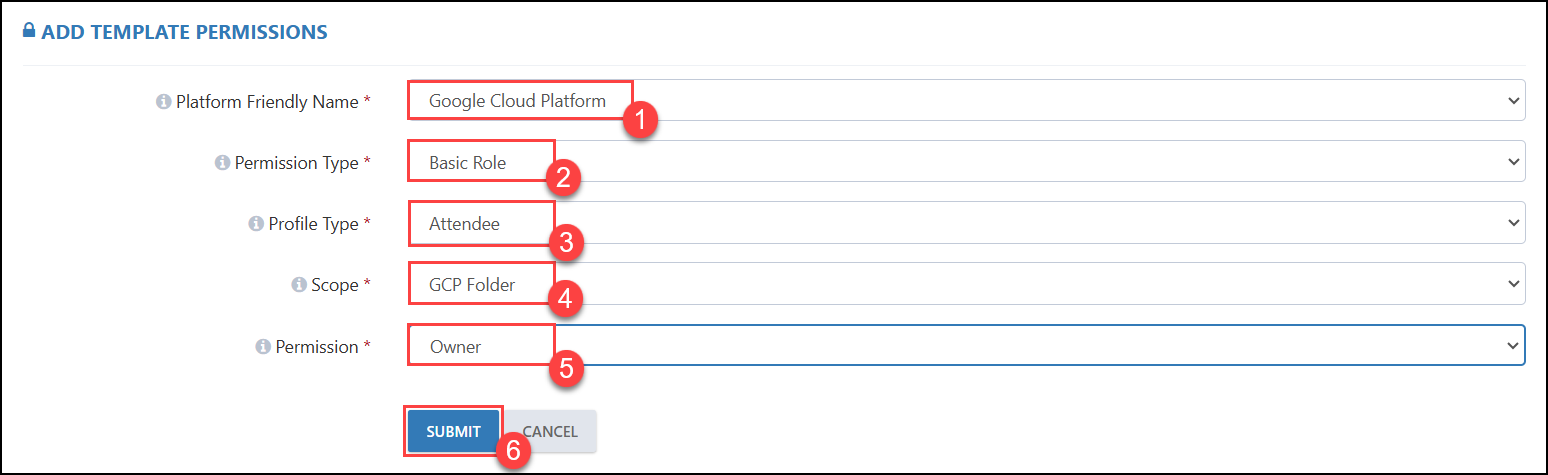
Note: Giving Owner permissions at the folder level gives the user full control over the projects under it, allowing them to deploy, modify, and manage resources.
Projects will inherit permissions from the folder. Other resource or IAM-related permissions can be defined using custom roles and applied as needed.
Now, click the Submit button to submit the template.
Go to the ODL (1) section and click on the Users (2) section.
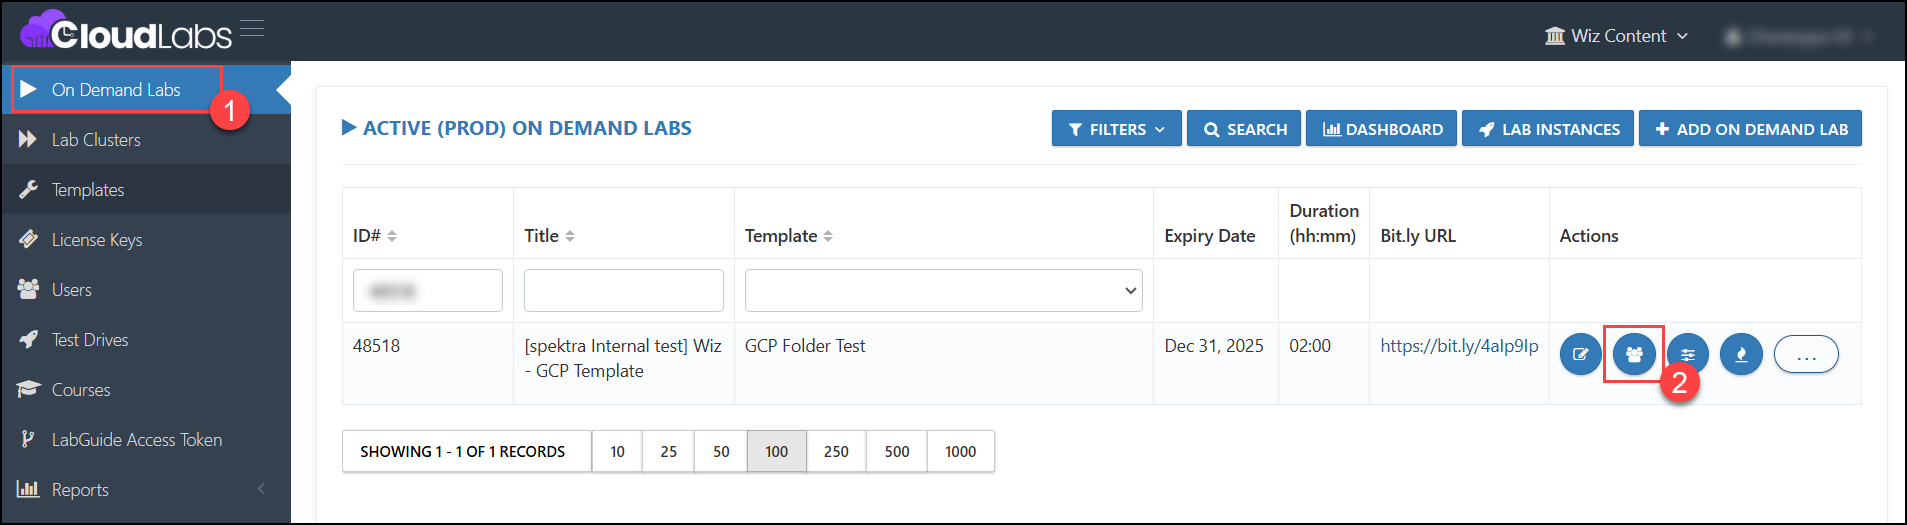
Now, deploy an ODL user from the users section.
Outputs Based on the Deployment:
Below is the screenshot for the folder and the 4 projects that are accessible.
Note: To view the folder and all projects under it, please go to the All Sections.
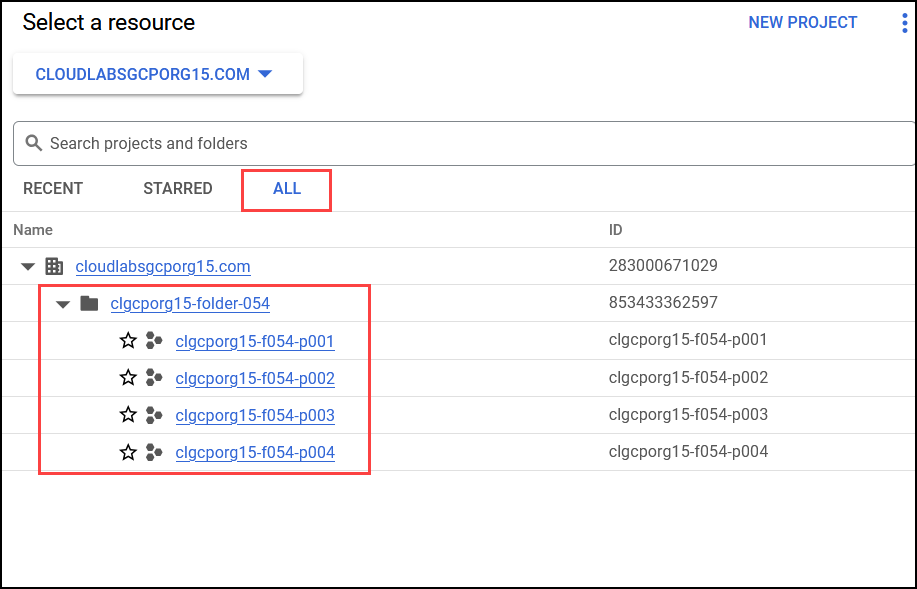
Below is the screenshot for the Cloud Template deployment that occurred in the first project, as specified in the template.
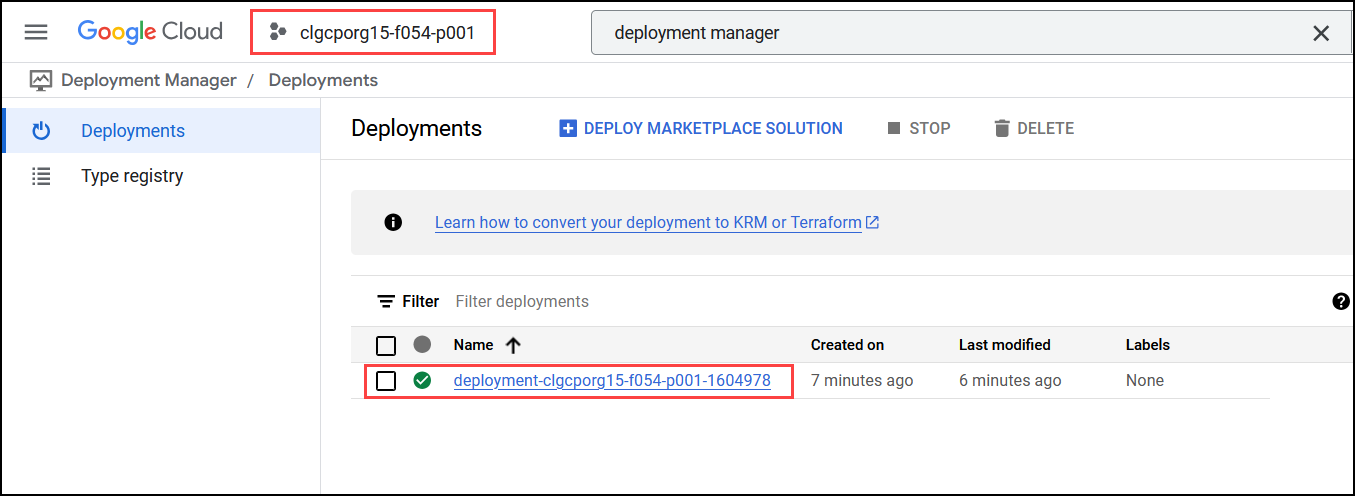
Below is the screenshot of the resources manually created in the other 3 projects.
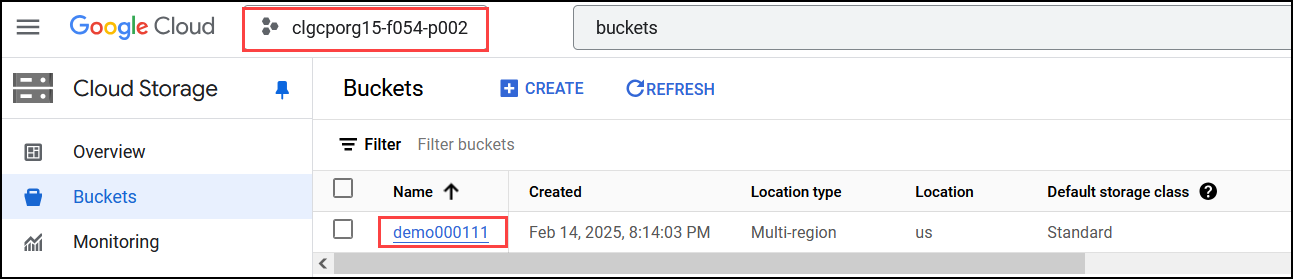
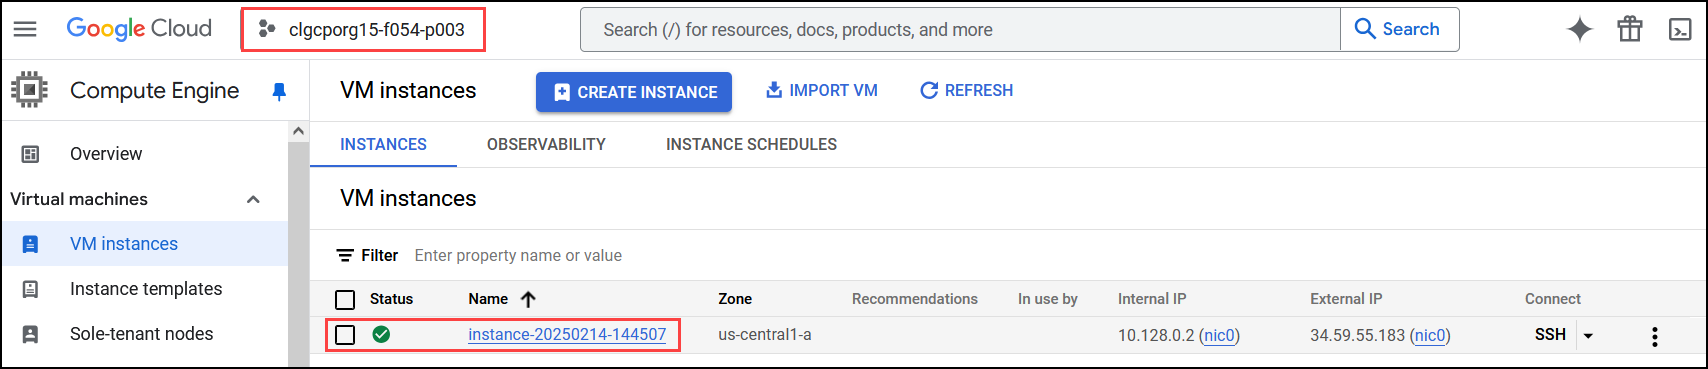

40. Implement Lab Progress Persistence After Refresh (17 February 2025)
Feature Requirement
Implement lab persistence to retain the deployment progress state, ensuring it continues from the same point after a page refresh.
Implementation
The deployment progress will no longer restart from 0% after a page refresh. It will continue from where it left off prior to the refresh.
Steps for Testing the Lab Progress Persistence After Refresh:
Log in to the CL portal and navigate to the required tenant (WIZ). On the left-hand side of the page, you will see the Template section.
Navigate to the ODL (1) section in the left menu and click on the Users (2) button.
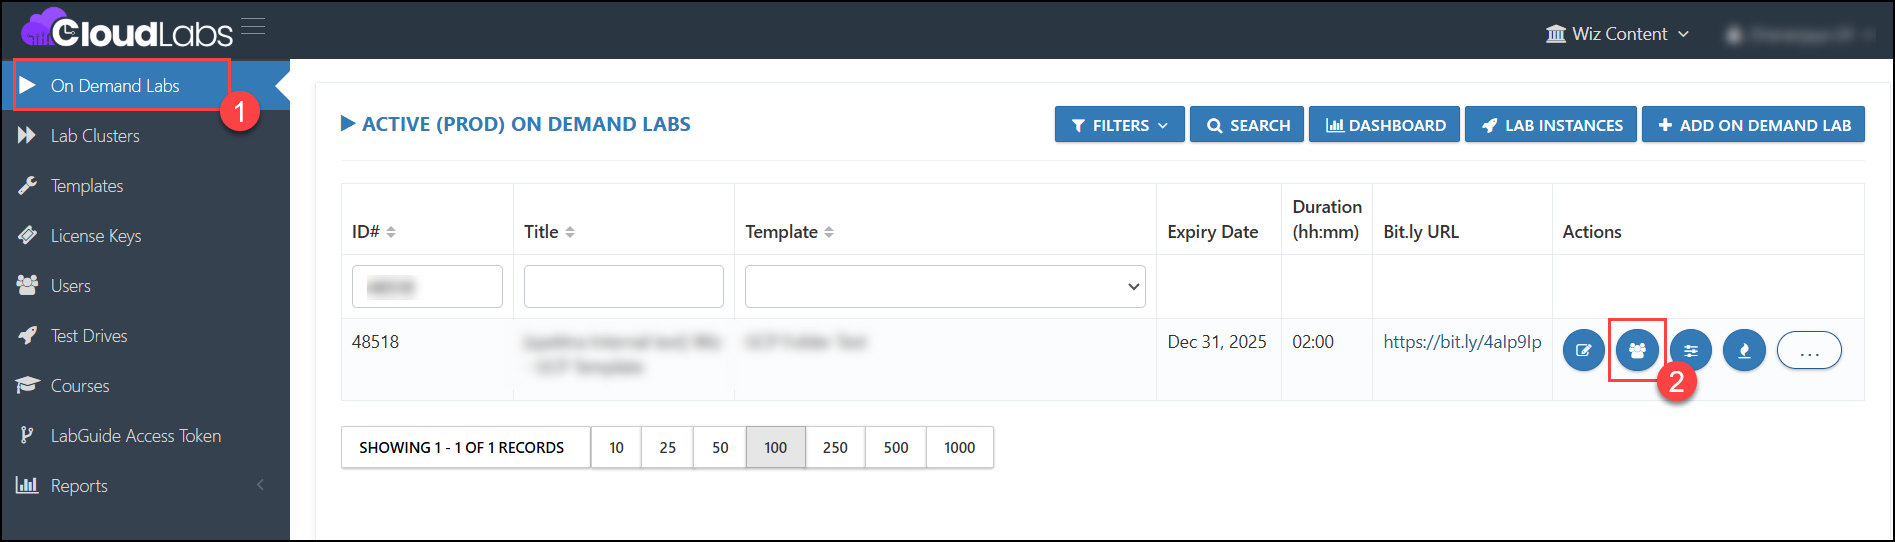
Click on the + Add User button.

Then, provide all the necessary details as indicated below and click on Submit.
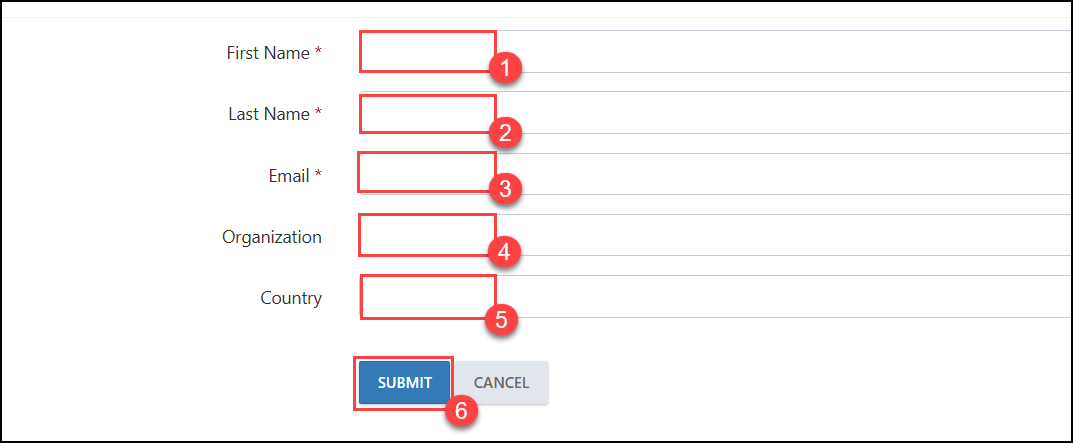
Once the user is added, click on the Open Experience Invite Link in New Tab button.

Then, click on the Launch Lab button.

As the lab is being deployed, you will see the duration and the percentage of the lab’s progress. Now, try clicking the Refresh button at the top left of the page and check the deployment status. It will resume from where it was before the refresh.
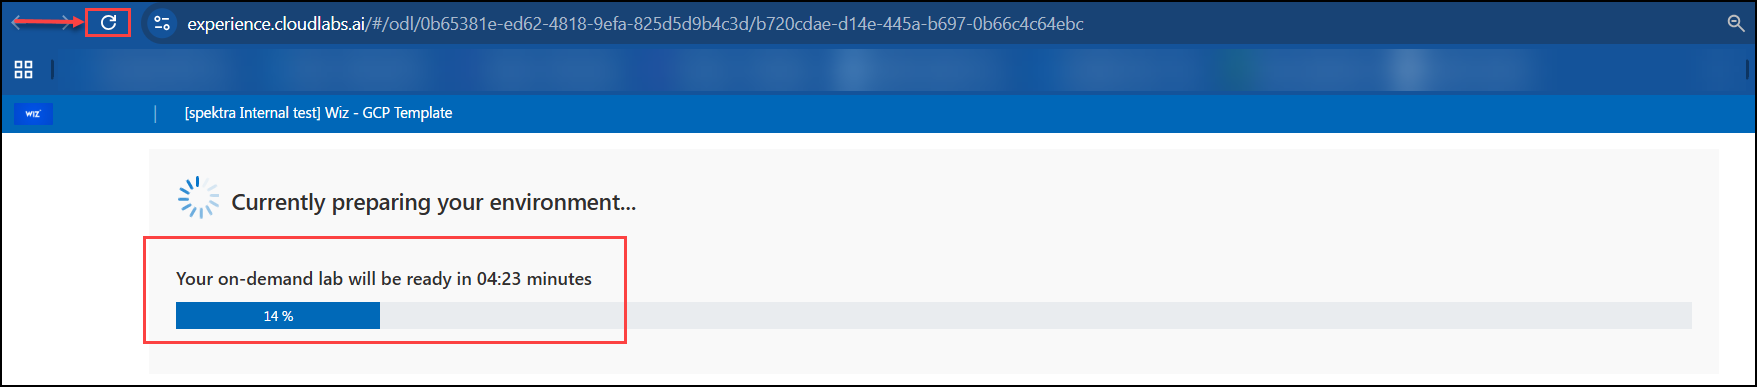
41. Availability of Three Subscriptions in Azure Dedicated Tenant (17 February 2025)
Feature Requirement
Azure Dedicated Tenant (DT) deployments should have three subscriptions with assigned permissions.
Implementation
Each ODL user deployment with a Dedicated Tenant will have three subscriptions with assigned permissions.
Steps to test Availability of Three Subscriptions in Azure Dedicated Tenant
In the Template section of CloudLabs, edit an existing template or create a new template where a Dedicated Tenant with three subscriptions needs to be tested.
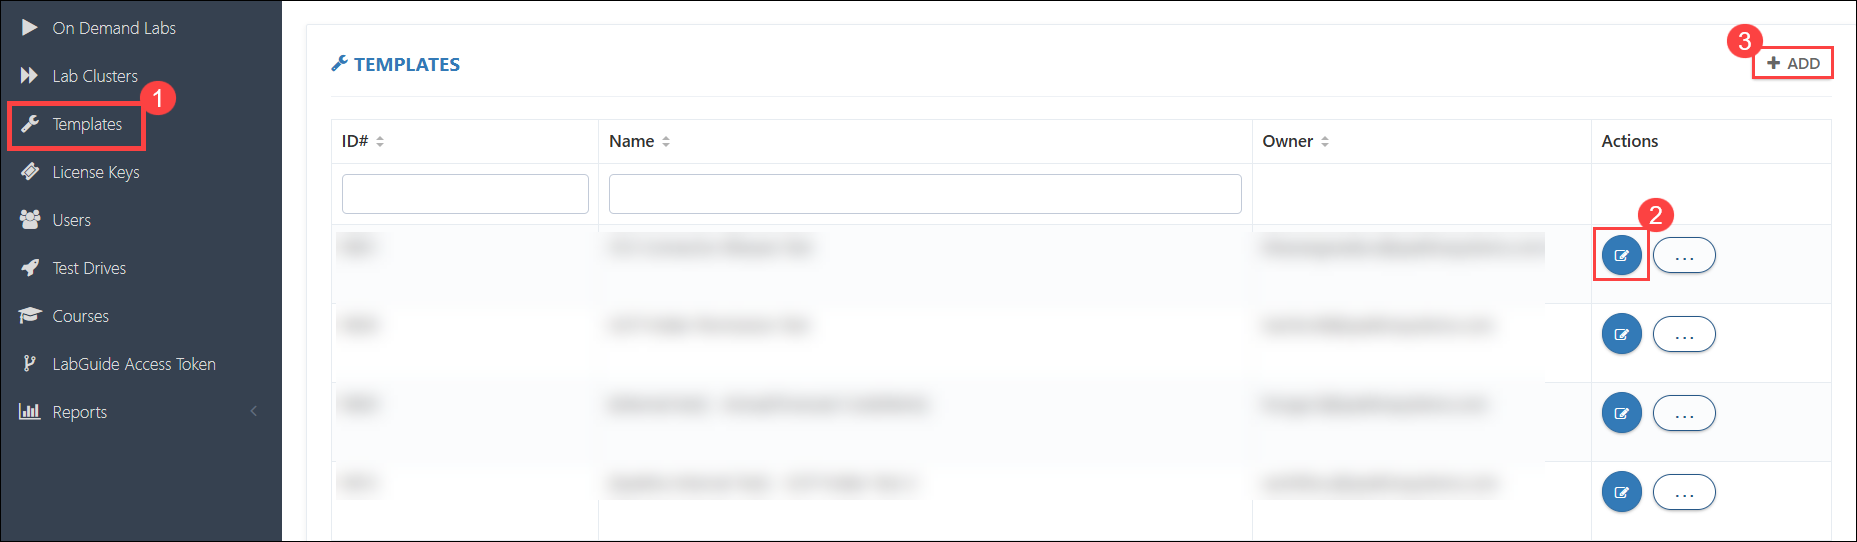
In the Cloud Platform Configuration section:
- Select Azure as the cloud platform (1).
- Select Subscription Type as Dedicated Tenant (2).
- Choose the Deployment Plan based on the requirement (3).
- Check the box for Enable Custom RG Name (4) (optional).
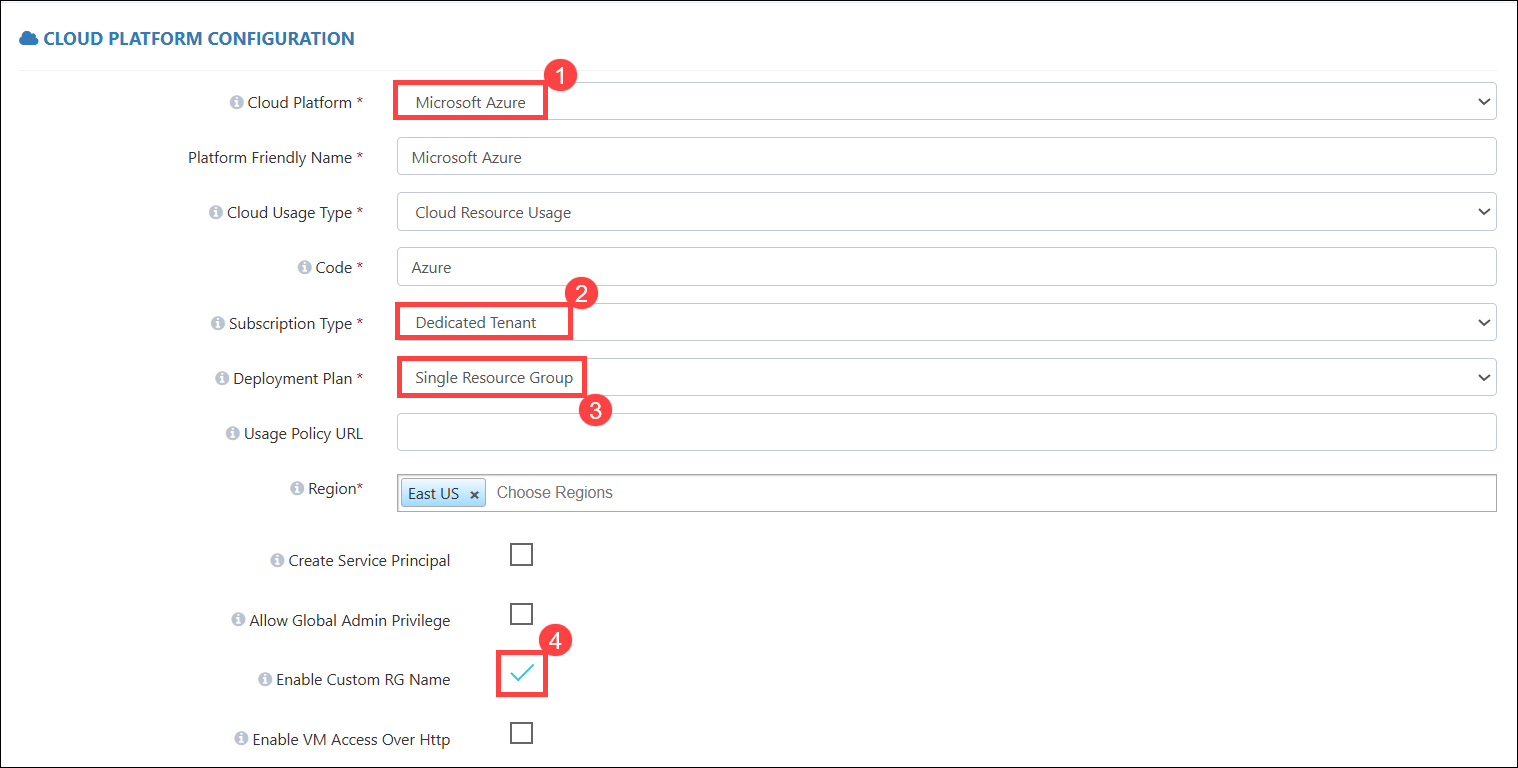
In the Cloud Template section:
- Select the Resource Group (RG) where resources need to be pre-deployed (1).
- Add a custom suffix to the RG (2).
- Provide the Cloud Template URL (3).
- Provide the Parameter Template URL (4).
- Then, click on the Submit (5) button.
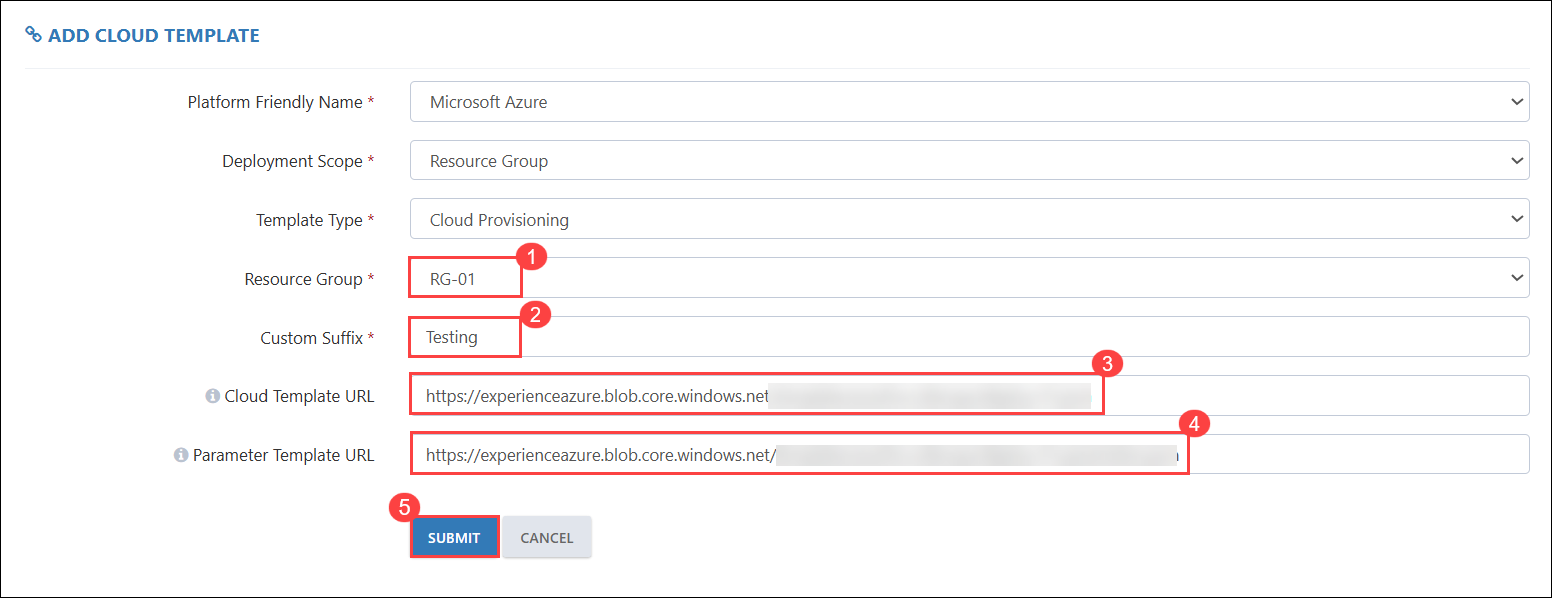
In the Template Permissions section, select the Permission Type.
Note: For now, provide the Owner built-in role or a custom role to test access to the three subscriptions. In the future, a custom ARM policy can also be applied to the subscriptions through the template section.
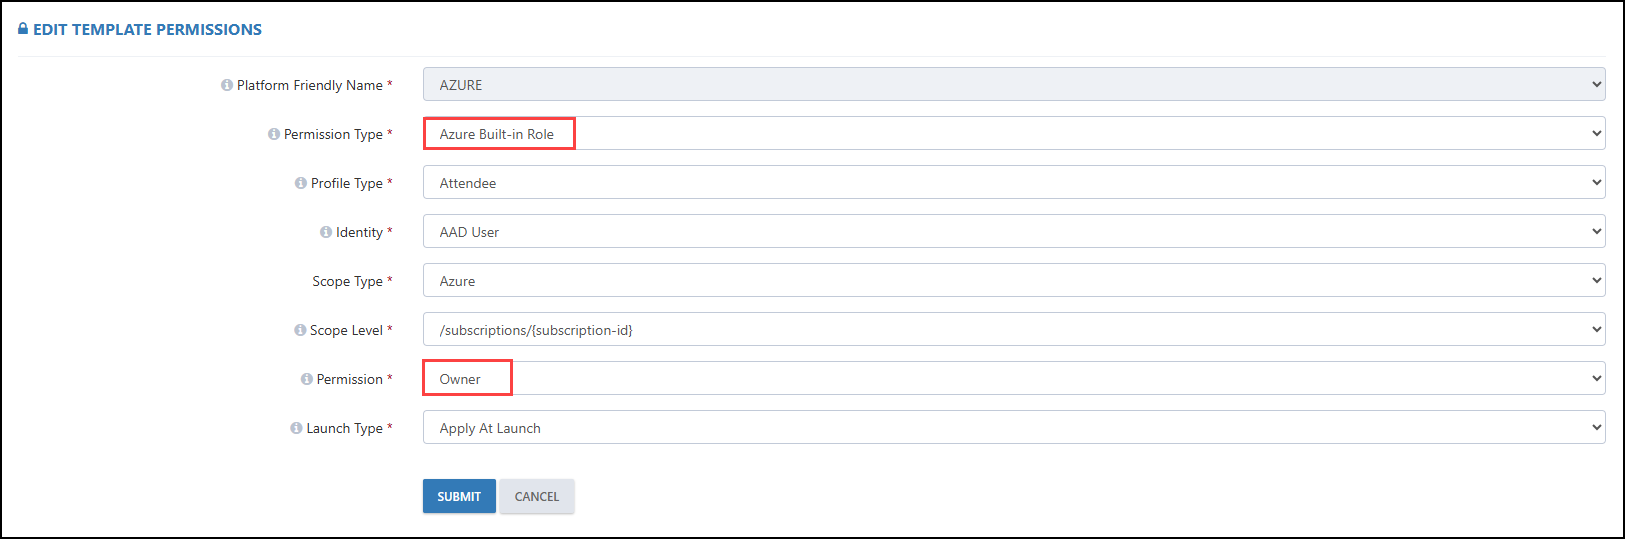
Below is a Basic Custom Role.
Link: Basic Custom Role
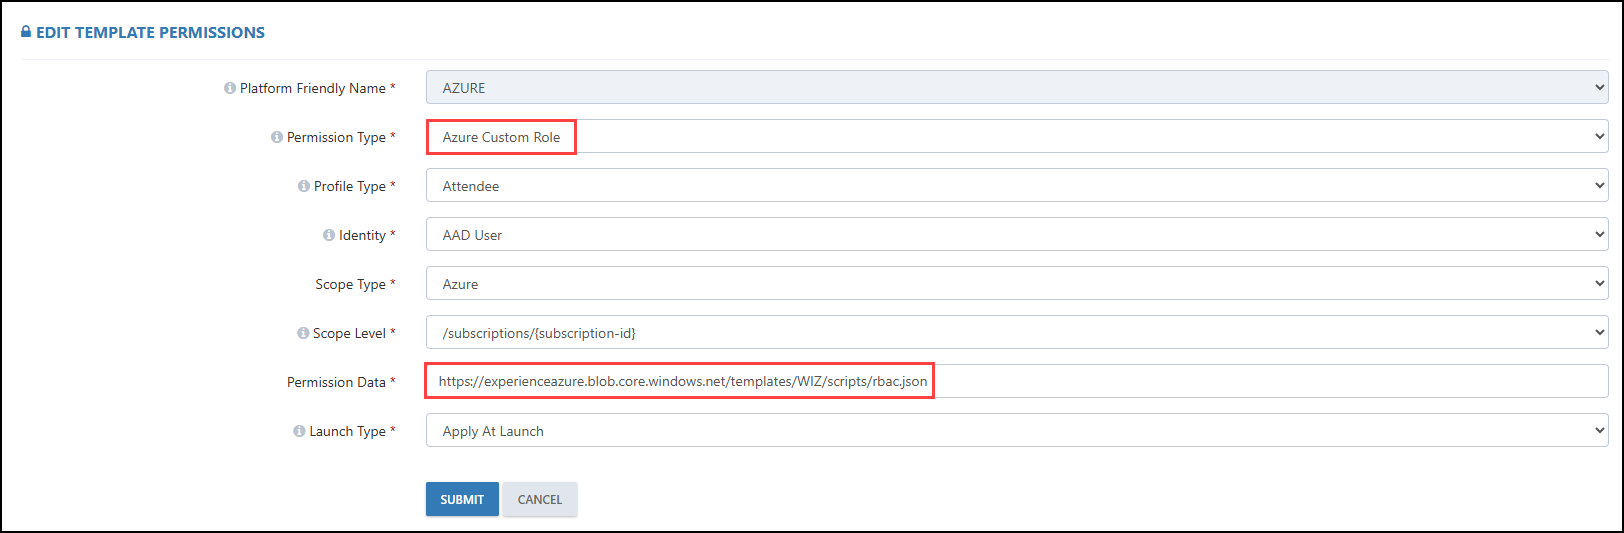
Save the template after making all the changes.
Navigate to the ODL section, create a new ODL, fill in all the necessary details, and associate it with the template used for testing subscriptions in Azure DT.
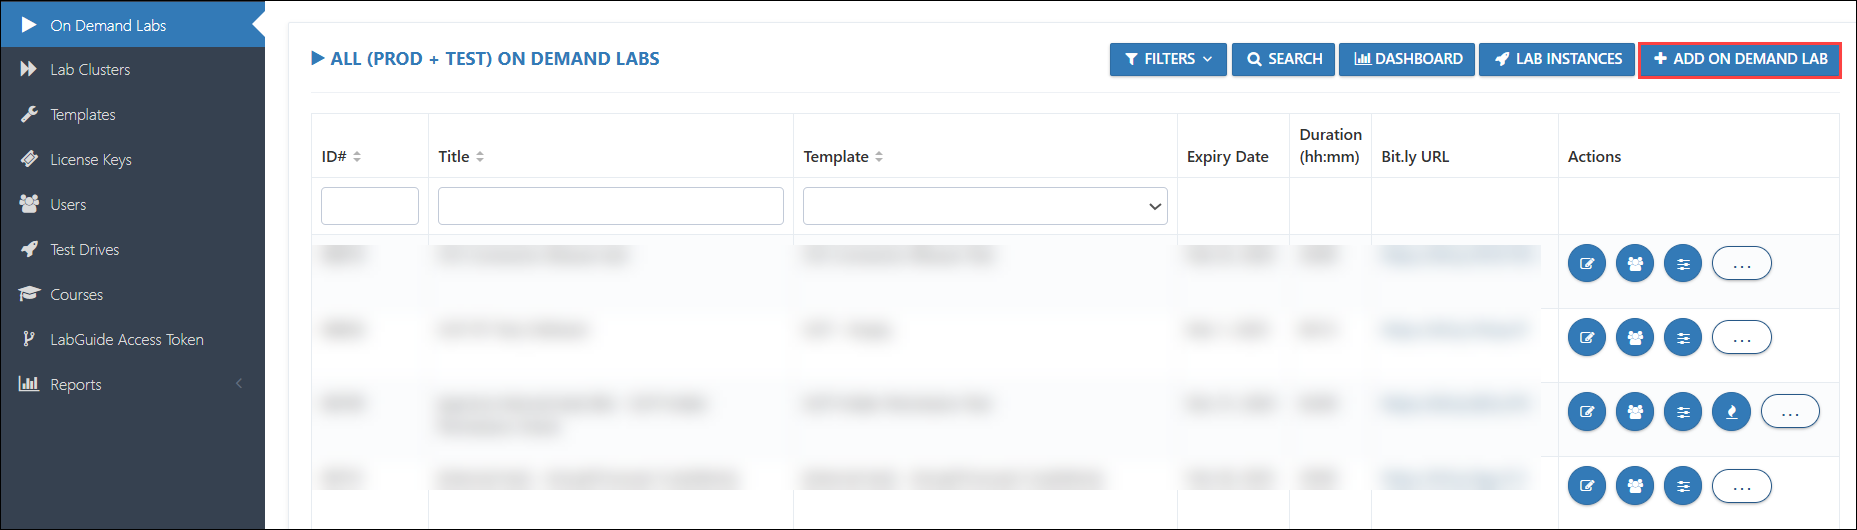
Navigate to the Users section of that ODL and launch an environment.
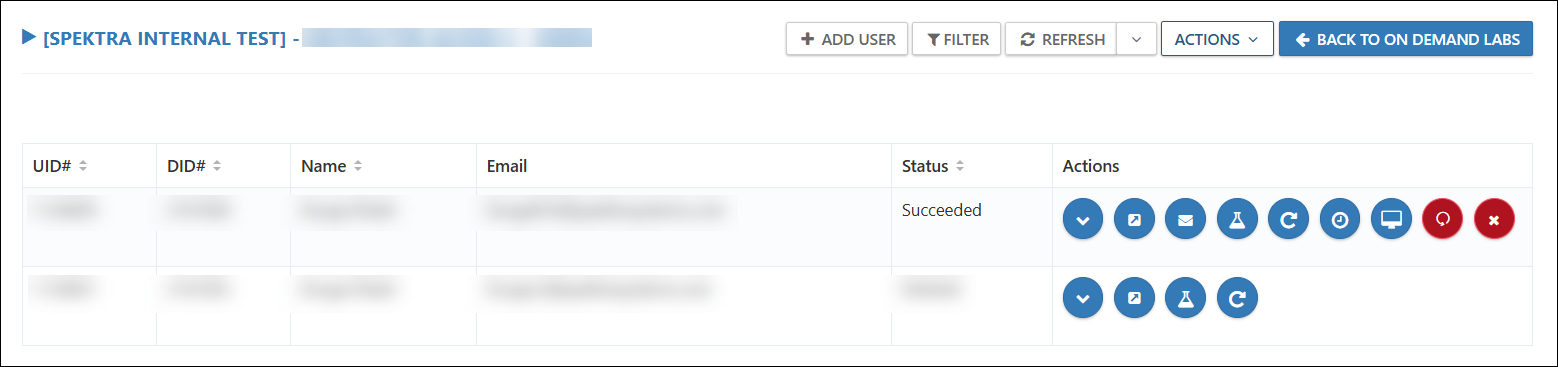
Log in to the Azure Portal using the provided credentials.
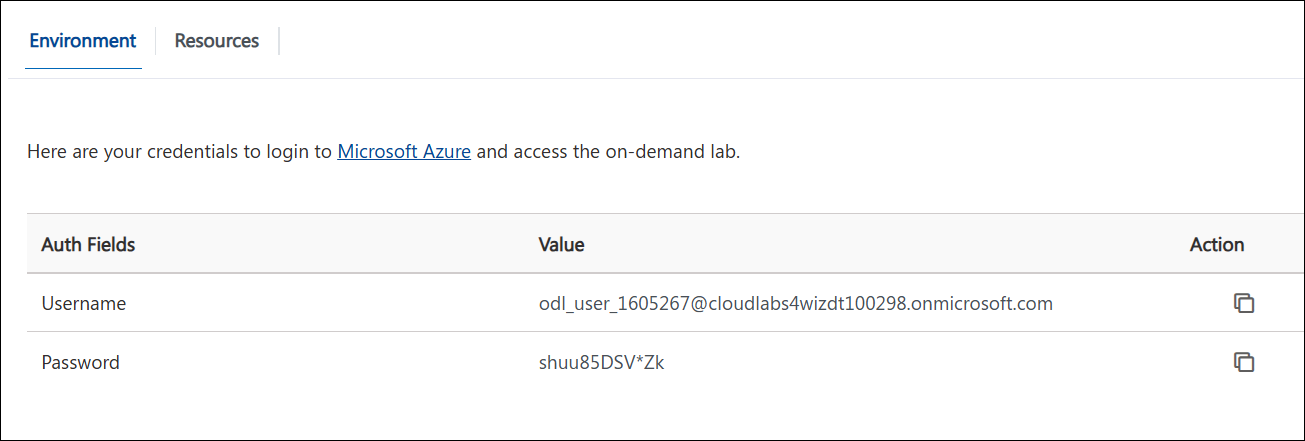
In the Search bar, search for Subscriptions and select it.
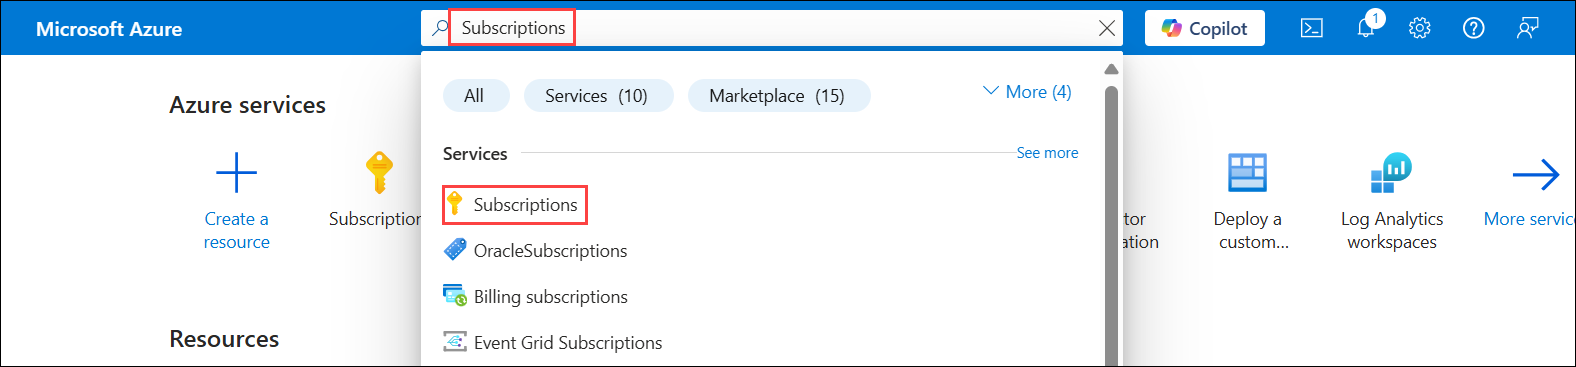
If the Owner Built-In Permission is applied, the user will be able to view and have Owner access to all three subscriptions.
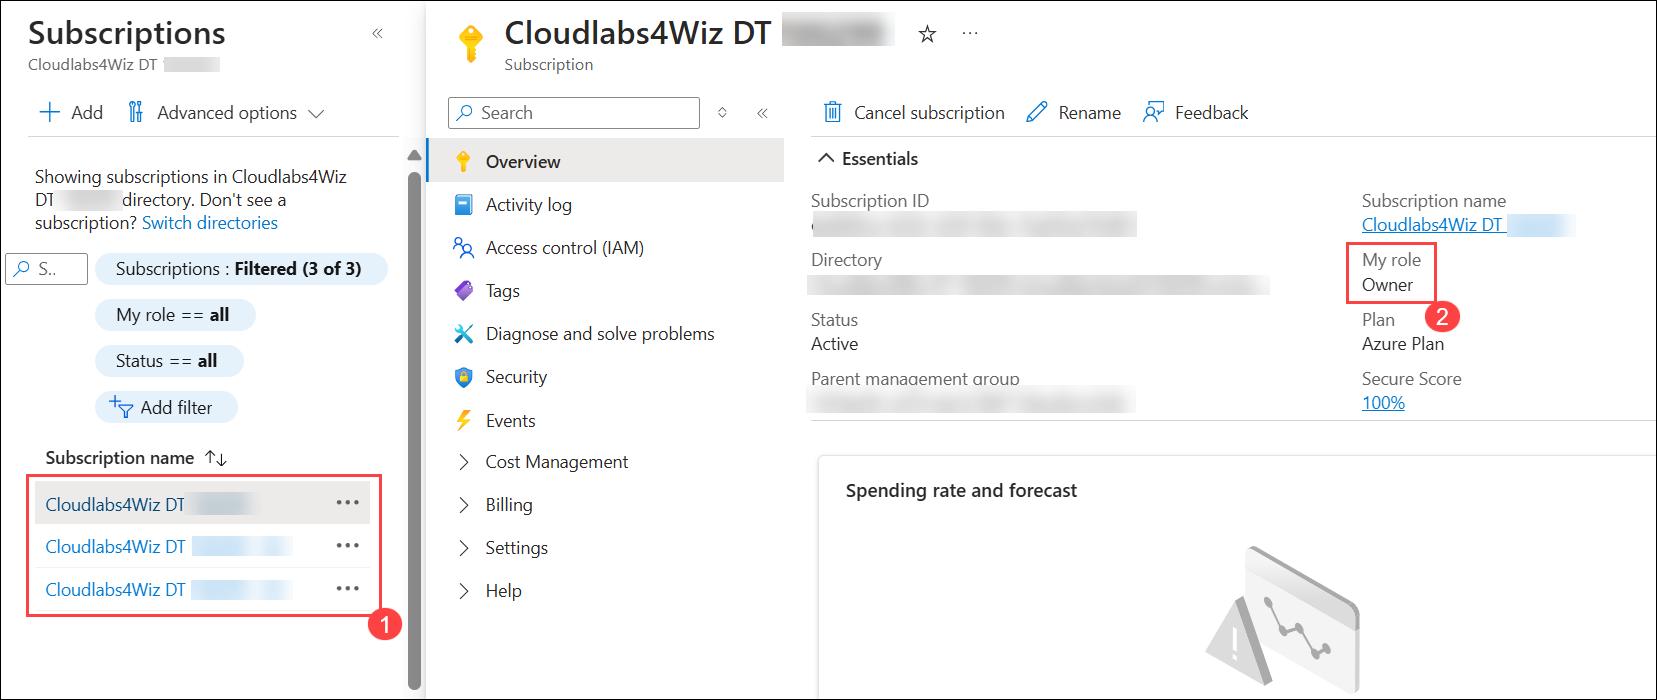
If the custom role is applied, the user will have specific access based on the permissions defined in the custom role. The custom role will be assigned to all three subscriptions. You can view the role Assignment Part in the role assignments section and verify the role's existence in the Roles section.
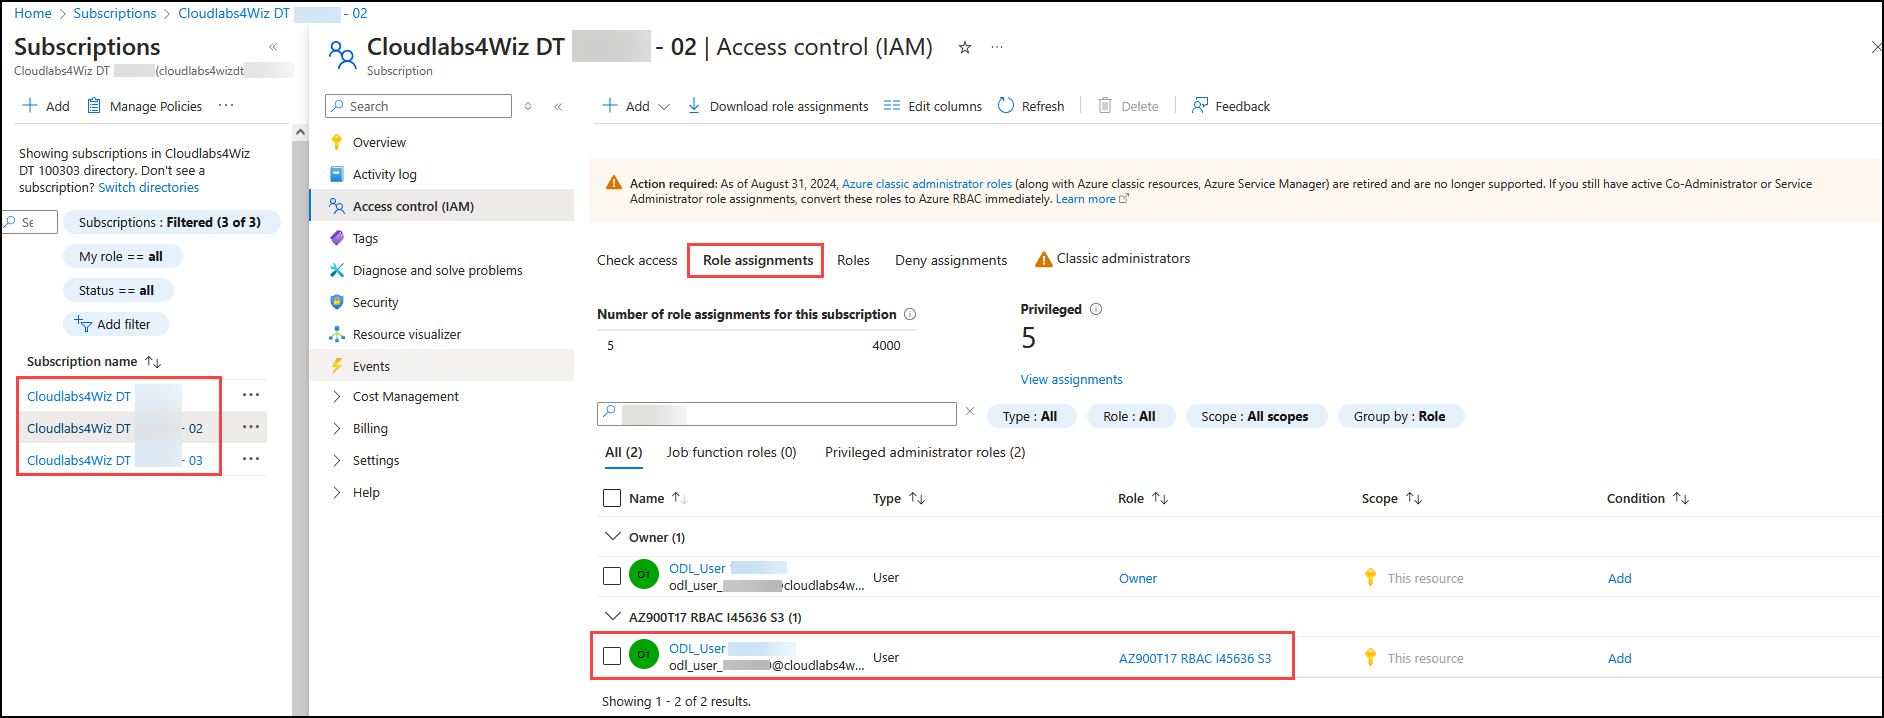
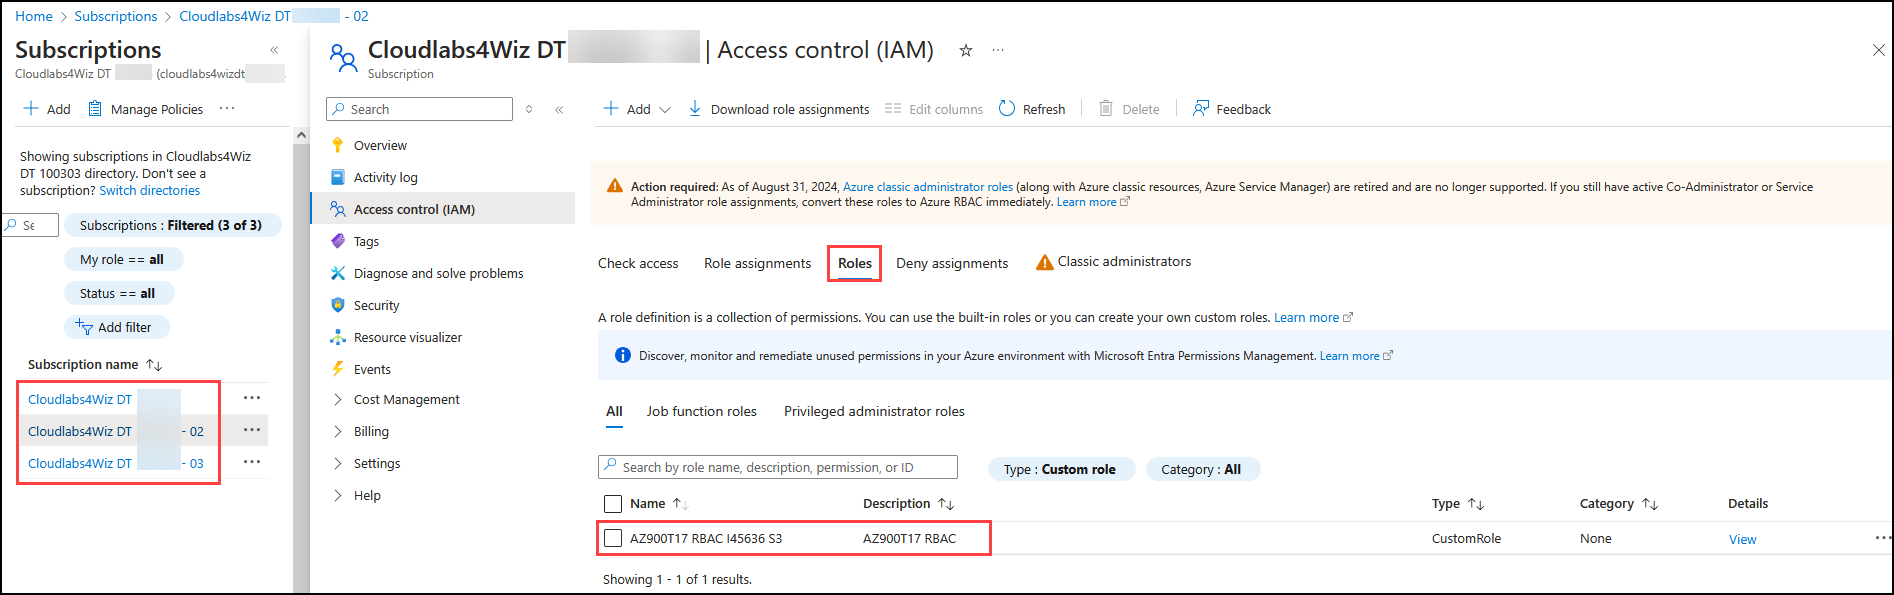
For resources pre-deployed by the Cloud Template:
- A Resource Group (RG) with the provided suffix will be created in the first subscription.
- The resources will be deployed within that RG.

Note: The Storage Account was created using the Cloud Template.
Create a Resource Group (RG) inside the second subscription as shown below.
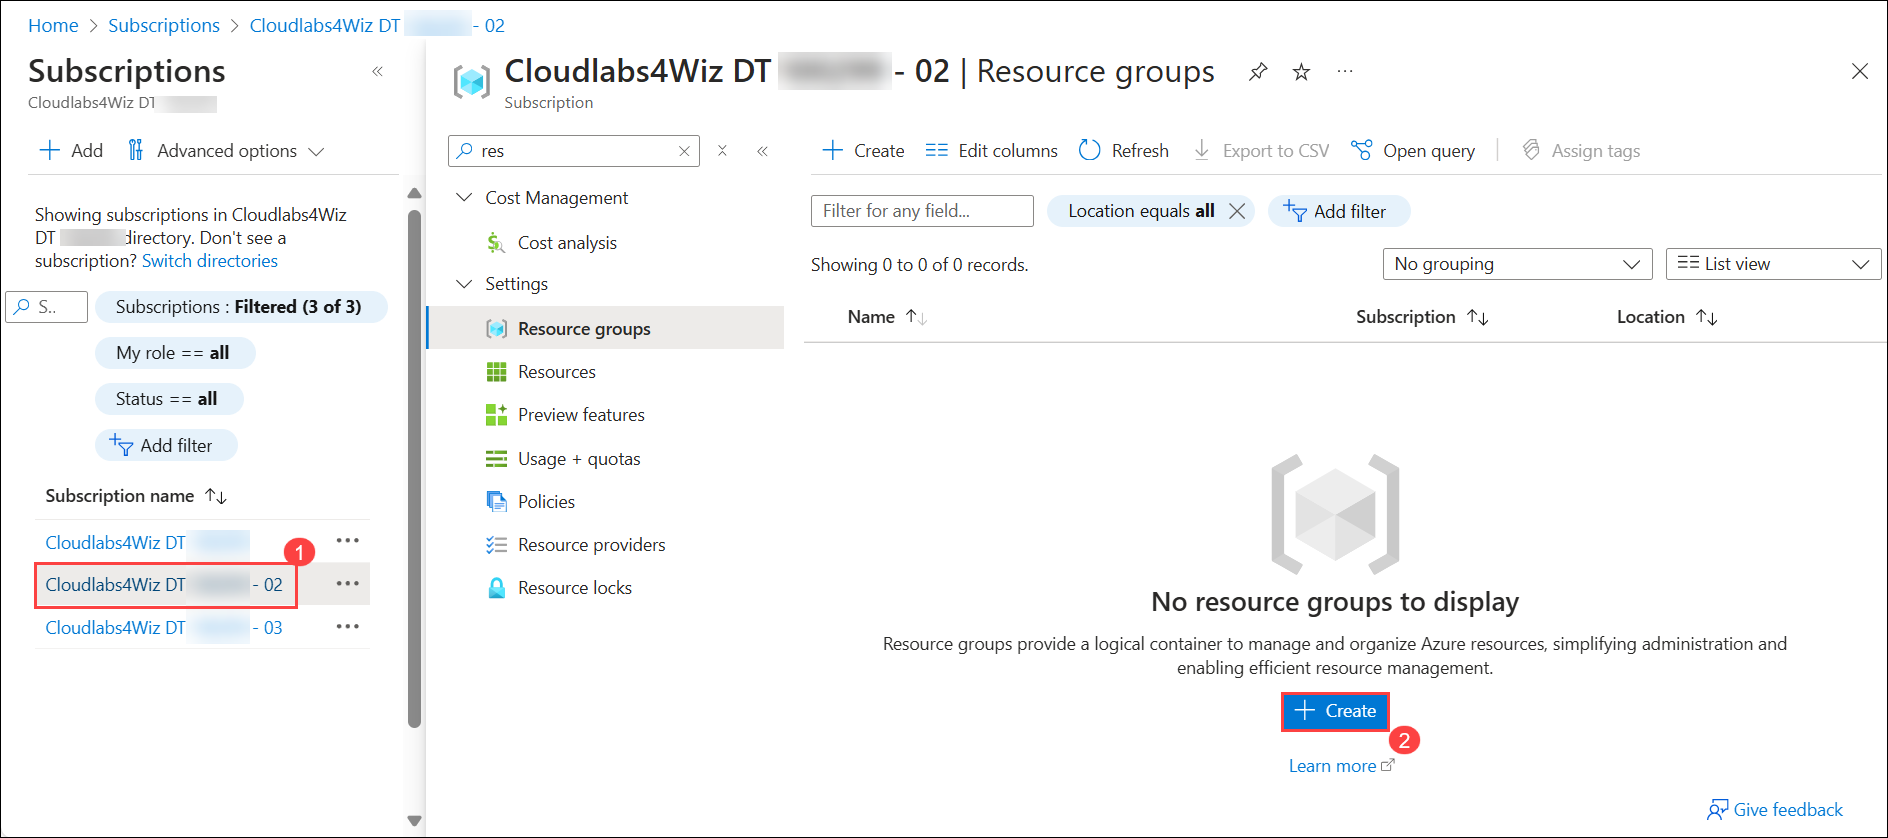
Select the newly created Resource Group.
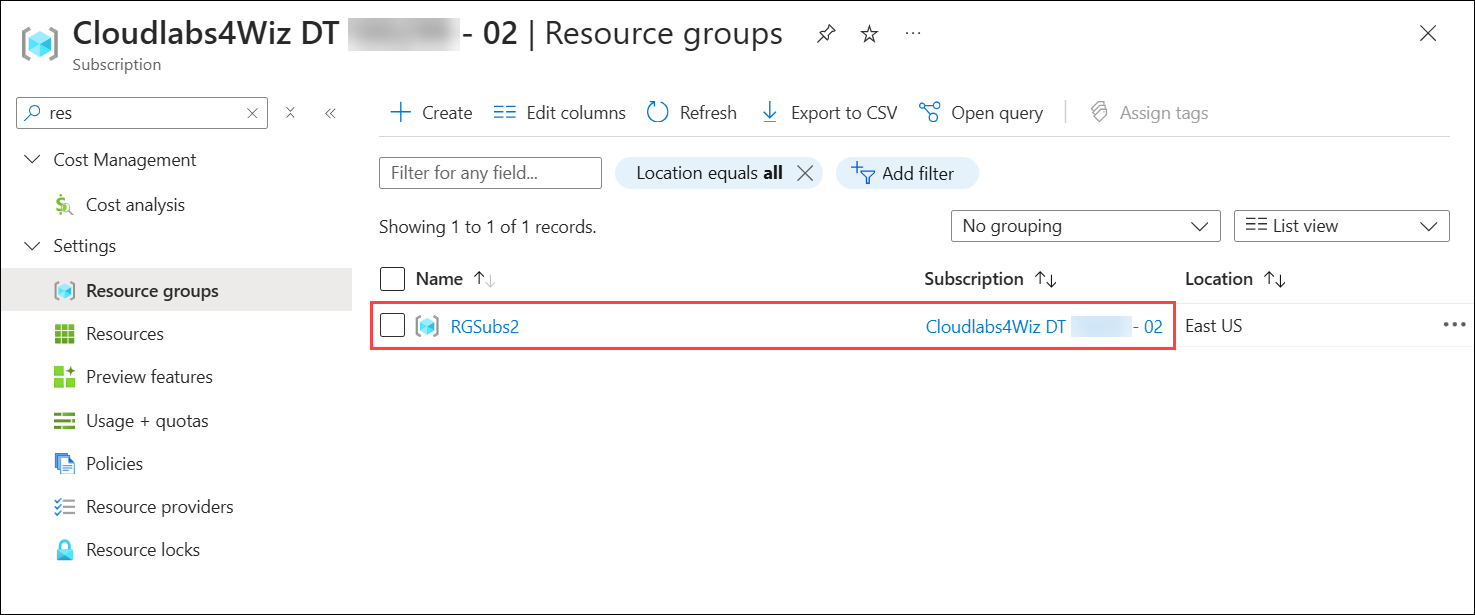
To create a simple Storage Account resource in the newly created RG for permission testing, click on Create a resource.
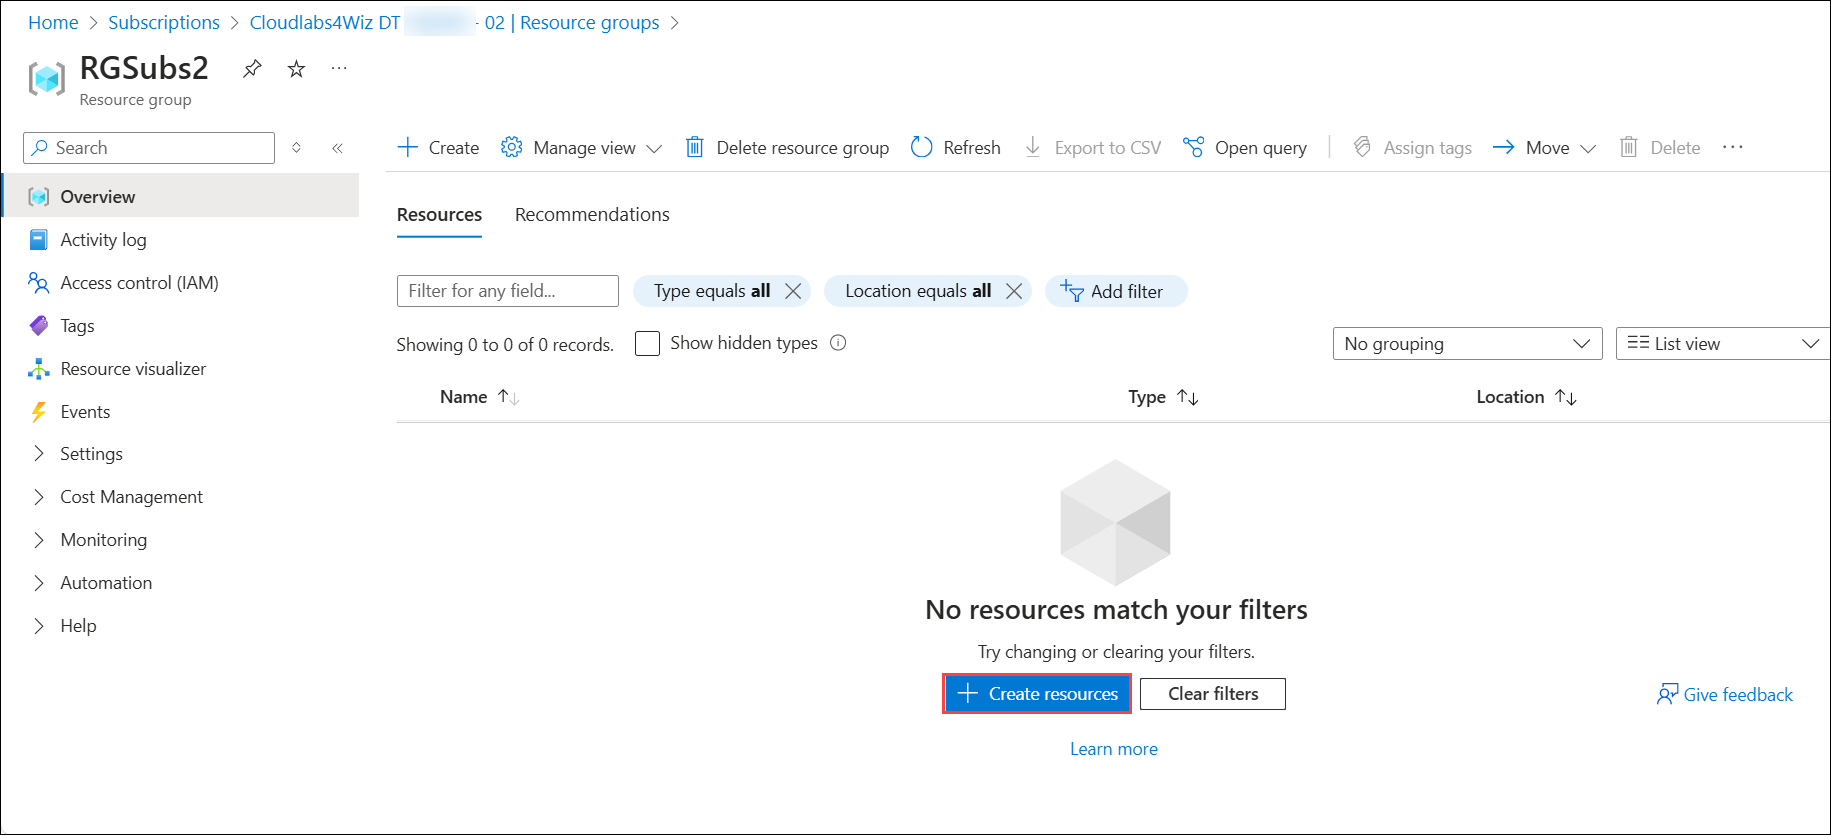
In the Search bar, search for Storage Account (1) and select Storage Account (2) from the Marketplace.
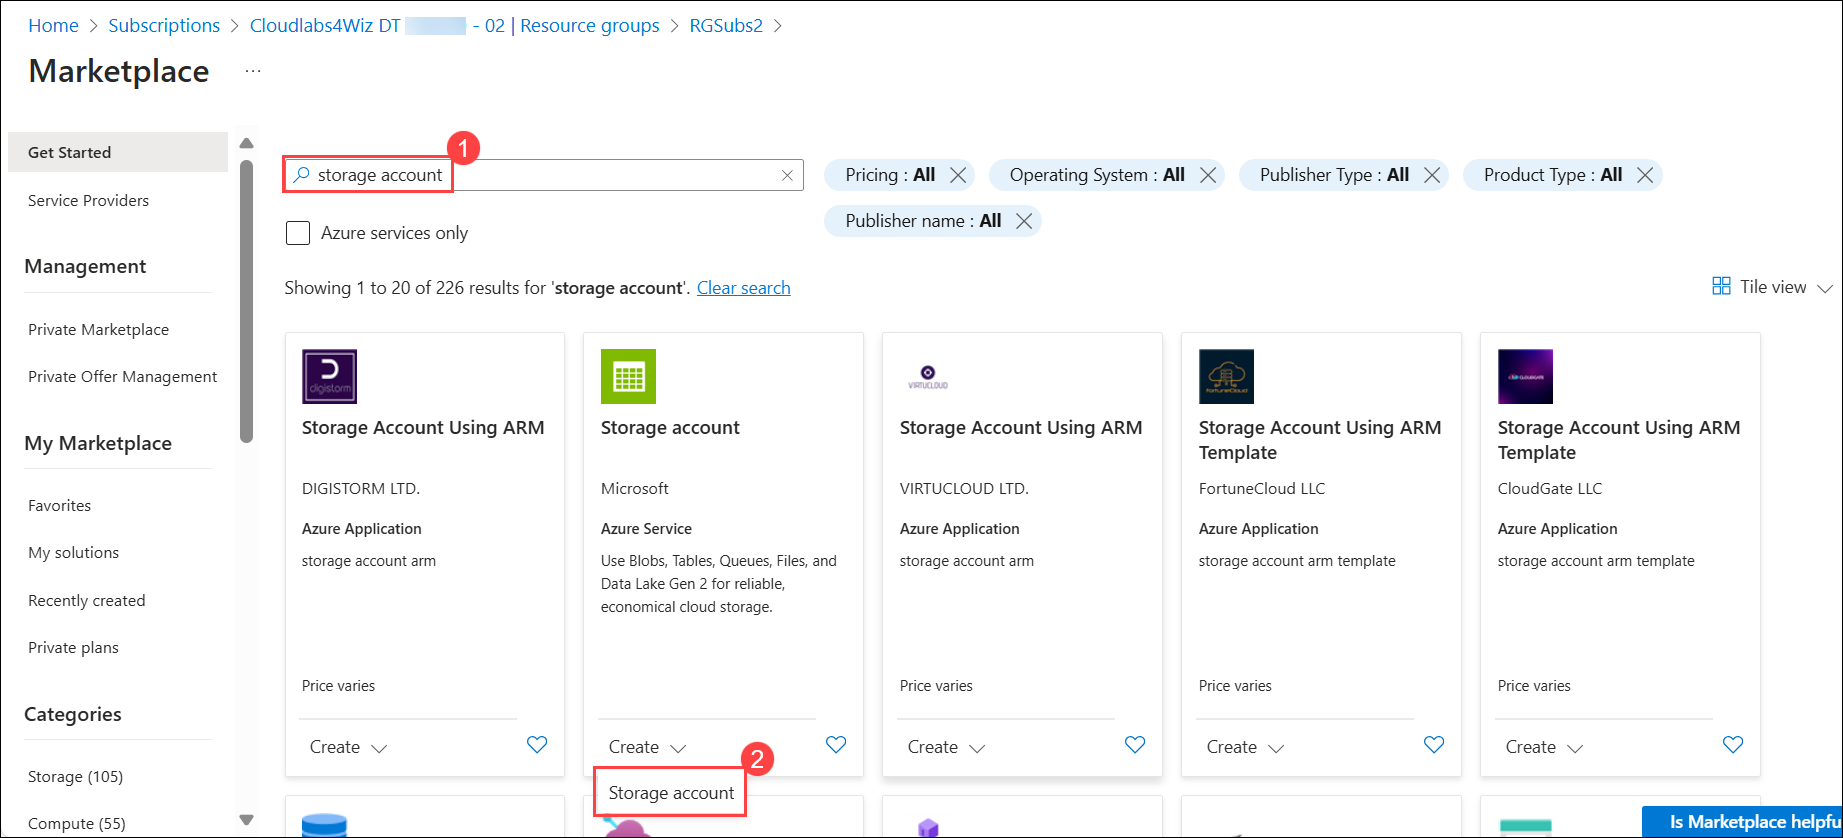
Verify that the second subscription and the newly created RG are selected.
- Provide a unique name (1) for your Storage Account.
- Review all other options and settings.
- Click on Review + Create (2).
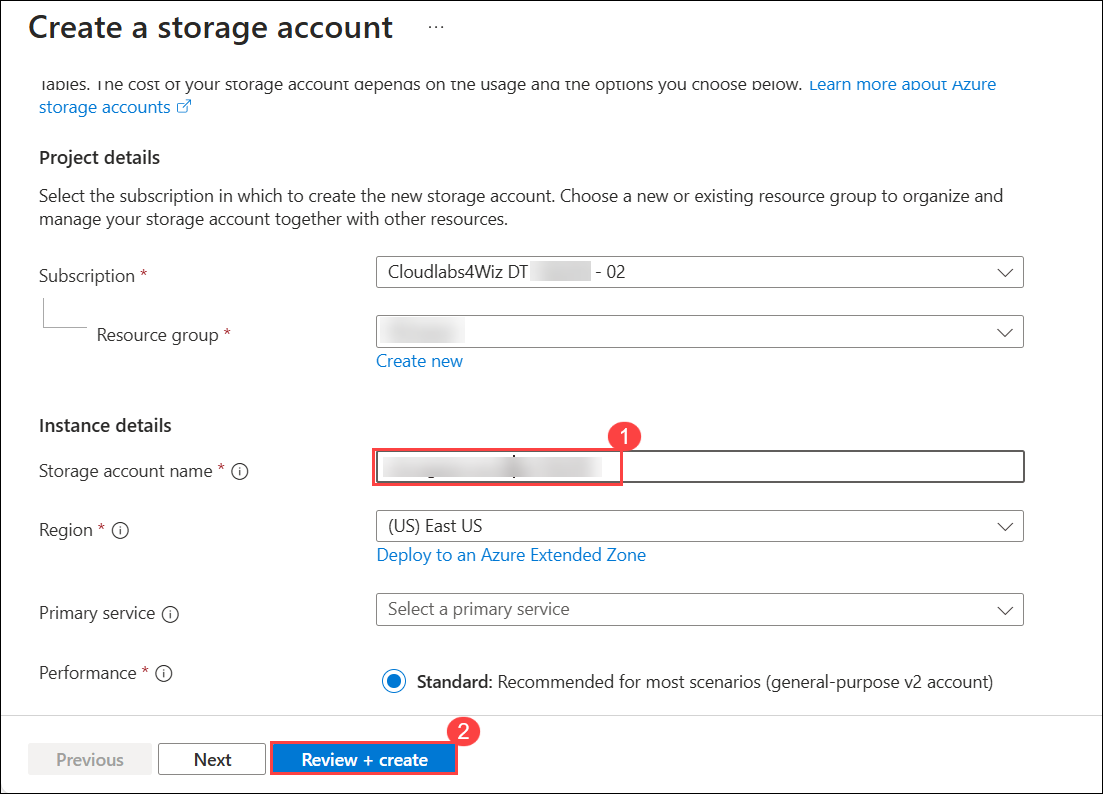
A Storage Account will be successfully created inside the RG of the second subscription.
- This confirms that the assigned permissions are correctly applied to the subscription.
- The Storage Account resource will be visible inside the RG.
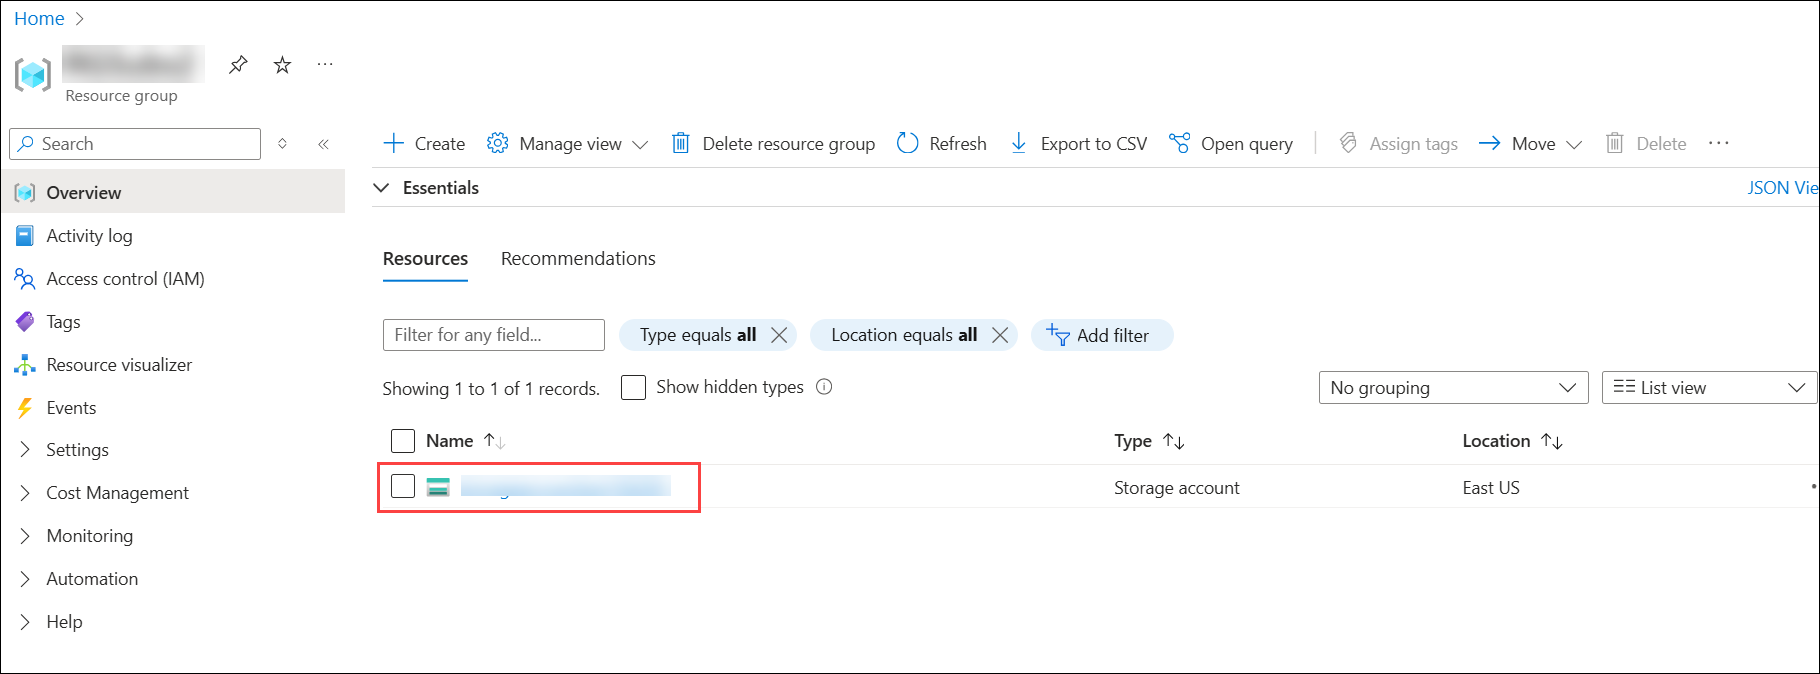
42. Instructor Access to WIZ Portal (17 February 2025)
Feature Requirement
The Instructor should be assigned the Global Contributor role and should be able to log into the Wiz portal using their instructor credentials.
Implementation
Each deployed Instructor will be assigned the Global Contributor role, and they will be able to log into the Wiz portal using only their instructor credentials.
Testing Global Contributor Role as an Input Parameter in Custom Handler
Prerequisites
In the Template section, under Custom Handler, select WIZ_Handler and add the URL that includes the Global Contributor role in the Input Parameter section.
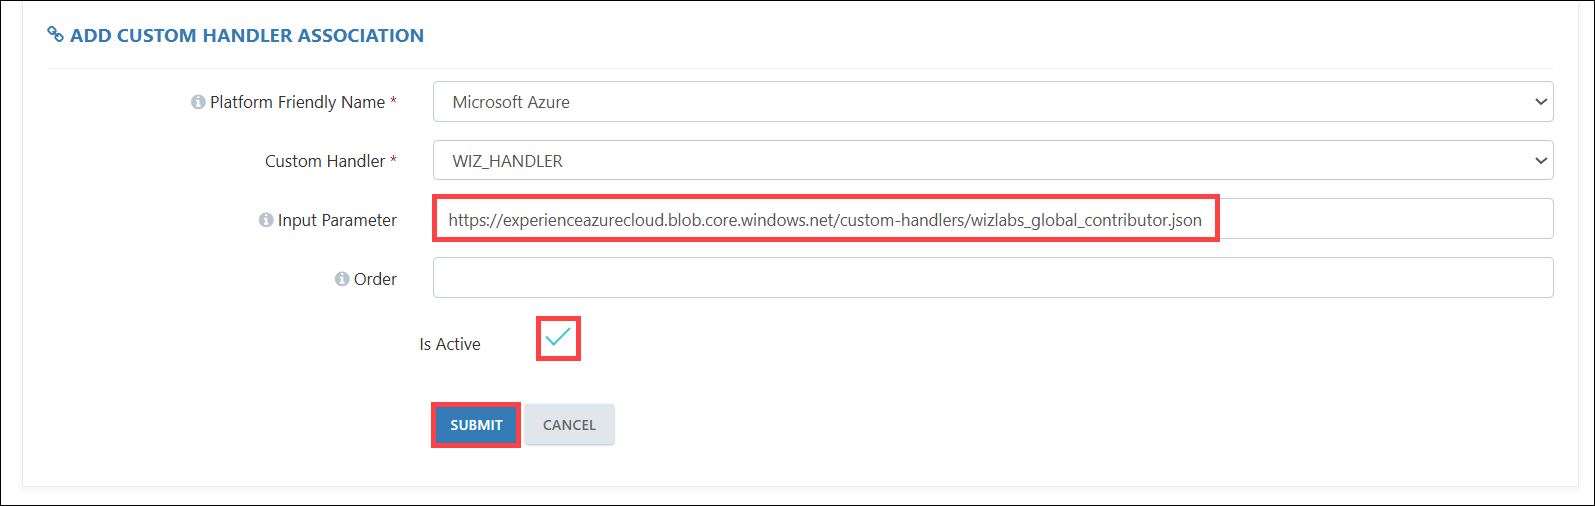
Note: Instructor access to the Wiz portal will only work on Dedicated and Shared subscriptions.
Steps to test Instructor Access to WIZ Portal
In the ODL section, click on the ellipsis (⋮) for the ODL where the Instructor should be added, then click Manage Instructors.
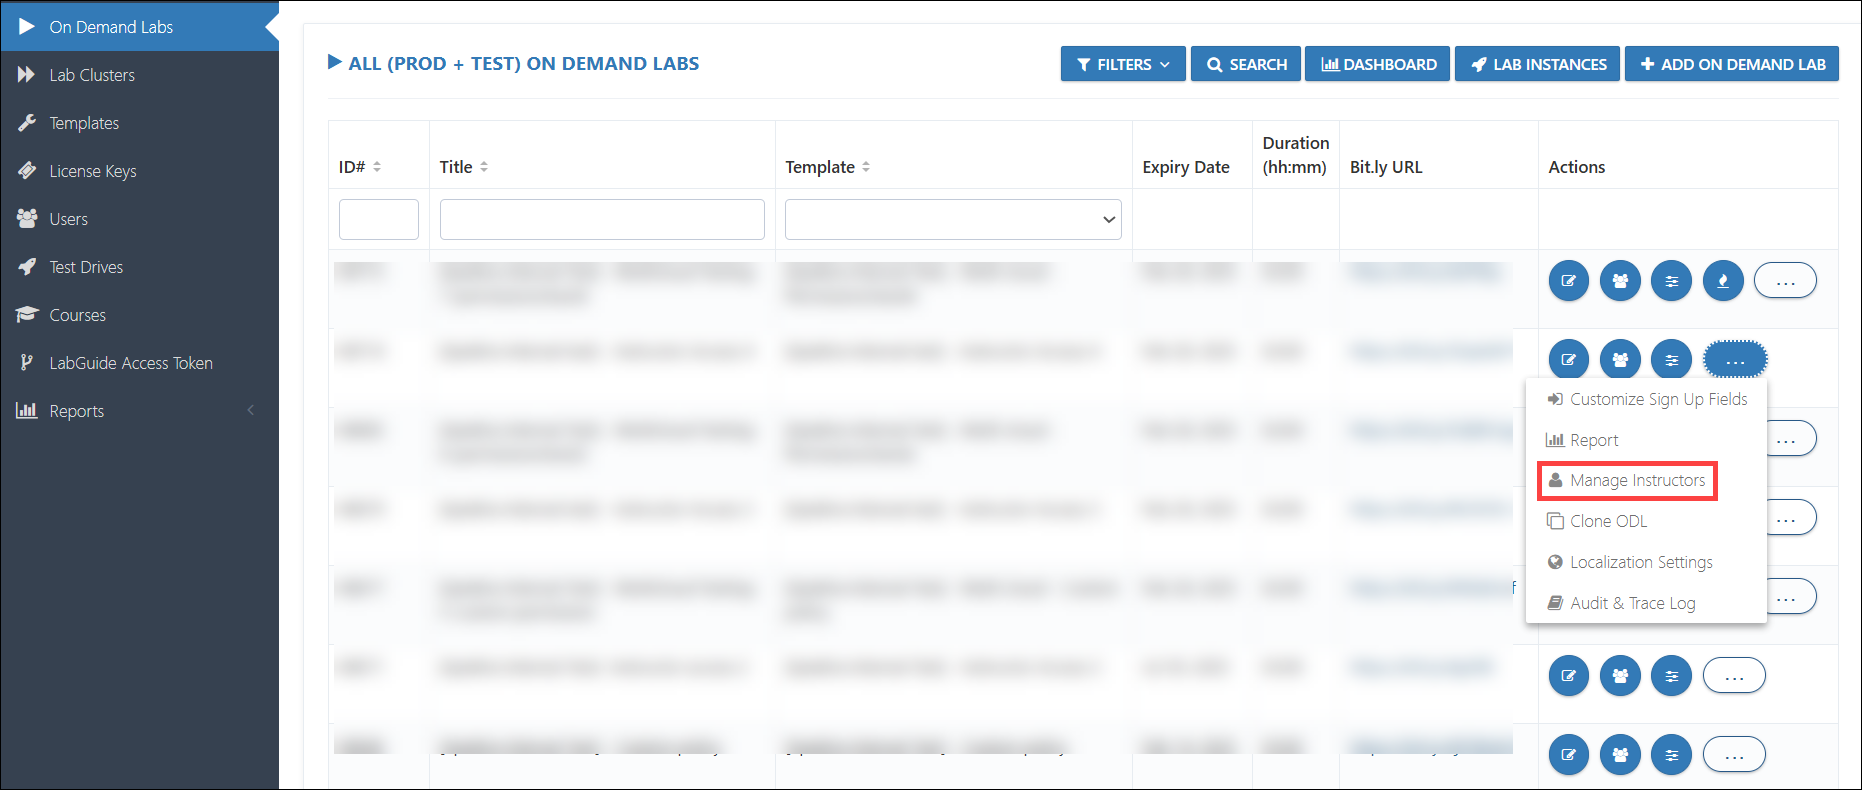
Click Add Instructor from the top panel, fill in the required details, and click Submit.
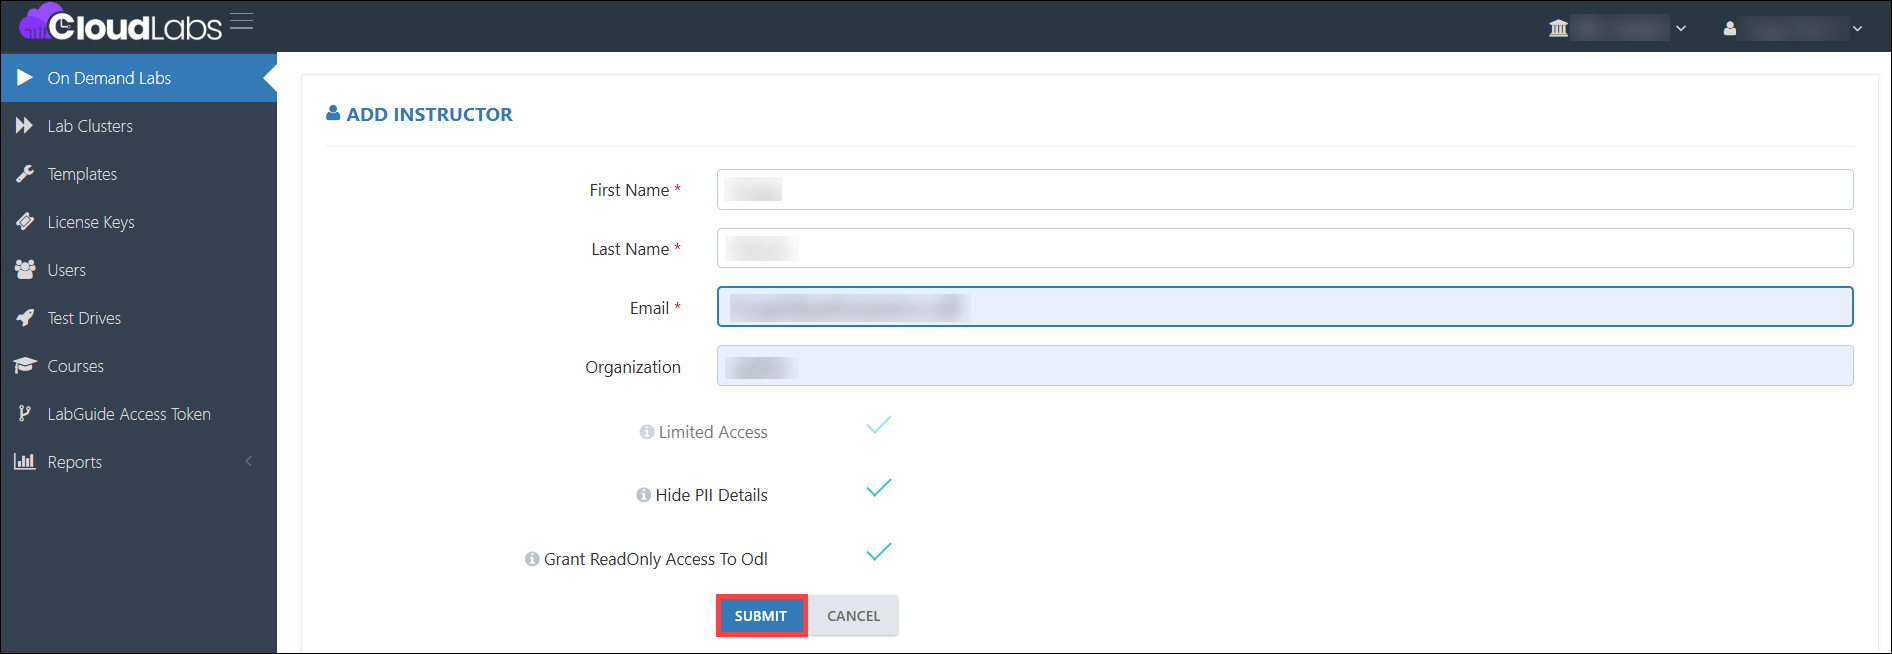
Click on the "i" icon to create a Cloud user and view the cloud details.
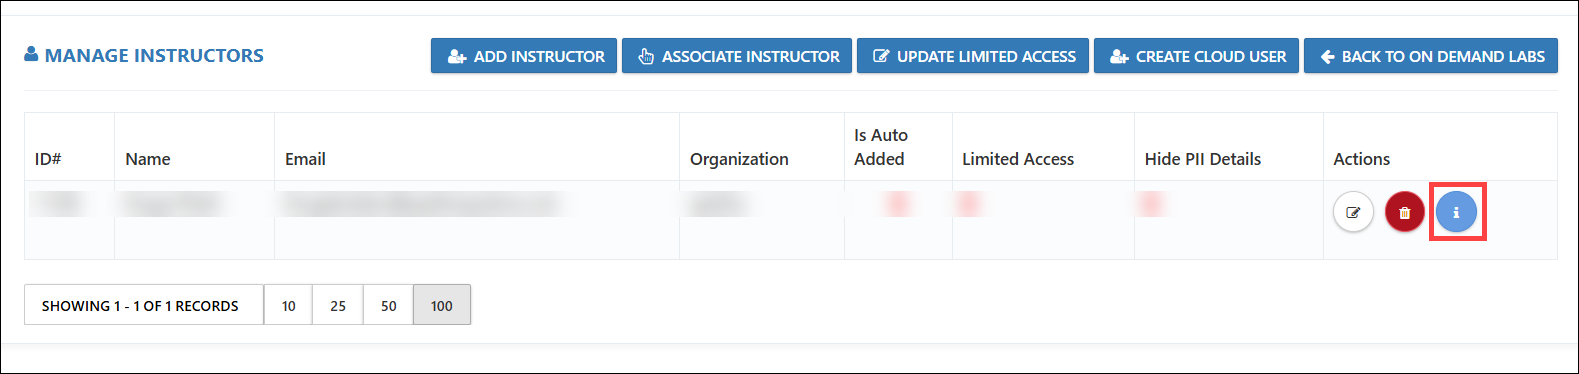
Log into the WIZ Portal using the cloud user credentials for that Instructor.
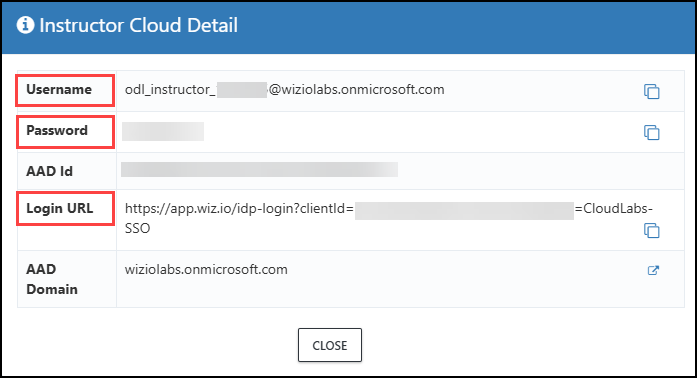
In the WIZ Portal, verify that the Instructor has been assigned the Global Contributor Role.
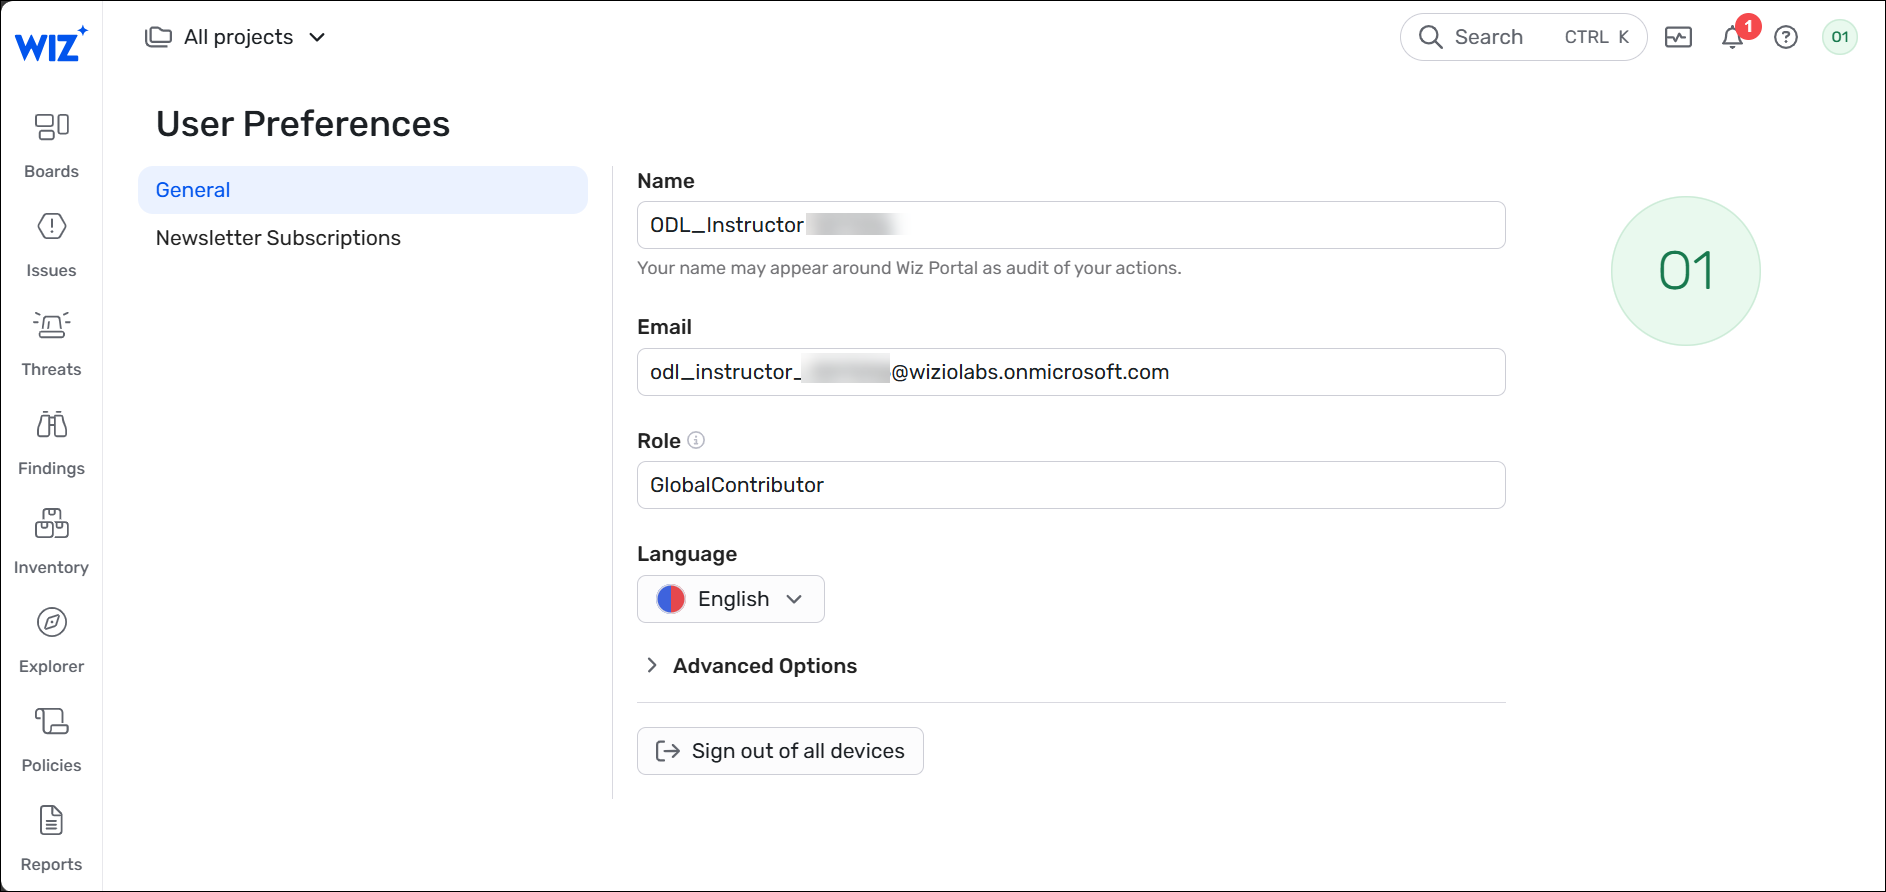
43. Optimize Alert Notification System to Prevent Redundant Emails
Feature Requirement
Optimize the alert notification system to prevent redundant emails.
Implementation
Whenever a threshold is met for the credit set in ODL, alerts will be sent based on the cost email alert frequency and the configured email alert frequency interval.
Steps to Test the Optimized Alert Notification System to Prevent Redundant Emails
First, set the cost email alert frequency and the email alert frequency interval in the super admin portal.
Note: The settings will be configured from the admin portal based on the requirements.
Cost email alert frequency: This feature can be set to daily, monthly, or yearly.
Email alert frequency interval: This feature allows setting any number, specifying how many alert emails CloudLabs will send per threshold. The number of alerts also depends on the preconfigured cost email alert frequency setting.
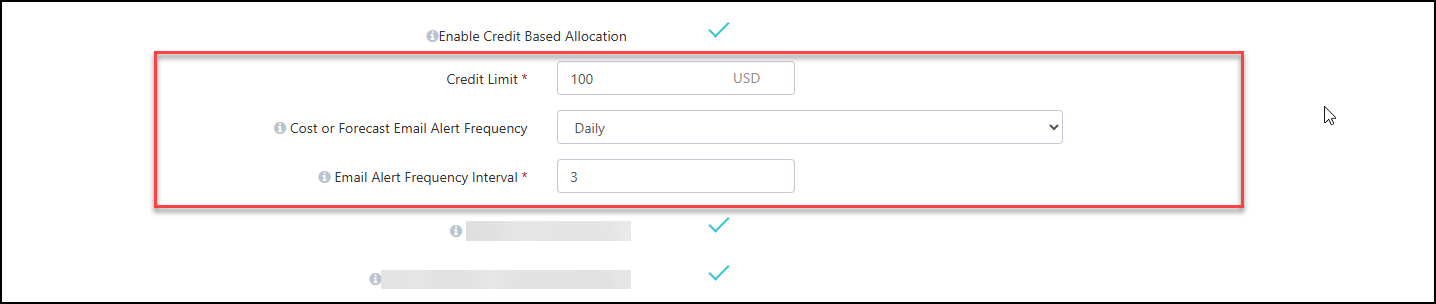
Set up the credit-based allocation and thresholds in the ODL based on the requirements.

Deploy the ODL user and verify the actual cost alerts.
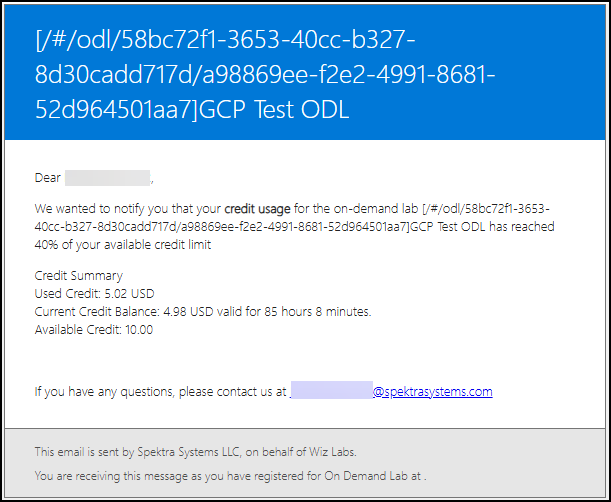
Cost Alert Frequency and Threshold Trigger Process:
Cost Email Alert Frequency:
If the cost email alert frequency is set to daily and the email alert frequency interval is set to two, then only two alerts will be sent per day for each threshold.
CloudLabs Job and Actual Cost Fetching:
CloudLabs runs a web job every 4 hours, starting from 12:00 AM UTC.
When CloudLabs runs, if GCP has the actual cost data ready, CloudLabs will fetch it and check if any threshold is met.
If a threshold is not met, no alert will be sent.
Alerts are only sent when thresholds are met. Since the interval is set to two, a maximum of two alerts will be sent per day for each threshold.
The interval between two alerts can vary, depending on when CloudLabs fetches the actual cost data from GCP.
Note: GCP Console can take around 18 to 20 hours to produce the initial actual cost data. After that, the actual cost will be updated more frequently.
Note: AWS Console can take around 12 to 24 hours to produce the initial actual cost data. After that, the actual cost will be updated more frequently.
Note: Azure Console can take around 24 to 72 hours hours to produce the initial actual cost data. After that, the actual cost will be updated more frequently.
Alerting Logic:
Each new day starts at 12:00 AM UTC. From this point onward, the system will start checking for the next threshold to trigger alerts.
If GCP provides cost data and CloudLabs fetches it, up to a maximum of two alerts can be sent in one day per threshold met (as per the defined interval).
If only two alerts are received in a day, it means GCP provided the actual cost data only twice, and CloudLabs fetched it twice. The next alert for that threshold will be sent tomorrow since it will be a new day (starting at 12:00 AM UTC).