DP-203: Learner Guide (August 2021)
This document is designed to help you get access to DP-203: Data Engineering on Microsoft Azure lab environment and navigate through the course labs.
Get Access to Lab environments
Your instructor should have provided you a unique link to sign up for the DP-203 Lab. If you do not have the sign up information, contact your instructor or another contact as applicable.
Please follow the below instructions to register for the lab environment. You can use Microsoft Edge Chromium, Google Chrome, or Firefox browsers.
Open the provided registration URL https://bit.ly/XXXXXX in a supported browser, provide the required information in the fields.
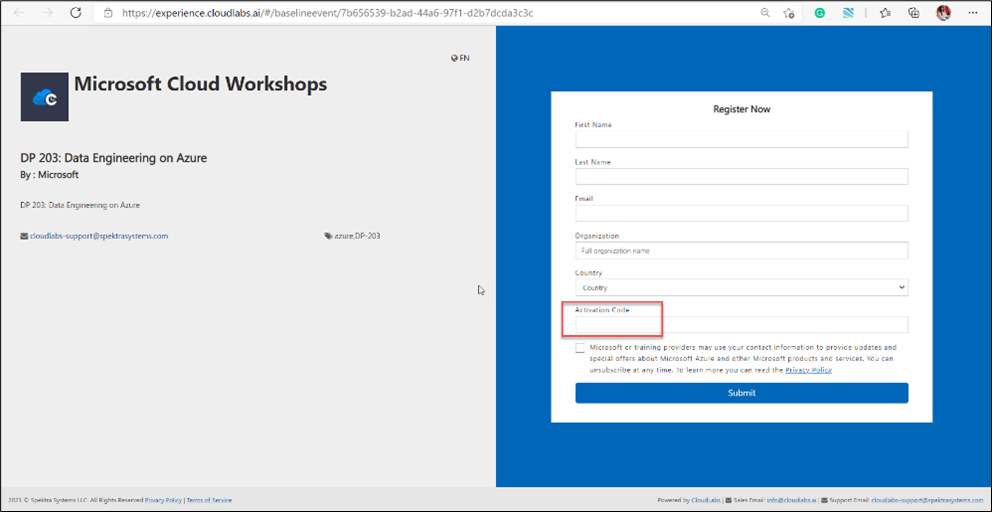
Enter the provided Activation code such as ACTIVATEXXXX and click on Submit.
As soon as you signup and you will get access to lab launch page. Please save this unique URL, you will need this throughout the course. You will also get this link in your registered email address from noreply@cloudlabsai.net (Be sure to check junk email)
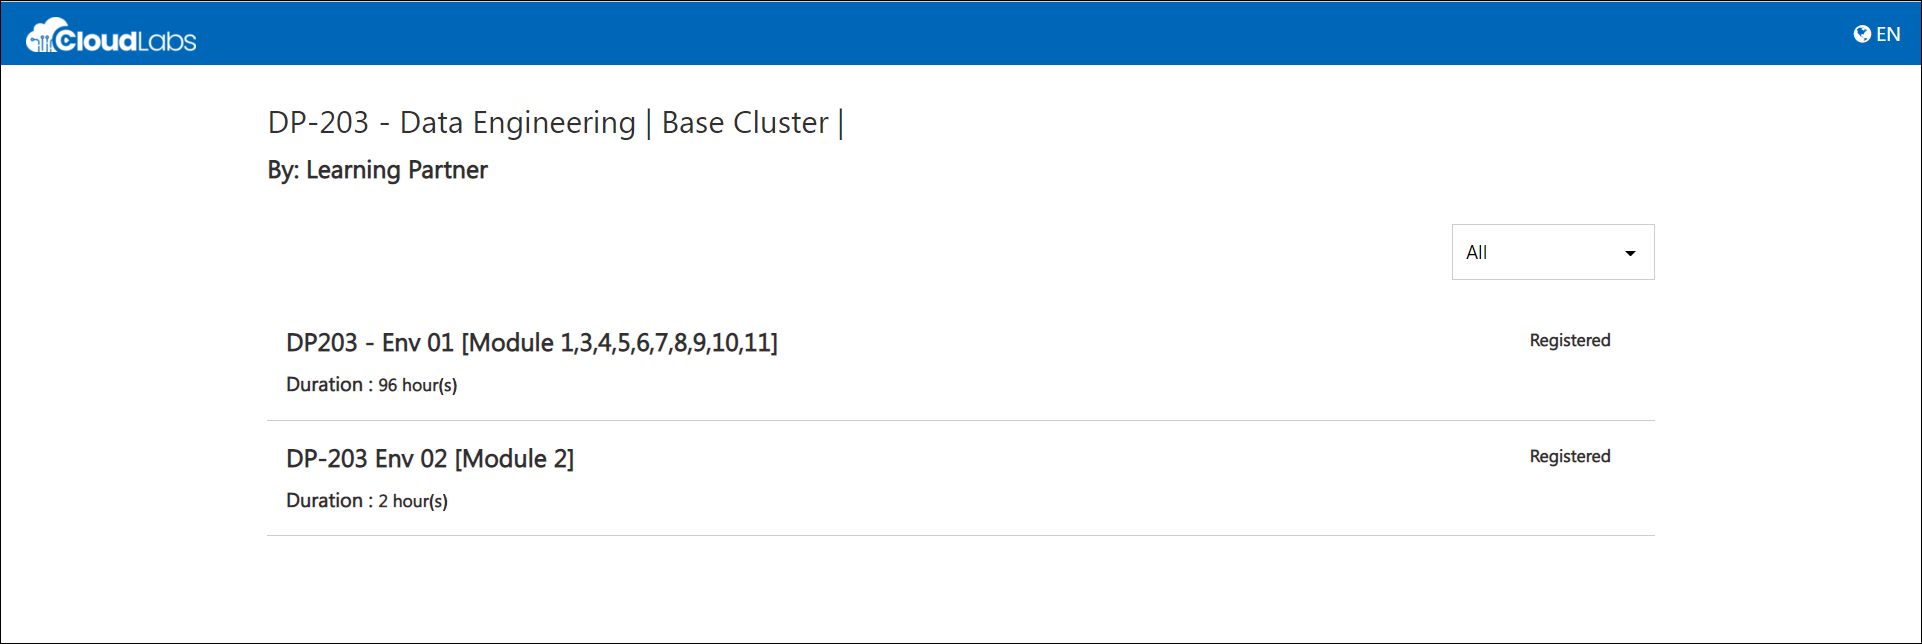
Understand the Lab Environment: DP-203 includes 11 modules, in which all the modules includes labs. There are 2 lab environments used in the entire course, as you can see in the above screenshot. Each lab environment can be used to perform one or more lab module exercises as described below.
Lab Environment and respective lab module mapping:
    Lab Environment 1: Includes Module 1,3,4,5,6,7,8,9,10 and 11
    Lab Environment 2: Includes Module 2
Each environment can be activated independently, and you may be running multiple environments at a time. For example, you can complete Module 1 using Lab environment 1 and activate Lab environment 2 to complete module 2 while lab environment 1 continues to stay active in parallel.
Please click on the respective environment to launch the instance. This will take you to a Lab launch page. Click on Launch Lab to get the environment.
The timer starts once you activate a lab environment. If you want to view the lab guides and content without starting your timer, please take a look at the lab guide preview section.

The environment will loaded up on a browser with lab guide on the right and VM on the left.
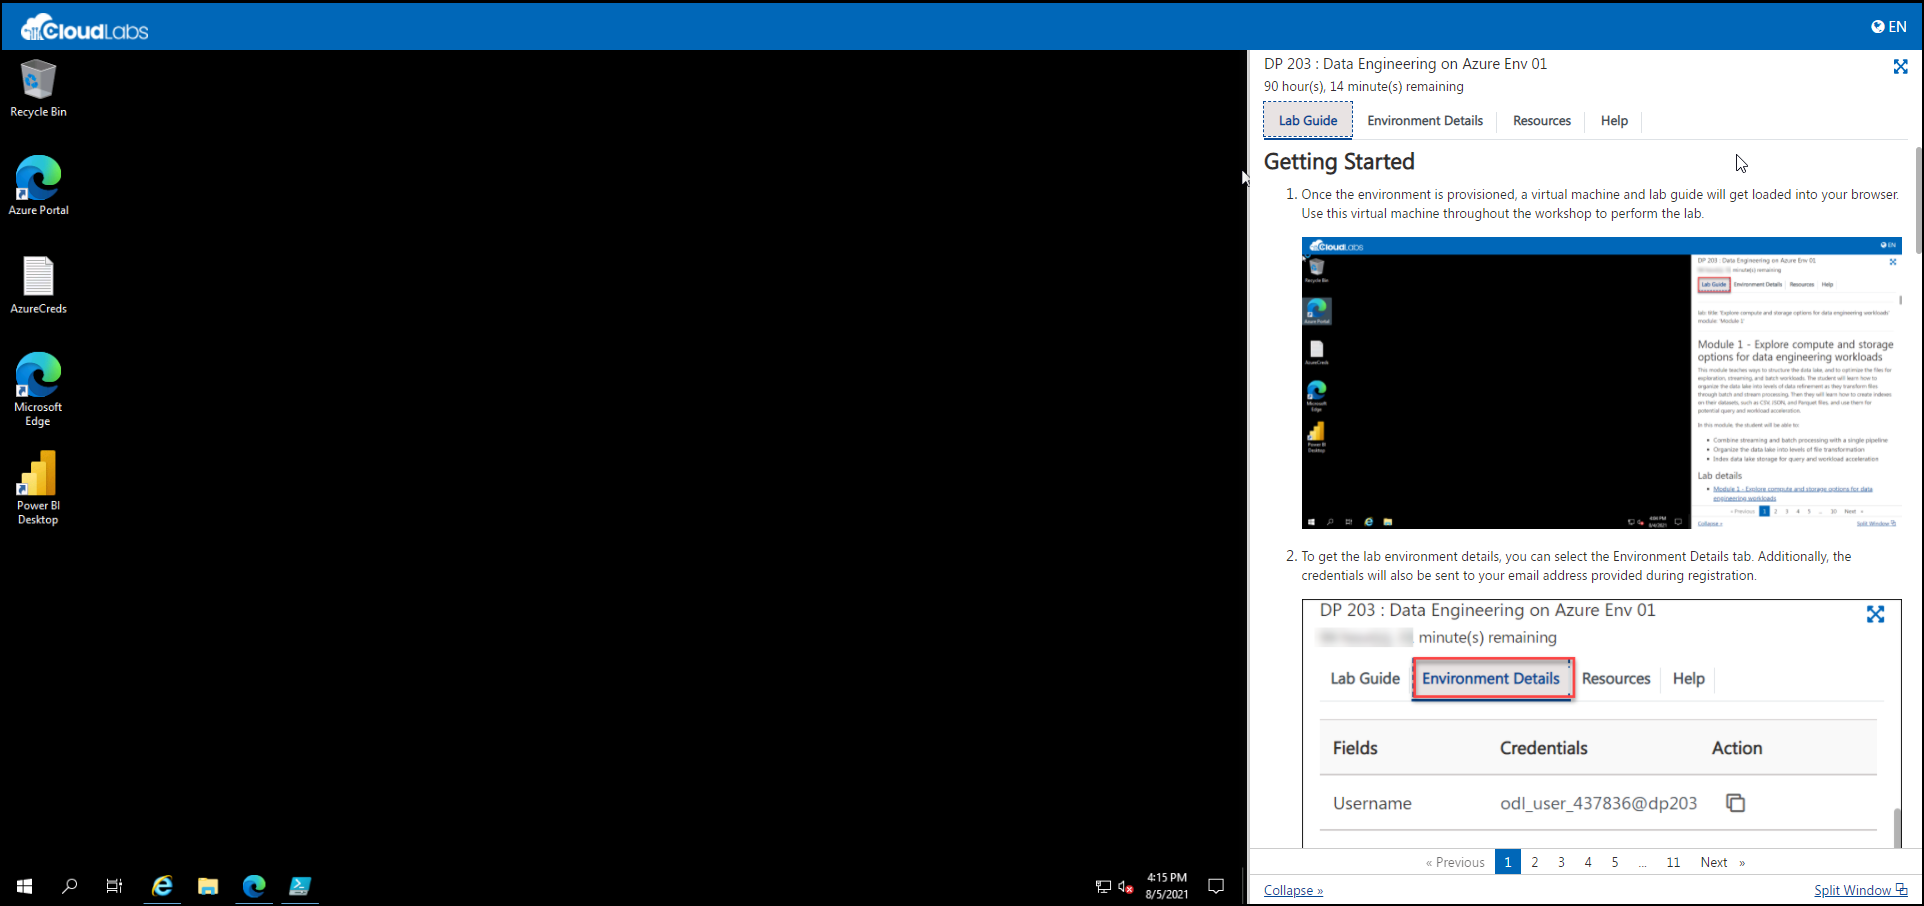
You are now ready to start running through the lab. Please be sure to go through this document till the end before starting the lab exercises.
Environment Duration and Uptime Limits
Each Lab environment has two characteristics. Let us take a moment to understand them.
Environment Duration : Environment will get deleted after a specified number of hours. e.g, Lab environment 1 duration is 96 Hours since it may be used for all 4 days to complete various lab modules.
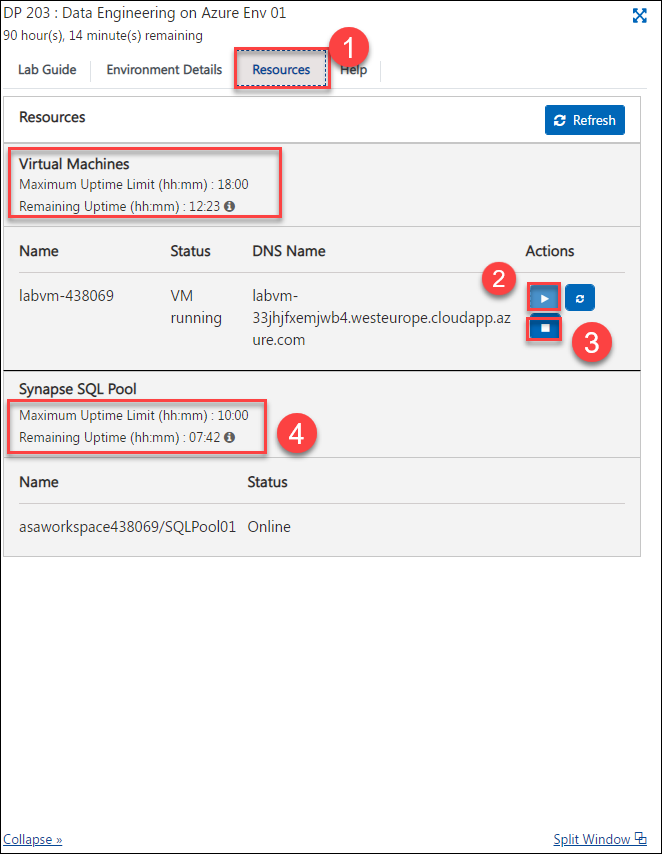
Environment Uptime : Lab environments typically include Virtual Machines (1) and SQL Pool (4). VMs and SQL Pool have uptime limits to keep the cloud costs under control. E.g, Lab environment 01 includes 10 Hours of SQL Pool and 18 hours of VM uptime limit. You will find the resource in stopped/paused stopped at the time of activation. Please start (2) them when you are ready to start the lab. Lab guides include the required instructions. Once the uptime limit is reached, all resources will remain in stopped/pause (3) resource.
Please be informed about the duration and uptime limits configured for DP- 203 Lab environment below:
| Environment # | Modules Covered # | Duration | VM Uptime Limit | SQLPool uptime limit |
|---|---|---|---|---|
| Env 1 | 1, 3,4,5,6,7,8,9,10 and 11 | 96 HRS | 18 HRS | 10 HRS |
| Env 2 | 2 | 02 HRS | 02 HRS | NA |
Lab Duration and uptime limits are defined based on the average required time to complete the labs along with some buffer. If you run out of uptime, please contact your instructor. Environments will get deleted once the timer runs out and can not be recovered.
Using the DP-203 Lab environments
Learners can activate the lab environments as per their course structure. Please see a typical course structure below.
You must perform the recommended action in the below table after each module, It will help in ensuring that you will have enough duration and uptime limits available to complete the entire course.
| Environment Mapping # | Module # | Course Day | Duration | SQL DWU | Learner Action After completing this module |
|---|---|---|---|---|---|
| Env 1 | 01 | 1 | 02 HRS | NA | Stop the Virtual Machine and databricks cluster. |
| Env 2 | 02 | 1 | 02 HRS | NA | Environment gets deleted after this module. |
| Env 1 | 03 | 1 | 02 HRS | NA | Ensure to stop the Virtual Machine and databricks cluster at the day end. |
| Env 1 | 04 | 2 | 02 HRS | 200 | Stop the Virtual Machine & Pause SQL Pool. |
| Env 1 | 05 | 2 | 02 HRS | 200 | Stop the Virtual Machine & Pause SQL Pool. |
| Env 1 | 06 | 2 | 02 HRS | 200 | Ensure to stop the Virtual Machine & Pause SQL Pool at the day end |
| Env 1 | 07 | 3 | 02 HRS | 200 | Stop the Virtual Machine & Pause SQL Pool |
| Env 1 | 08 | 3 | 01 HRS | 200 | Stop the Virtual Machine & Pause SQL Pool |
| Env 1 | 09 | 3 | 02 HRS | Not used | Ensure to stop the Virtual Machine & Pause SQL Pool at the day end |
| Env 1 | 10 | 4 | 01 HRS | 200 | Stop the Virtual Machine & Pause SQL Pool. |
| Env 1 | 11 | 4 | 02 HRS | Not used | Overall course gets deleted. |
Note: All lab environments will be auto-deleted at the end of your course.
How to Stop VMs and Pause SQL Pool
Please see the following instructions to stop the VMs and pause SQL Pool during the workshops to stay under the uptime limits.
Stopping/Starting the VMs
Please start the Virtual machine before you begin the lab steps. To do this, navigate to the Resources tab on the lab environment page. Click on Start (2) Icon.
Please stop (3) the VMs once you are done using a particular lab environment. You can stop the VM using the lab environment page. Please navigate to the Virtual Machines page and click the Stop icon.
Pausing/Resuming the SQL Pool
Similarly, SQL Pool also needs to resume/paused throughout the workshop. You will use Azure Portal to complete these steps.
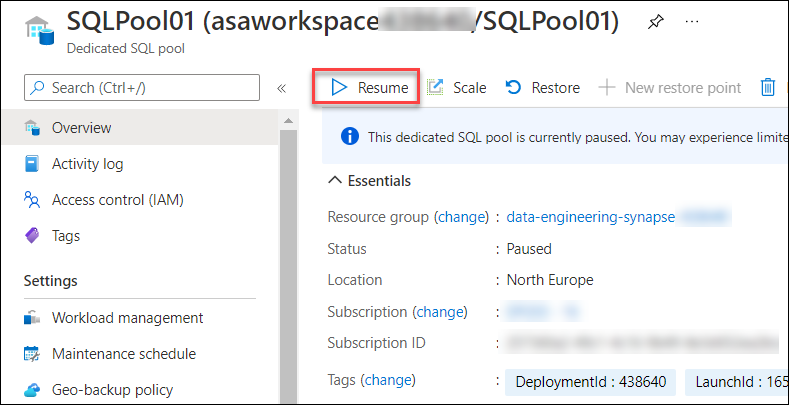
Please resume the SQL Pool before you start the lab. SQL pool can be resumed from the azure portal under the resource group named data-engineering-synapse.
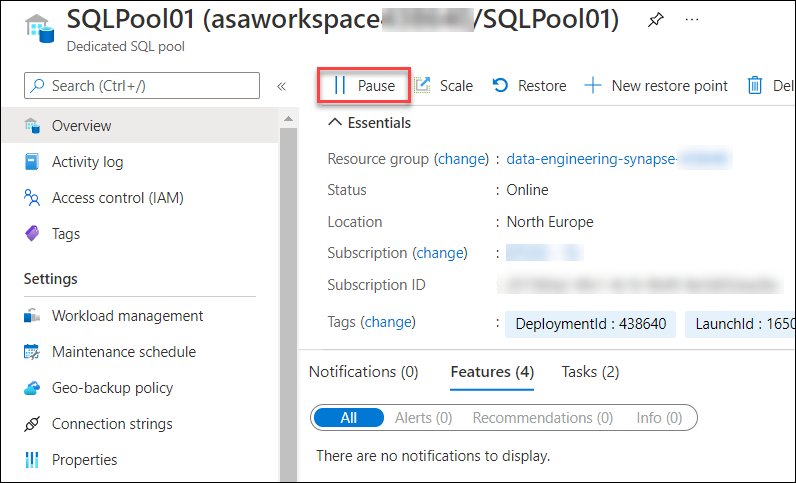
Please pause the SQL Pool once you are done using a particular lab environment. SQL pool can be paused from the Azure portal under the resource group named data-engineering-synapse.
Preview Lab Guides
If you want to experience the module guides without launching the lab environment as instructed above, you can use below preview links. Following preview links are designed to get you access to module guides without starting the lab environments and timer.
| Environment # | Modules Covered # | Preview Lab Guides |
|---|---|---|
| Env 1 | 1,3,4,5,6,7,8,9,10 and 11 | Click Here |
| Env 2 | 2 | Click Here |
Best Practices & Common Troubleshooting:
Stop the VM when not in use. Similarly, Pause the SQL pool whenever it is not in use to optimize the azure cost.
Bookmark your personalized lab URL to use throughout the workshop.
If you face an issue loading VM, please do the following:
- Verify if VM is in running state from the Virtual Machines tab.
- Try to open the environment URL in an incognito/ private window.
- Accept the cookies to the site (cloudlabs.ai)
If you are unable to copy-paste from your device to inside the VM, it is probably due to clipboard access being disabled. Please click on the SSL certificate symbol at the top left corner in your browser and set the clipboard to Allow. Once clipboard access is enabled, you can use CTRL+C to copy and CTRL+V to paste inside the VM. You can also try copying by right click > Copy on the selected content.
Please contact your instructor for any questions or problems during the workshop. Your instructor will have CloudLabs support contact if the issue is related to lab environments.